Subscriber - Tickets
Tickets are used to record ALL interactions and activities on a Subscriber's account. There are an endless number of uses for Tickets. Templates can be created for recurring tickets for efficient and consistent tracking.
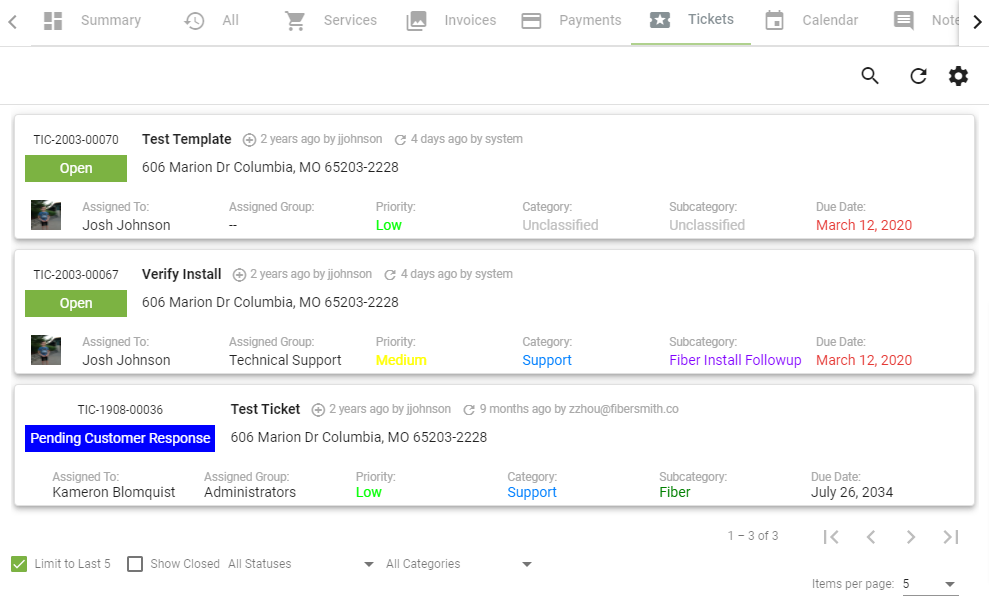
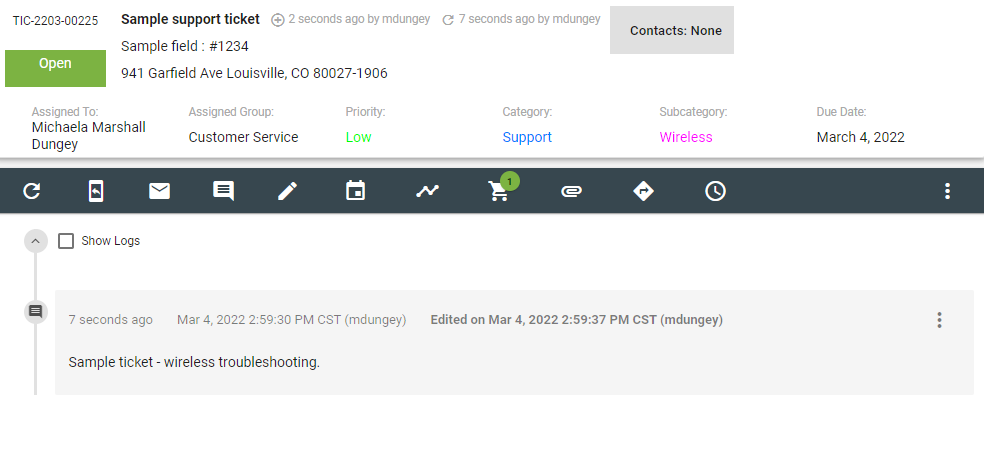
The Tickets tab will show all Tickets for a Subscriber. Tickets in Vision have a status, description, assignment, assigned group, priority, category, subcategory and due date.
Examples of Tickets - A Ticket is created when a Subscriber calls in to report a connection problem to record troubleshooting activity; a Ticket is created when a lead needs follow up on a sales call; a Ticket is created when a Subscriber is affected by a network outage; a Ticket is created when a Subscriber calls in with a question about a change or charge on last month's bill.
Tickets are a powerful tool for looking back at trends for common service questions or technical troubles with specific equipment. Tickets can be used to predict call volume, to track quality of service levels, to record Subscriber churn and more when applied consistently. Tickets allow a provider to be proactive with communication with the goal of alleviating unneccesary calls and increasing satisfaction.
Create a New Ticket
There are two ways to create a new ticket. Either click ![]() on the Vision Dashboard, or click the
on the Vision Dashboard, or click the
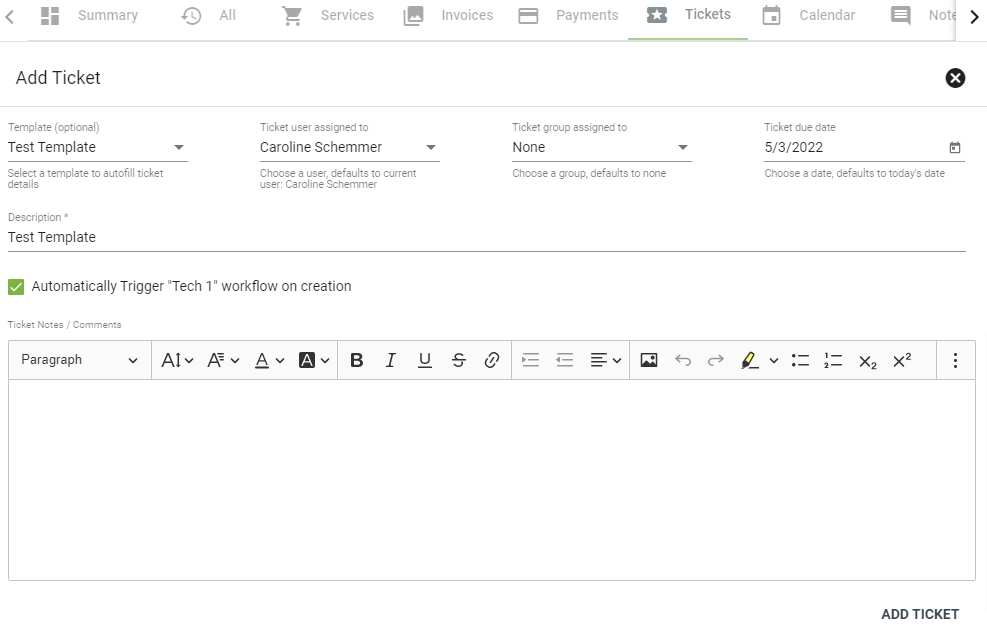
You have the option of choosing from previously created templates when creating a new Ticket. Templates may have Workflows already associated and may be triggered upon Ticket creation. Templates help to quickly solve issues by recreating solutions already previously used.
Otherwise, enter a description of the Ticket as well as any notes or comments below, which may be formatted. Then click ADD TICKET.
View a Ticket
The Tickets tab displays the five latest Tickets associated with a Subscriber's account.
You can quickly make changes to a ticket by clicking on any of the fields displayed.
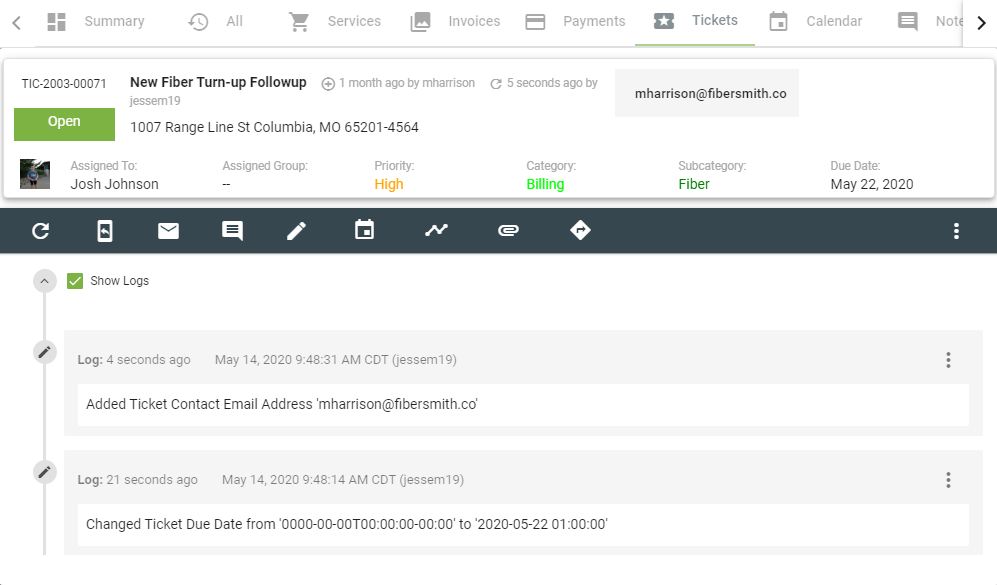
Below the Ticket you'll find a toolbar that allows you to:
This toolbar can be found directly under the ticket details.
Viewing a Ticket will first show you a log of all changes made to a Ticket
Click on the overflow menu icon
Changing a note status to make it public will allow the subscriber to view the note in their portal. Pinning a note to the top of a ticket is a useful tool to ensure that important information on a subscriber's account is displayed at first glance.
Click on the
This overflow menu allows you to take action on an entire ticket instead of a specific note.
Display Settings
Click on the ticket title to expand the ticket and make additional changes.
The
Toggle between tickets being displayed as cards or in a table under the Layout drop-down menu.
Choose the default number of tickets to display under the Tickets per page drop-down menu.
Select or de-select the check boxes to display closed tickets, show the latest 5 tickets, show attachment previews in tickets or to hide logs by default.
Click SAVE CHANGES to save.
Ticket cards display basic details about a ticket, like the title, priority, category, subcategory and due date.
Click on the ticket title to view more information, or click on a category to make changes.
The ticket table displays tickets as line items. Click on a line item to view more details about the ticket.
Send SMS
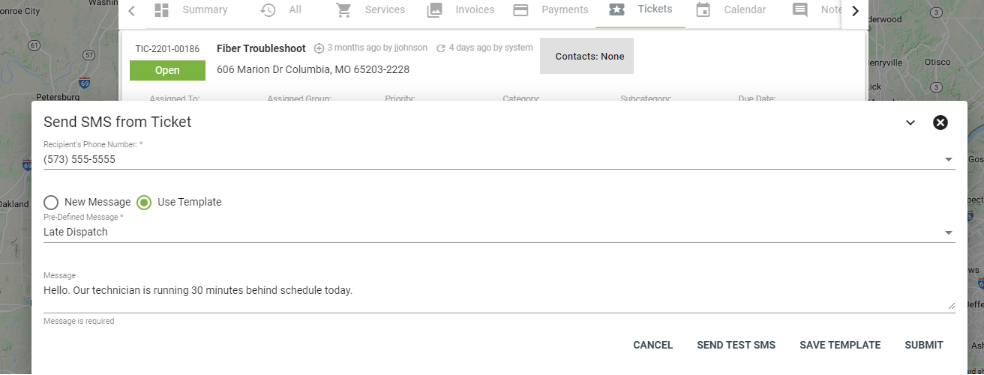
First choose the recipient's phone number from the drop-down menu, then select whether to send a new message or use a template.
Using a template will allow you to select from pre-saved messages in the drop-down menu.
Selecting SAVE TEMPLATE allows you to create a new template based on the new SMS message body.
Click SEND TEST SMS to send a test text message (hover over the button to view the user number on file) or SUBMIT to send the message to the subscriber.
Send Email
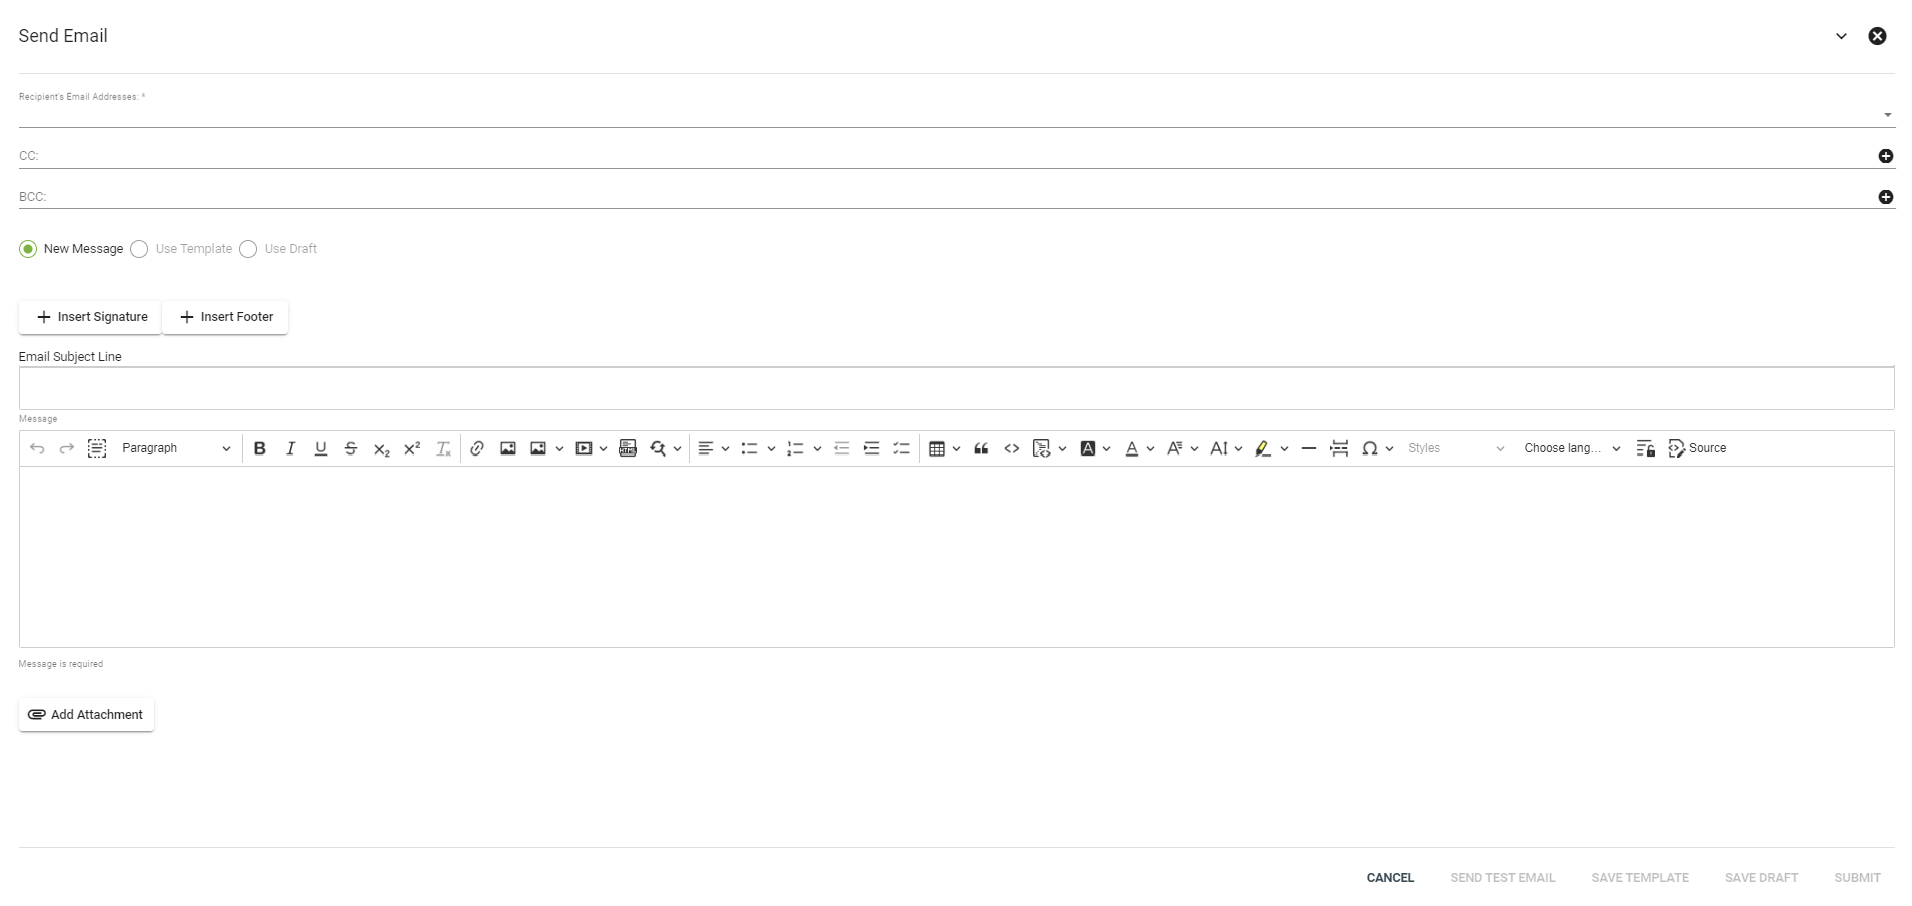
Choose the recipient's email address from the drop-down menu, and add the optional CC, BCC email addresses then select whether to send a new email message or use a template.
To send a message from a template, choose a message from the drop-down menu. Insert a signature or footer to the email by clicking ![]() Insert Signature
Insert Signature ![]() Insert Footer.
Insert Footer.
Click the Add Attachment button to add an attachment to the email.
Select SEND TEST EMAIL to send a test message to the user's email, or select SAVE TEMPLATE to save the new message as a template. Another option is to save the email as a draft to make changes at a later time by clicking SAVE DRAFT to be able to make changes to the email before sending the message.
Click SUBMIT to send the email to the subscriber.
Add a Note
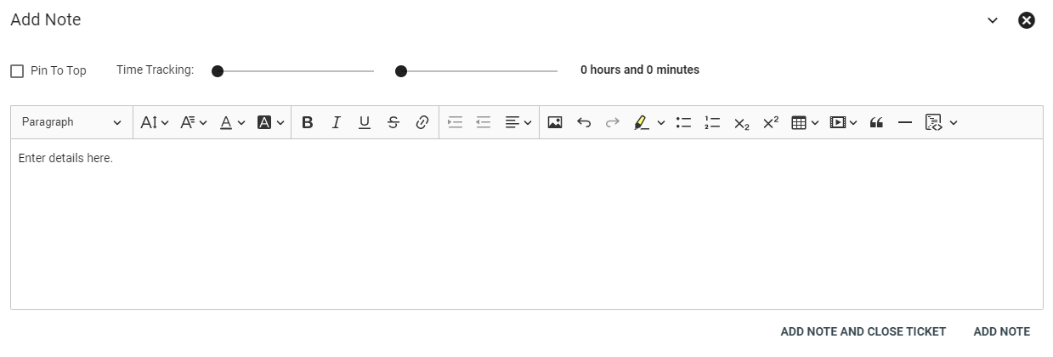
Add a note to the ticket log using the text editor.
When finished, click ADD NOTE. To add the note and close the ticket, select the ADD NOTE AND CLOSE TICKET button.
Toggle the sliders at the top of a ticket note to track the time associated with a ticket. Only tickets with a category that have enabled time tracking will display the time toggle.
Edit Ticket Details
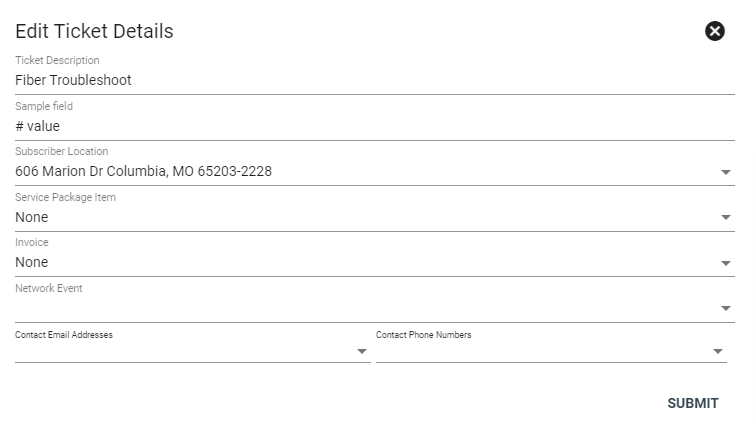
Editing ticket details allows you to associate Service Package Items, an Invoice or a Network Event.
Make changes to the ticket name under the Ticket Description line. Toggle between subscriber accounts (if applicable) or select an alternate subscriber location under the Subscriber Location drop-down menu. This ensures that tickets can be specific to each pertinent subscriber location on an account.
Choose to associate a service package with the ticket by selecting from an option under the Service Package Item drop-down menu.
Select an invoice to associate with the ticket from the Invoice drop-down menu, or add a network event from the Network Event drop-down menu.
Select an email address to contact from the Contact Email Addresses drop-down menu, or add a new email address.
Choose a phone number to contact under the Contact Phone Numbers menu, or add a new phone number to contact.
Click SUBMIT to save your changes.
Editing ticket details will also display the ticket's custom field (if applicable). In this instance, the custom field is "Sample field" and is only viewable on tickets categorized as support.
The custom field will display directly below the ticket name.
Changing the ticket category will eliminate the ability to access the custom field.
Dynamic Workflows
View active workflows associated with a ticket or add a new workflow.
Click on the
Click on the drop-down menu next to a workflow task to view more details or add notes.
Select UPDATE to save the notes and update the task, or COMPLETE TASK to complete the specific task.
The green circles next to a task denote whether the task has been completed — open circles represent open tasks while closed circles indicate completed tasks.
Adding Workflows will ensure that tasks associated with this Ticket are completed in the appropriate order. Search for a previous workflow or select the
Review the saved or new workflow, then click START WORKFLOW to initiate action.
Network Events
The network events tab displays any network events associated with a specific ticket.
View a description, category of event, status, start and end time and assignment.
Click on the event ID to view more details about the network event.
View Directions/Drive Time
The Directions/Drive Time tool allows you to map out a route within a ticket.
Type in the origin address (must be in the system) and choose from one of the displayed options.
The search types dictate where the system searches for the address results.
Click GET DIRECTIONS to get driving directions.
View the route on a map under the map dropdown.
View the route mileage and an estimated time of completion under the route dropdown.
Switch Subscribers
To switch a ticket from one subscriber to another, in the ticket click on the 3-dot![]() menu to show a drop down menu and select
menu to show a drop down menu and select ![]() switch subscriber.
switch subscriber.
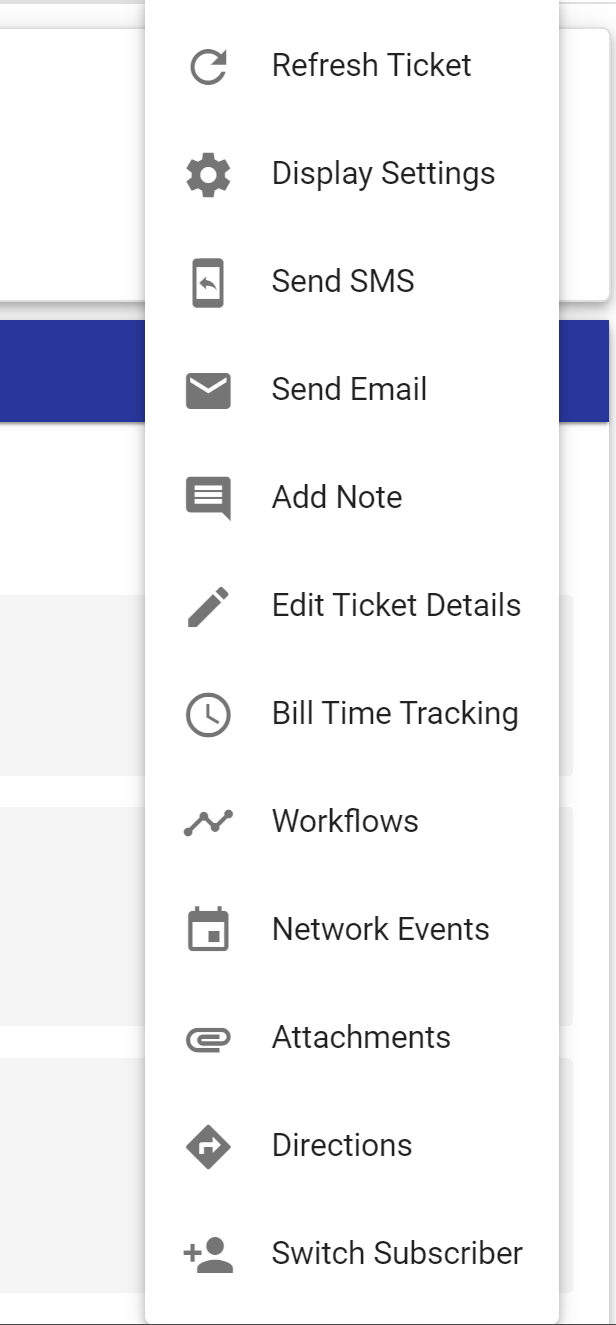
In the next screen this is where the new subscribers information can be filled out, location will autofill based on the subscriber number and account.

Bill Time Tracking
Click on the
Choose a package from the drop-down menu. In order to display in the drop-down menu, the package must be entered as a onetime charge.
Change the quantity associated with a package, or add additional packages from the drop-down menu.
Click Add Charges to add the charges to the account.
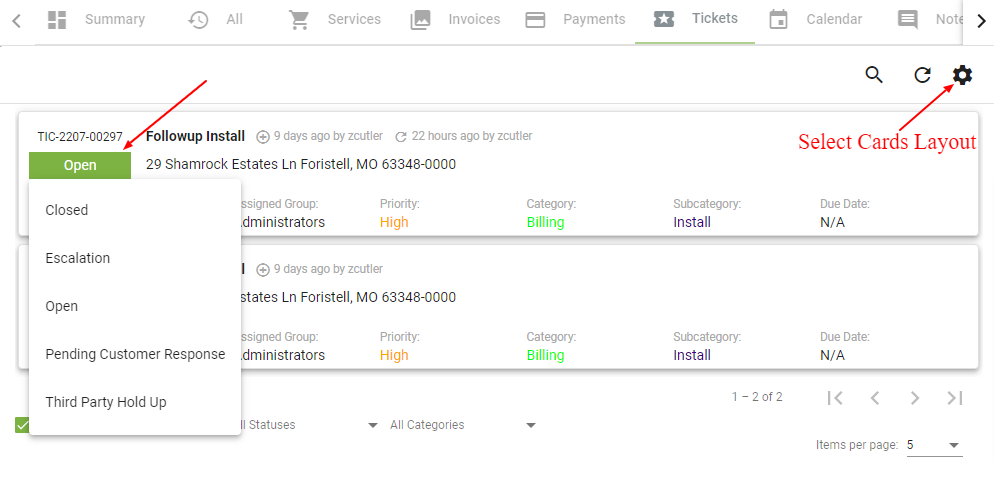
The status of the ticket at a glance reflects the current condition of the subscriber situation. The status options other than Open and Closed are specific to each company using Vision to manage their call center.
Tickets can easily be closed in the card display view without needing to open the tickets individually.
When you are on the ticket tab of the subscriber account, hit the gear icon in the upper right corner. Select cards under the layout drop down. Click SAVE CHANGES. That will change your default settings for tickets going forward.
Then you can click the open box to flip it to closed or another status listed.
