Portal
The Subscriber Portal is a secure online site where a subscriber can log in to manage parts of their account including payments, services, contact information, tickets, etc.
- Add a New Portal User
- Reset or Change Password
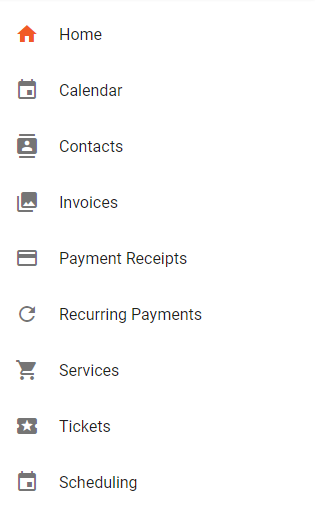
- Portal Home
- Make a Payment
- Calendar
- Contacts
- Invoices and Receipts
- Recurring Payments/AutoPay
- Services
- Contracts
- Tickets
- Scheduling
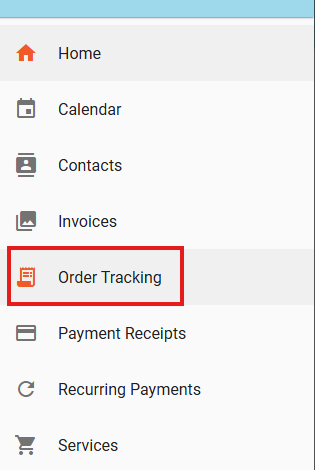
- Order Tracking
- Troubleshooting
The Portal is built to be a slimmed-down version of Vision's internal system to speed up the ease of navigation and to avoid the need for representatives to learn a new or different site.
The Portal utilizes commonly-used design elements and features to maximize predictability with navigation elements. It is designed to be mobile-first to ensure the subscriber's experience is seamless on any device. Subscribers do not need to download a separate app on their device.
The subscriber portal also allows for Quick Pay, a way for a quick and easy payment can be processed without having to log into the users account only giving information to link the payment back to the user.
Every portal site is set up to match the branding styles of each Vision client, including company logos and colors.
Any update made on the account by the subscriber in the Portal, such as payments, services changes, contact information, etc., is marked as a record on the subscriber's account history under the ALL tab for reference by customer service and tech support teams.
Learn where the Subscriber Portal is managed and how you can resend the verification email to a customer.
Add a New Portal User
An individual subscriber's access to their secure, online account is added either by a Vision User or by the Subscriber themself. During the account creation process, an email, username, and password must be provided. Need to change a password?
To ensure the subscribers identity, a verification link is sent to the email address set up on the account. This link expires after five days of being sent to the subscriber. If needed a Vision User can manually resend the verification email.
Verified subscribers will be able to access their account at any time by logging in through the user portal.
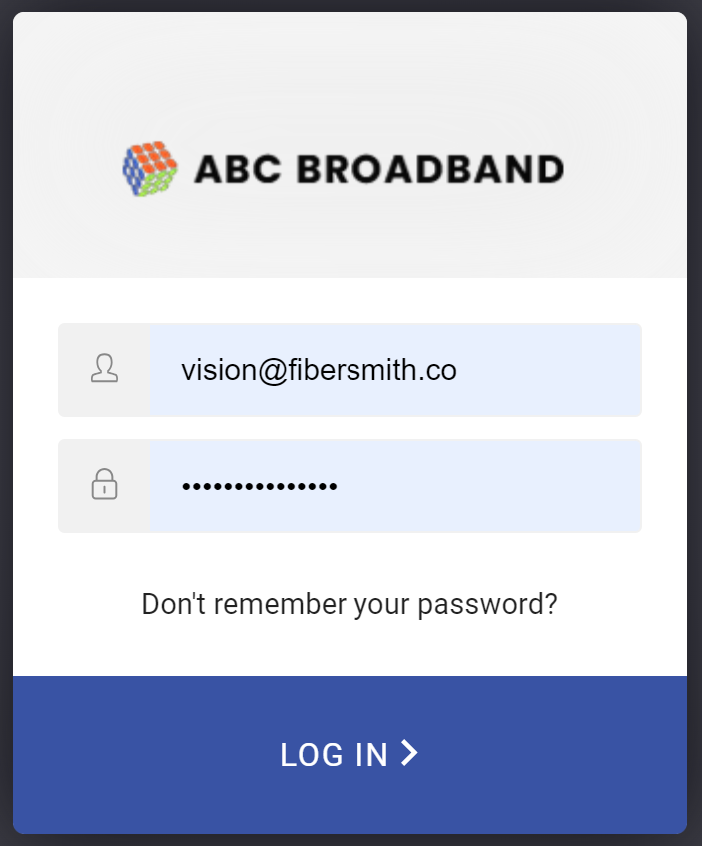
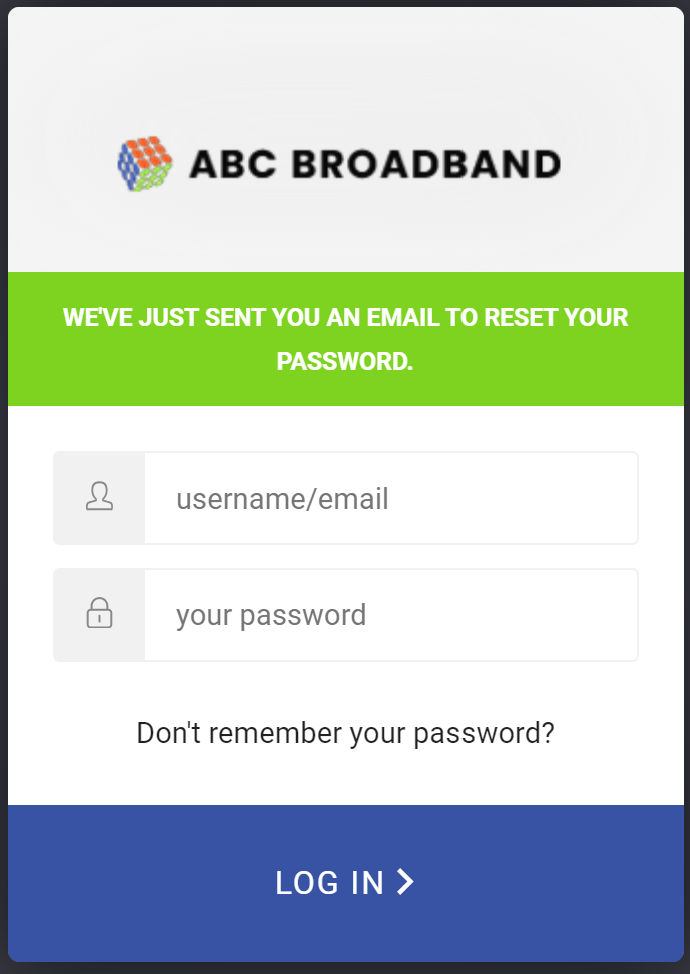
Example of a Portal Login page. Your Portal would include your company colors and logo.
Self Signup
Here's how a subscriber can sign-in and set up their customer portal online all by themself.
As its set up, this works well for the residential accounts with a matching last name is a required field.
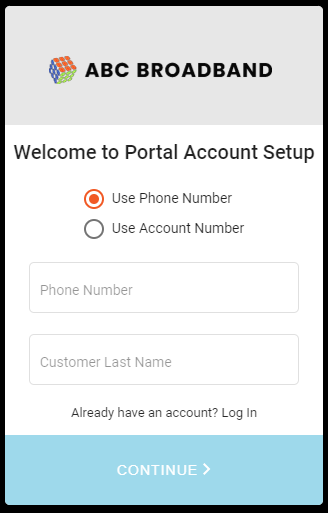
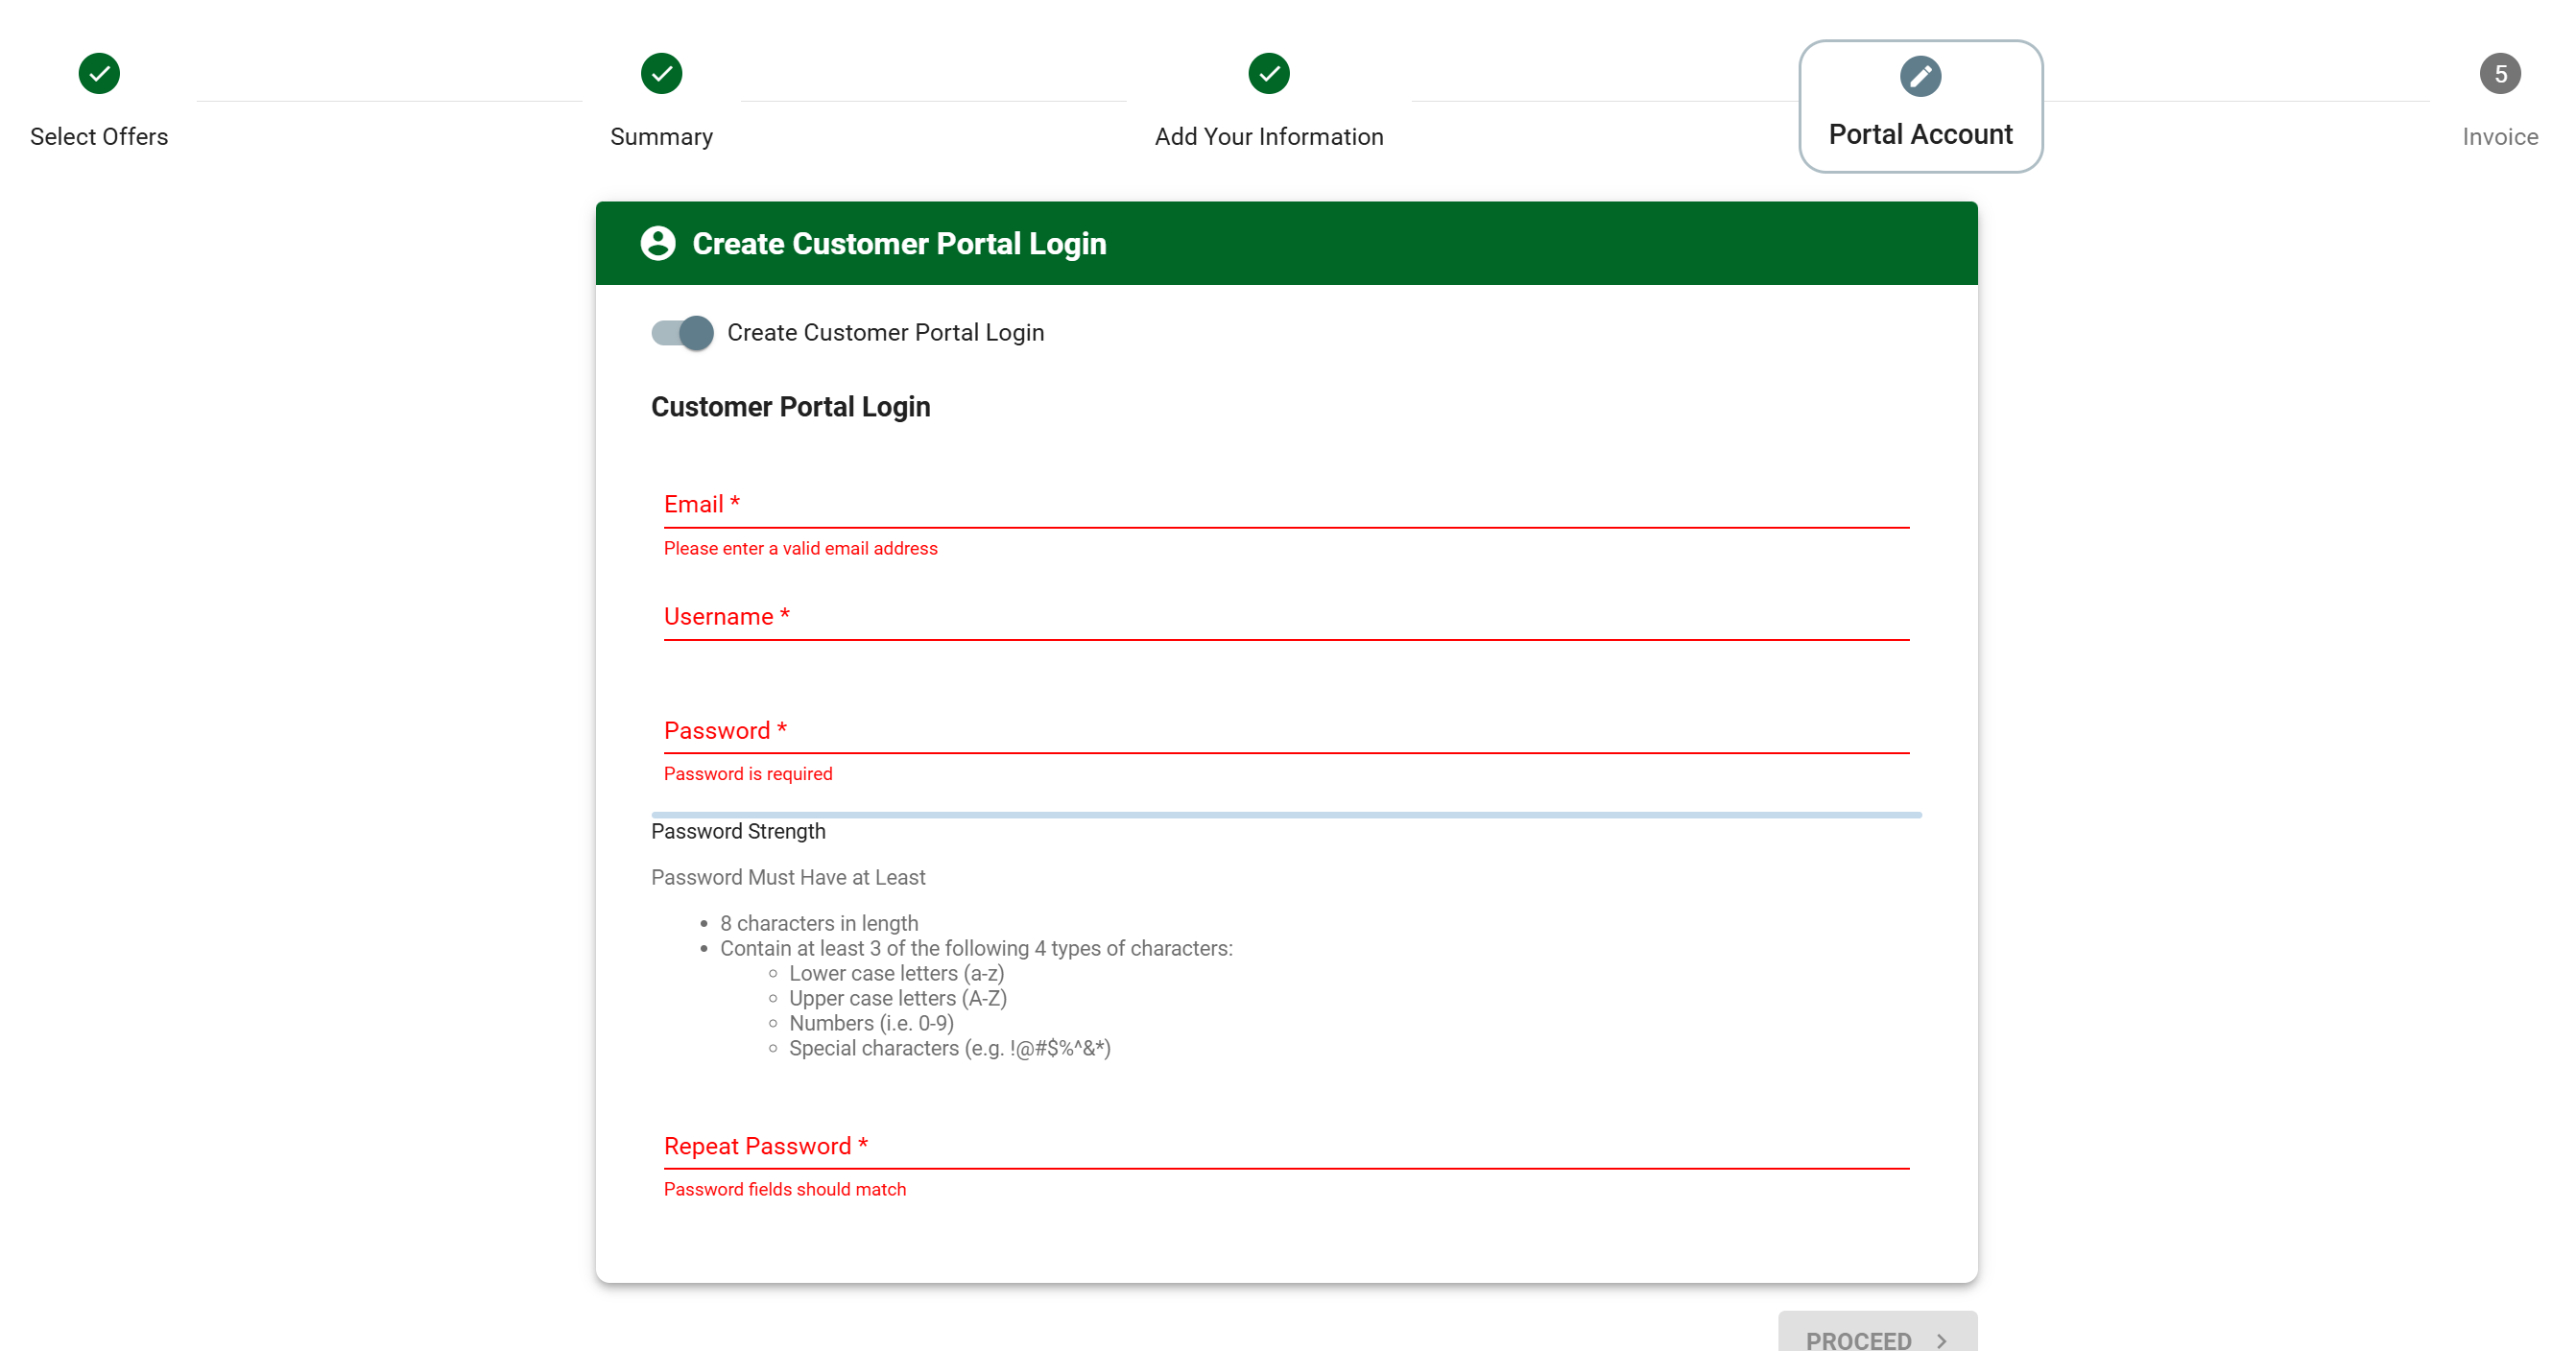
The subscriber will fill out their information to start the Online portal setup.

After filling out all the account and contact information, Press CREATE ACCOUNT
New portal users will be required to check their email as a secure verification step before their first login.
Subscribers will now have a Portal account and can access bills, services, and tickets to see what is happening in their account.
Signup During Checkout
Customers can also create a Portal User Account when using the Public Shopping Cart. Having them create a Portal User Account when they sign-up for a service is an additional feature available in the shopping cart. You can disable, make optional, or require this feature via Service Area Management.
Manually Add a User
To set up access: using the FAB on their Subscriber Account. Click on the Add Portal User icon and fill in the new user information. The Portal tab on the subscriber's account will display the portal users. Account access can happen at the time of sign up prior to service being activated or after the service install. A valid email and username is required at sign up.
Reset or Change Password
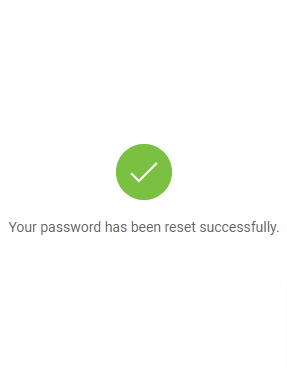
Reset Password
Subscribers click "Don't remember your password?" and then enter the email associated with the login.
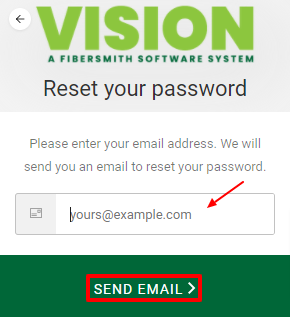
Example of an email to reset password.

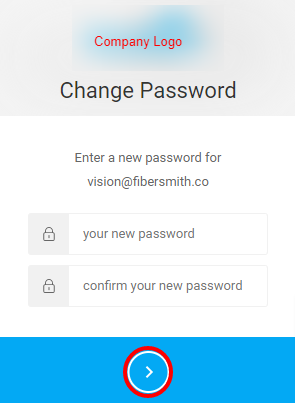
Change Password
Click on the 
Portal Home
The main home page of the Portal displays the subscriber's name, subscriber ID, along with the current balance, and due date.
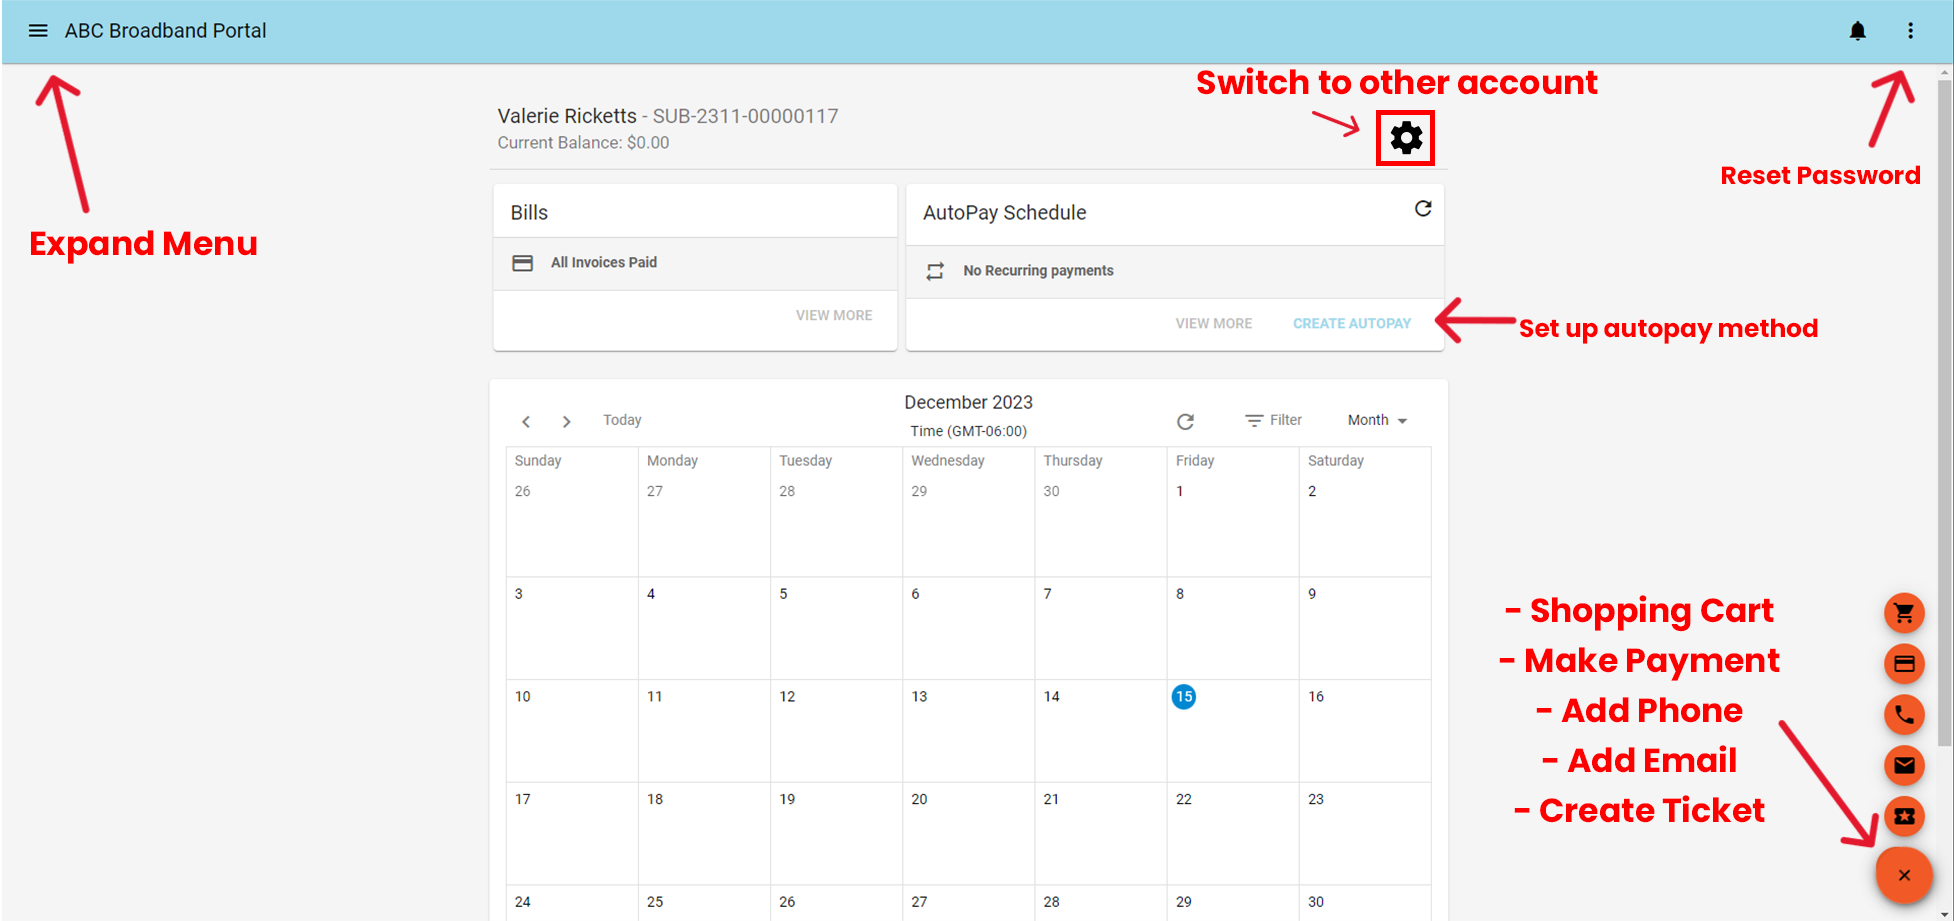
Click 
The PAY BILL prompt is displayed if a balance is due which directs the subscriber to make an online payment.
The VIEW MORE button directs the subscriber to the Invoice page of the Portal.
The 
The 
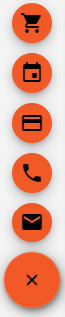
Click to expand: Add Email Address, Add Phone Number, Make Payment, Go to Scheduling, Go to Shopping Cart.
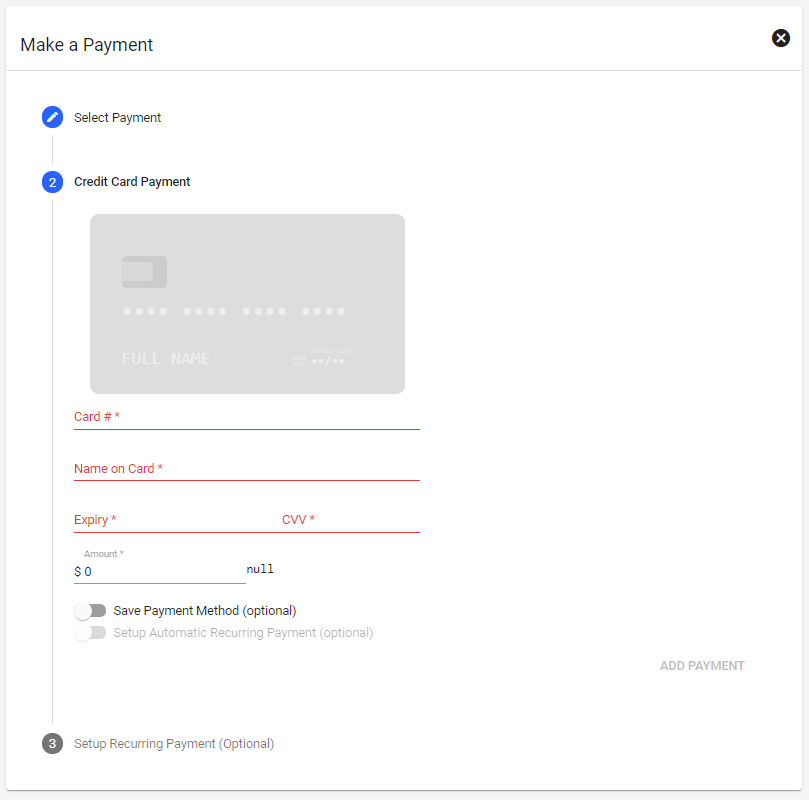
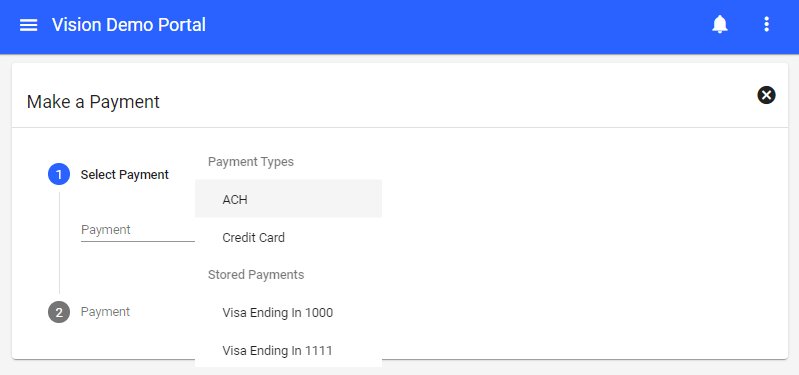
Make a Payment
Click on the CREDIT CARD icon to Make a Payment.
1 - A payment type is selected in the Payment dropdown ex: credit card, ACH, stored payment types.
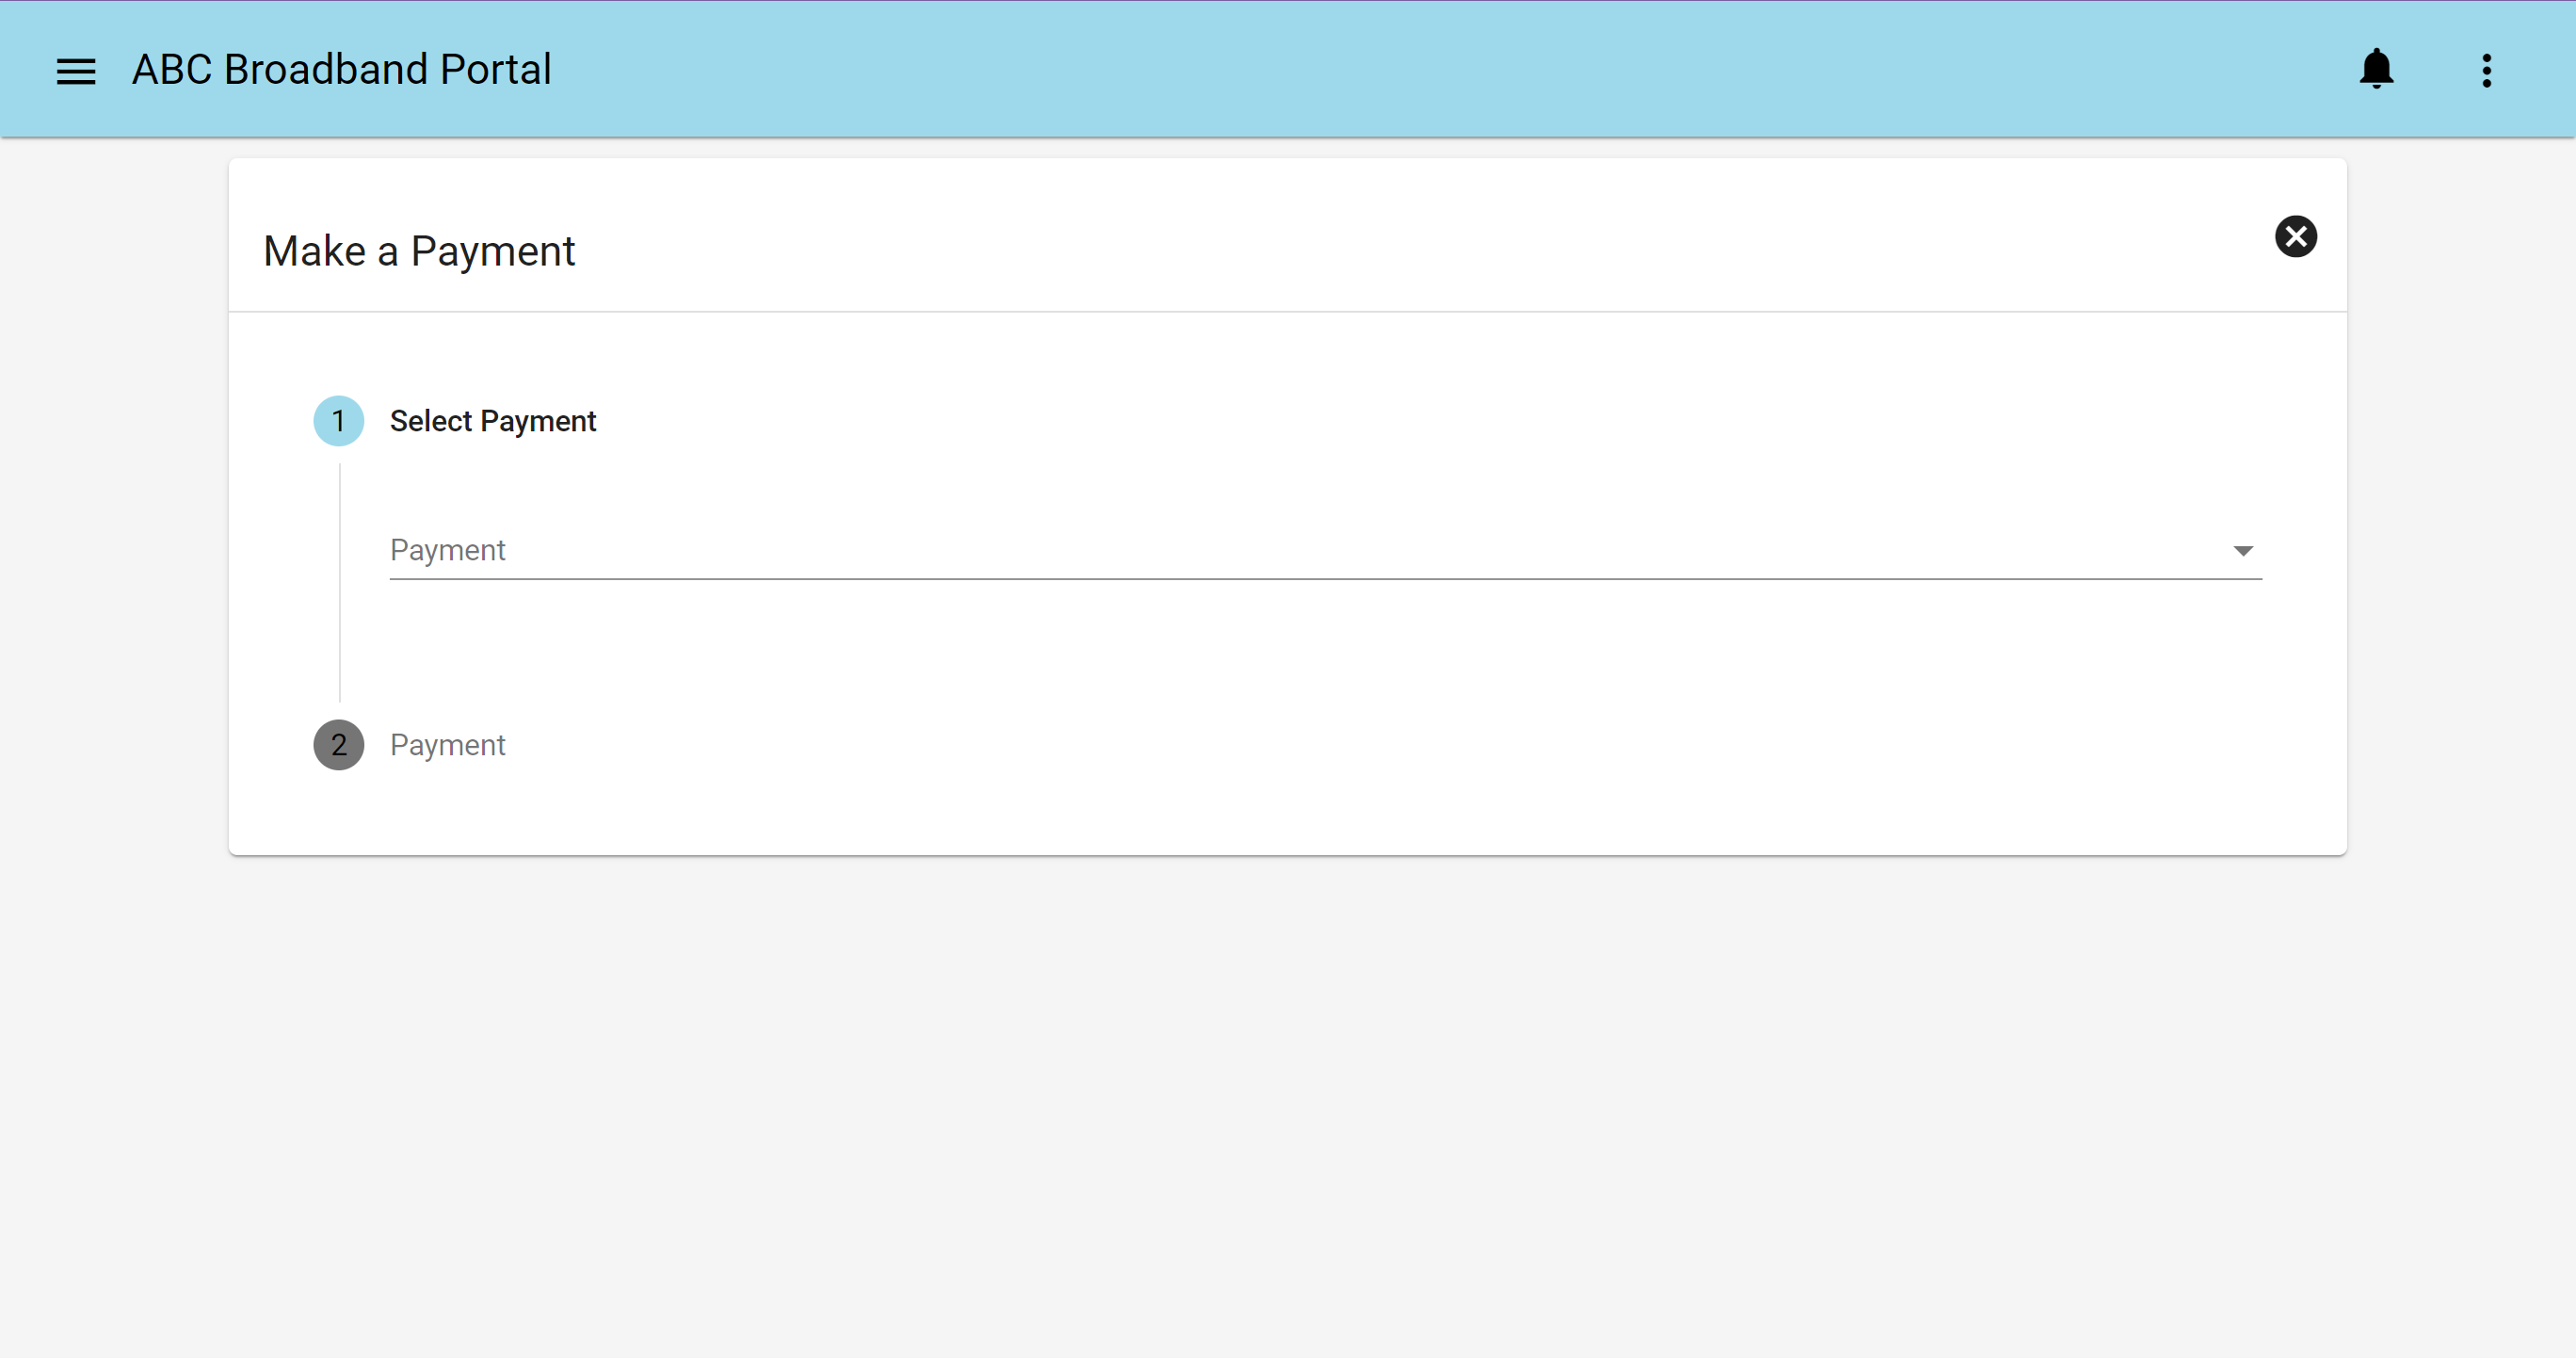
2 - Fill in the applicable Credit Card information.
Click the slider on to Save Payment Method and/or Setup Automatic Recurring Payment options, if desired.
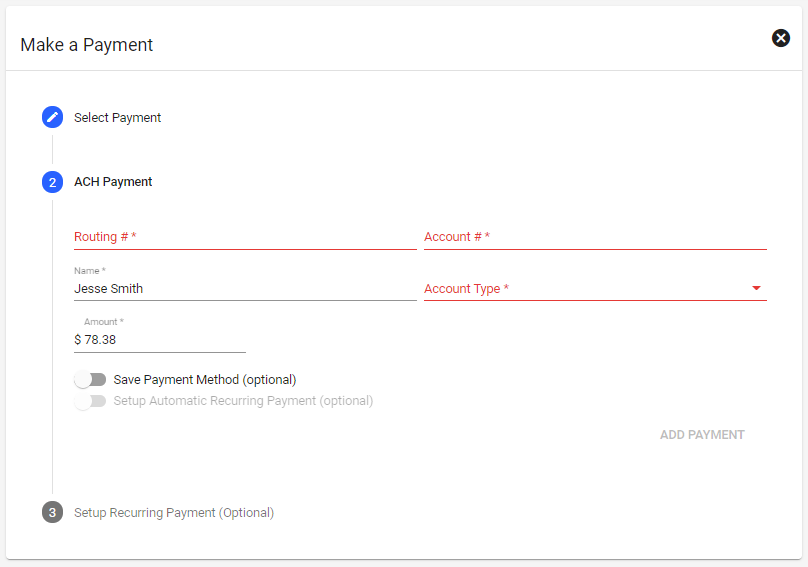
Or, enter in the applicable ACH banking information.
Click the slider on to Save Payment Method and/or Setup Automatic Recurring Payment options, if desired.
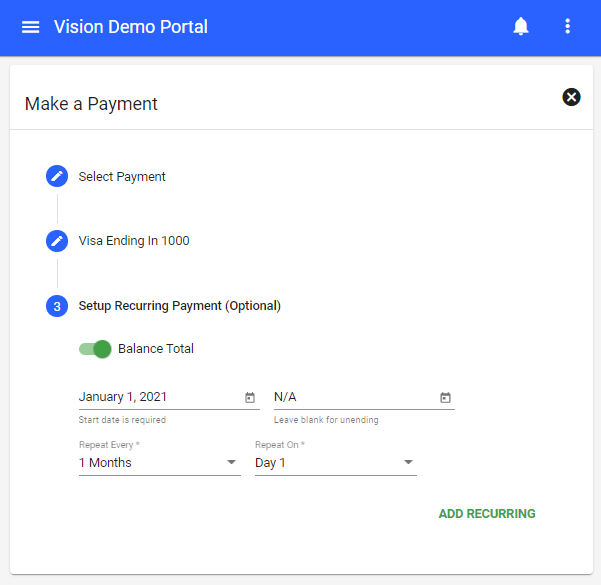
3 - Details of the recurring payment are displayed. Simply hit ADD RECURRING to confirm.
*Certain editing functionality of this step may not be accessible to the subscriber based on the provider's terms and conditions.
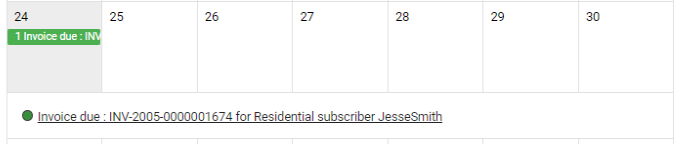
Calendar
A calendar is available for subscribers to view several types of event items related to their account.
By default, the following items are displayed on the calendar view:
- Tickets Created
- Invoices Due
- Payment Receipts Created
Click on FILTER to change items shown.
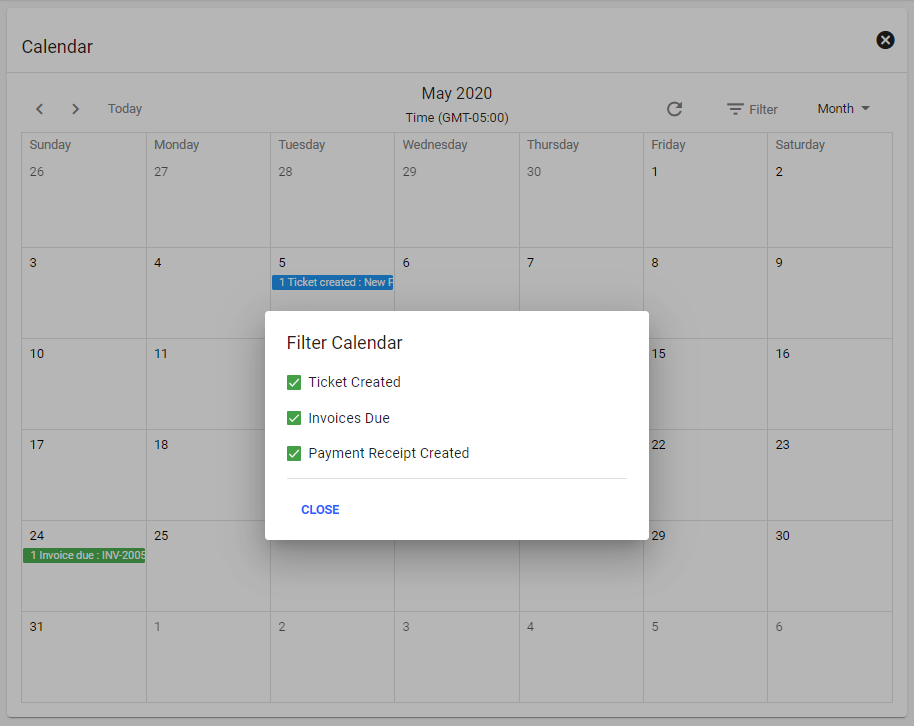
Click on a calendar item to expand the event item details and to open a link for more information.
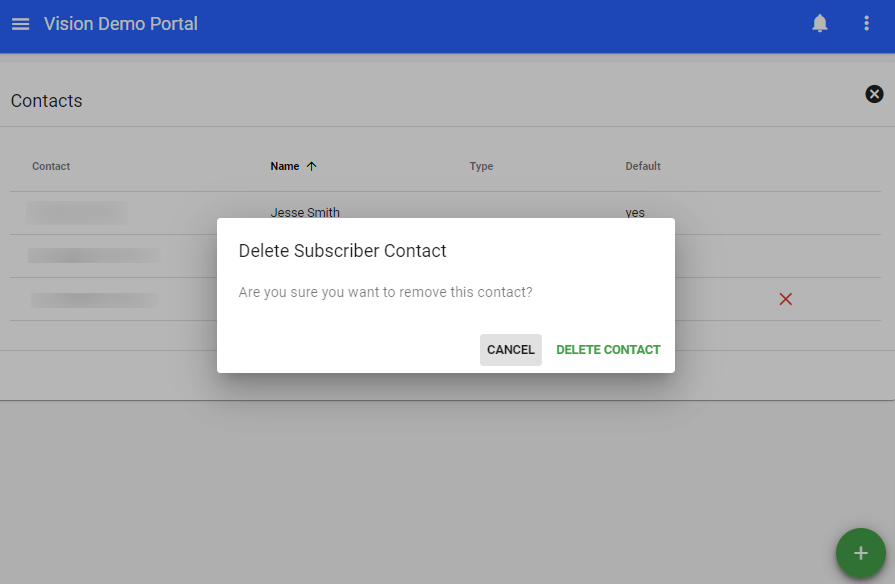
Contacts
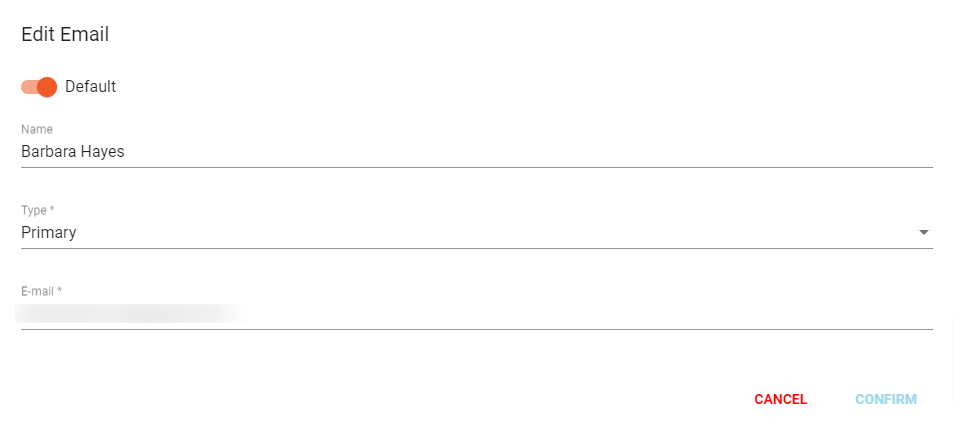
Contact information on the subscriber's account can be accessed through the portal. Subscribers can add, edit or delete contact information related to their account.
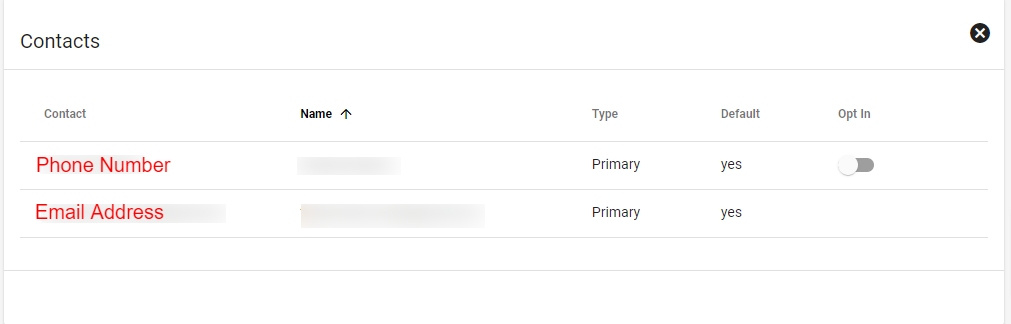
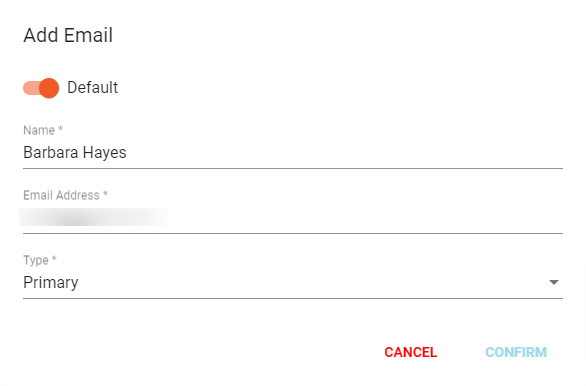
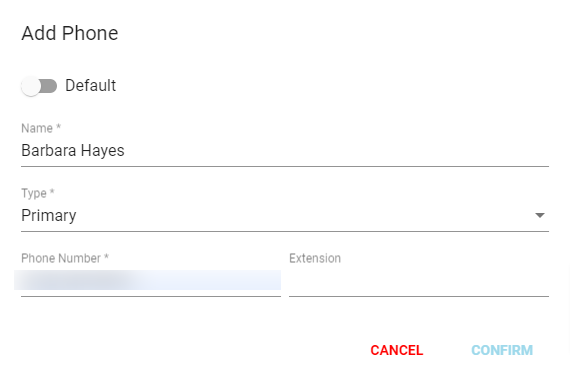
To ADD a name, email address or phone number, the user clicks the 
New information is filled out. The user hits CONFIRM to add the new contact information to the account.
*The Type field options are controlled by the system Admin and can be helpful in understanding accounts with multiple contacts. This is especially true for business accounts, as shown below.
To DELETE a name, email address or phone number, the user clicks the red X next to the contact information. Hit DELETE CONTACT in the confirmation notice to complete.
To EDIT a name, email address or phone number, the user clicks on the information that needs to be changed. Once updates are made, then simply hit CONFIRM.
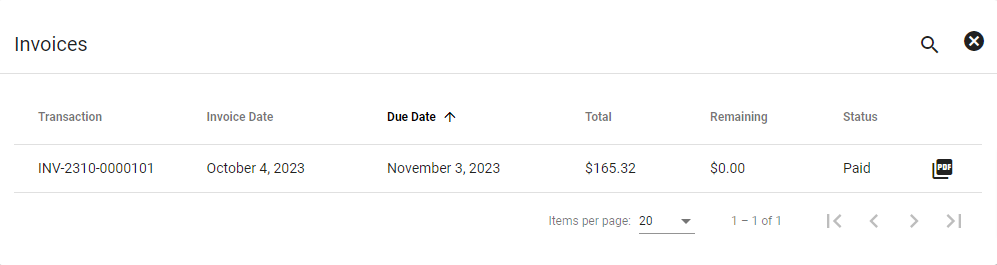
Invoices and Receipts
Invoices
Subscribers can access a list of invoices charged to their account through the Portal.
To view, download or print the invoice document, click the PDF icon.
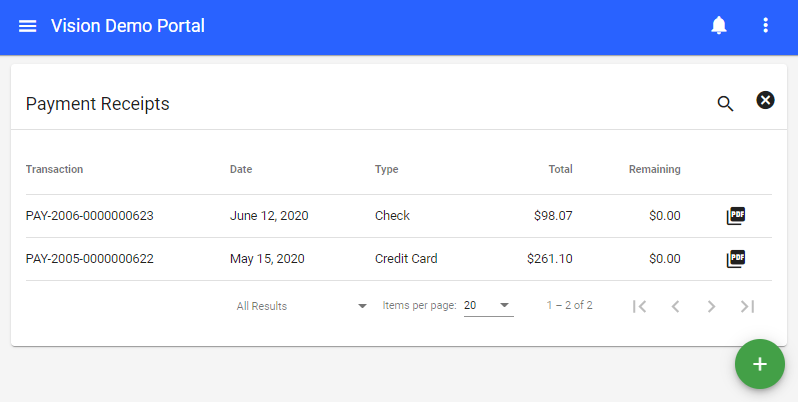
Payment Receipts
Subscribers can access a list of payments applied to their account through the Portal.
To view, download or print a payment receipt document, click the PDF icon.
Recurring Payments/AutoPay
Subscribers are able to manage recurring payment options to automatically pay future invoices on their account through the Portal.
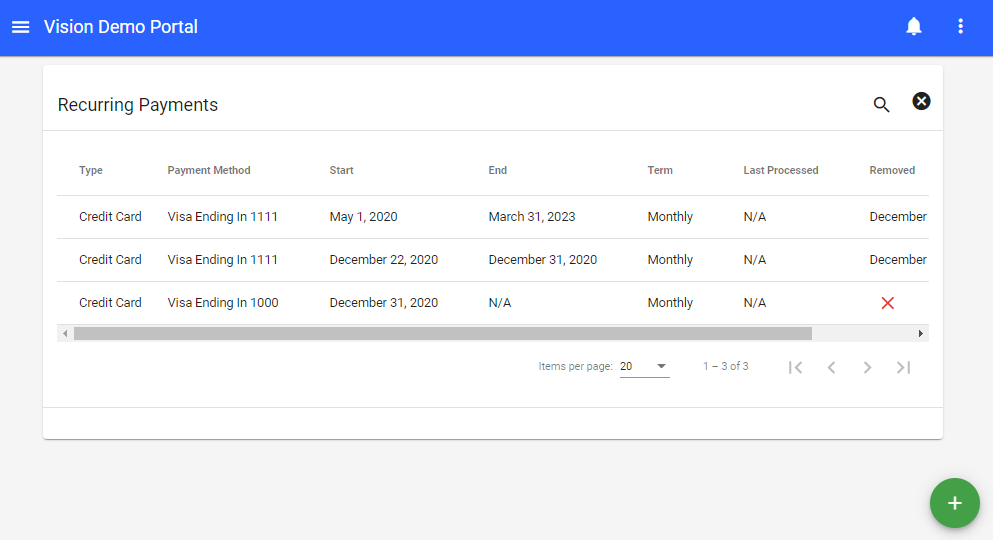
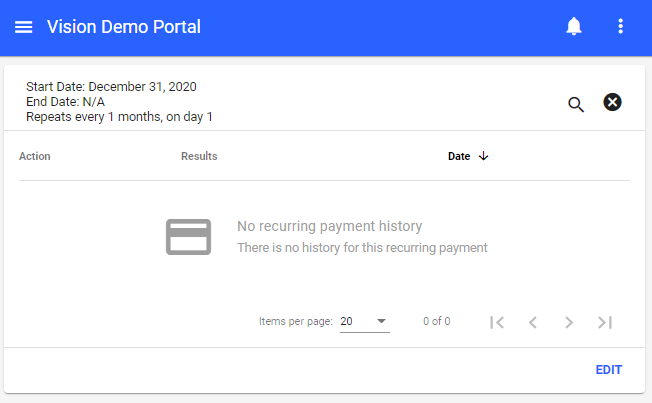
To view the history of recurring charges on the account, click on the recurring payment type.
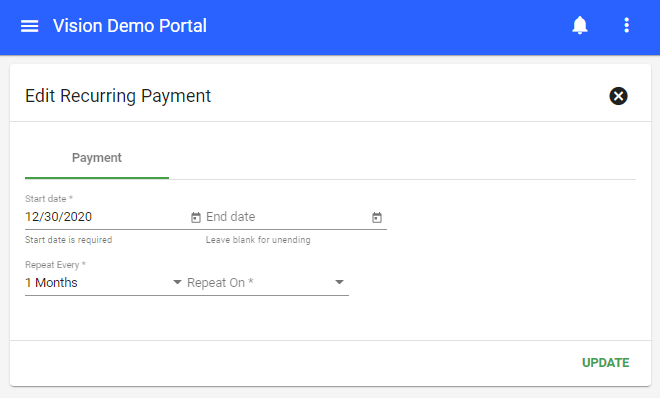
To EDIT the recurring payment, click on the EDIT button.
*Certain functionality of this feature may not be accessible to the subscriber based on the provider's terms and conditions.
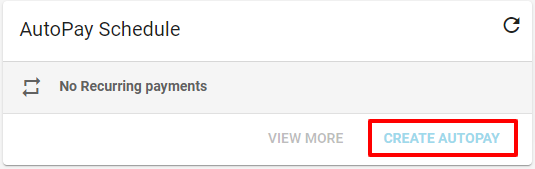
To set up recurring payments start by clicking on the 
The subscriber will select from the Store Payments section of the options.
Next the subscriber will be allowed to jump to the Setup Recurring Payments (Optional) step. Simply hit ADD RECURRING.
To REMOVE the recurring payment on the account, click the red X next to the payment information.
Services
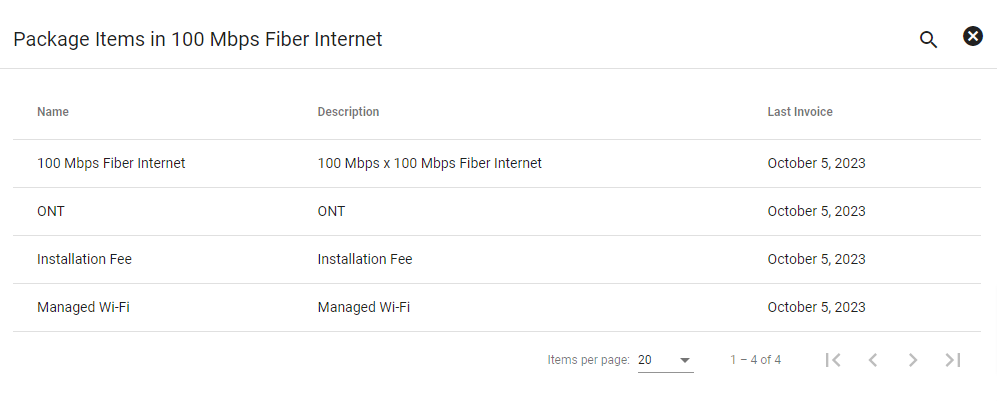
Subscribers are able to view service packages billed and non-billable services of their account through the Portal.
If a contract is on file or needs to be signed, the subscriber can view or complete the contract from the Services page.
*If a provider chooses to do so, subscribers could be allowed to change the speed level or service package through the Portal.
To view the package item details, click on the package line.
The portal gives the subscriber the option to upgrade/downgrade or change their service straight from the portal by themselves. First go to Services, this is where they would see their currnet services and the button that says CHANGE is where to go to change the service.

Next is to select the new package that will be replacing the existing package and adding to the shopping cart. Then click PROCEED
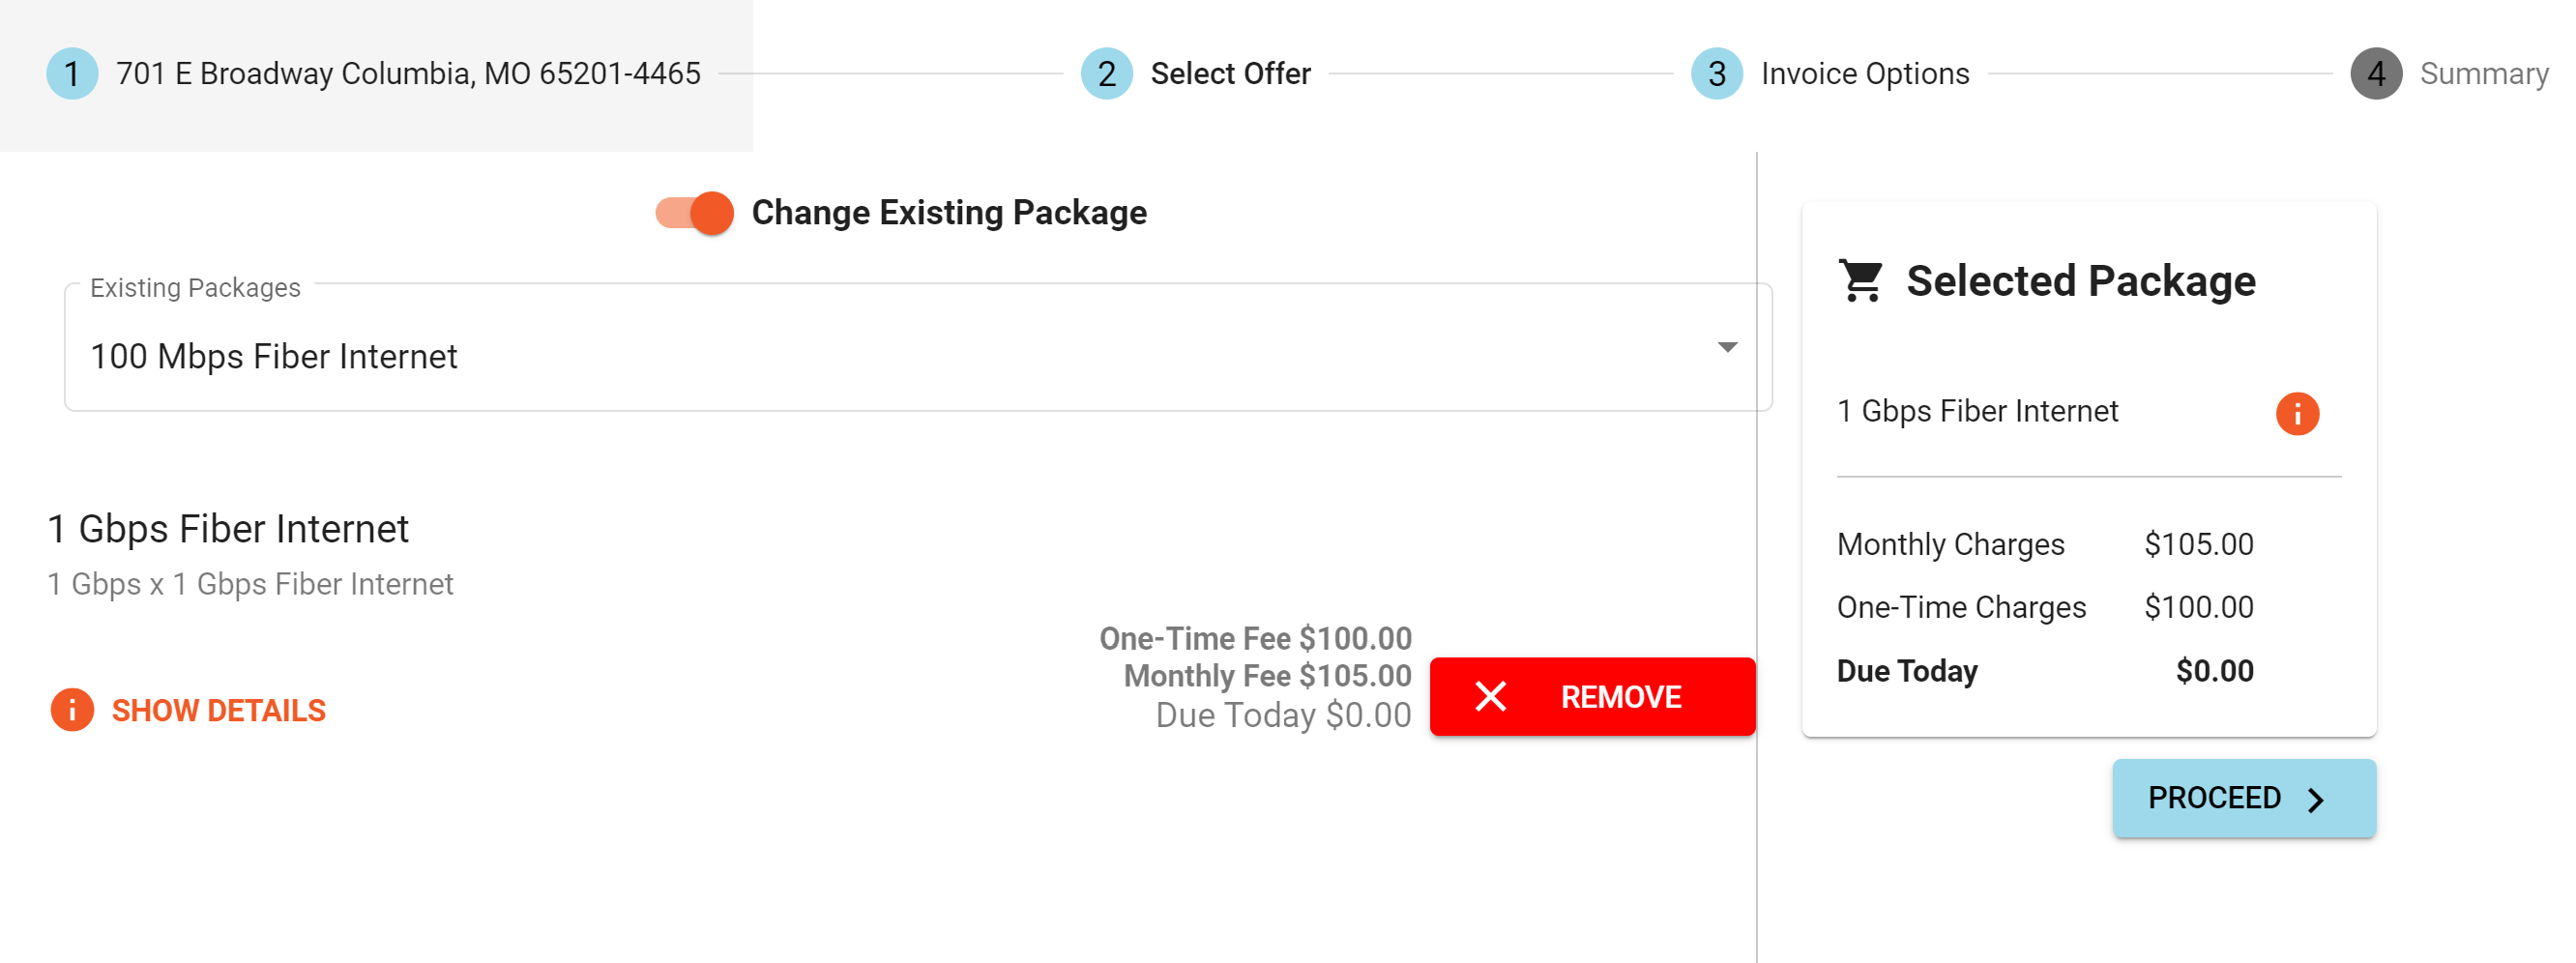
The next step is to confirm invoice prefences and confirming the new package, this will start a workflow to get those changes made to the subscribers account.
Contracts
Subscribers have the option to sign the contract straight through the portal with an e-signature. This setup will make starting a subscribers services faster than waiting for documents to be sent back and forth. In Vision you can see if the subscribers contract has yet to be signed through the services ![]() tab in their account.
tab in their account.

The subscribers will also have access to sign the contract through the portal as a contract will pop up with the option to sign right away.
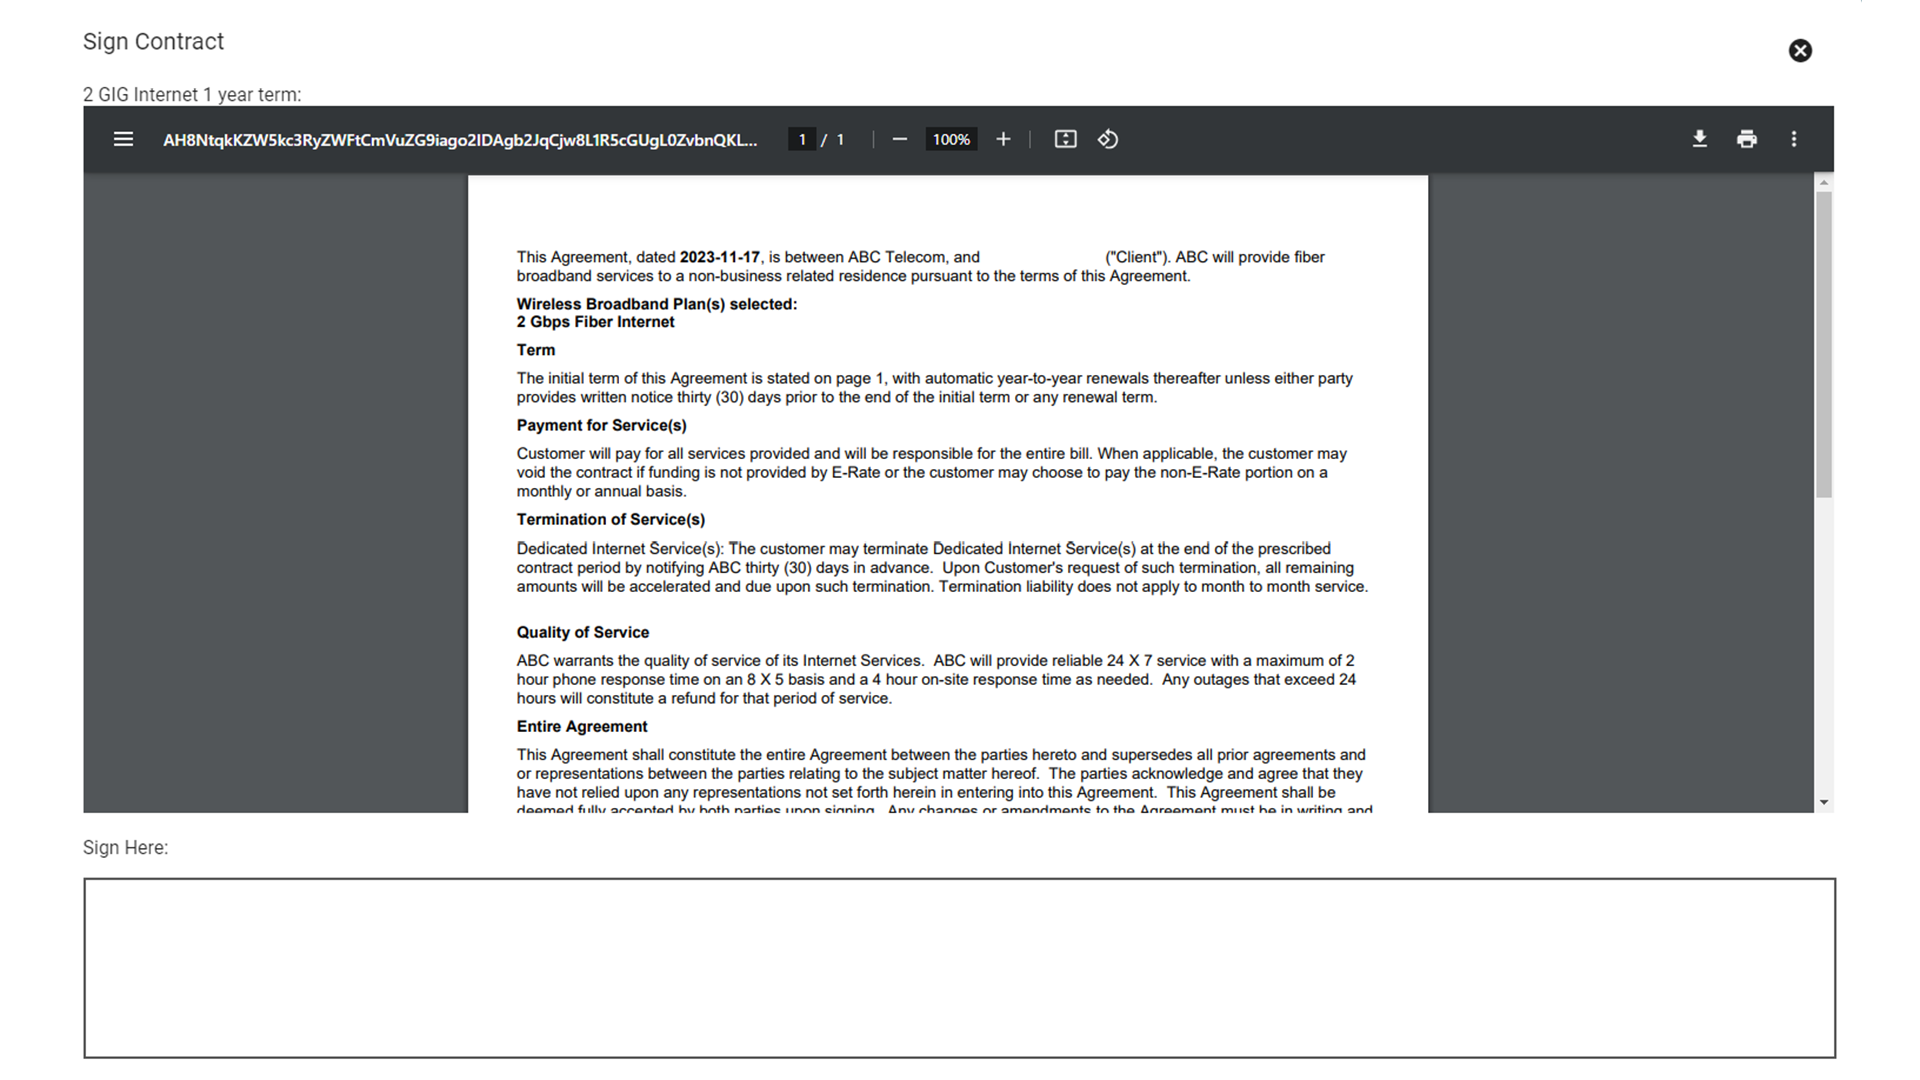
The feature of contracts being able to sign straight through the portal allows for an easier way for subscribers to continue the process of setting up their service.
Tickets
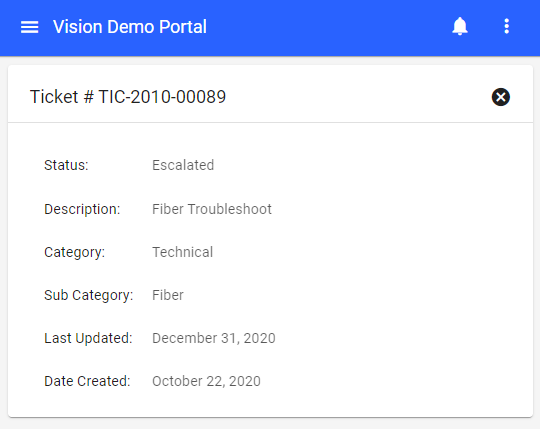
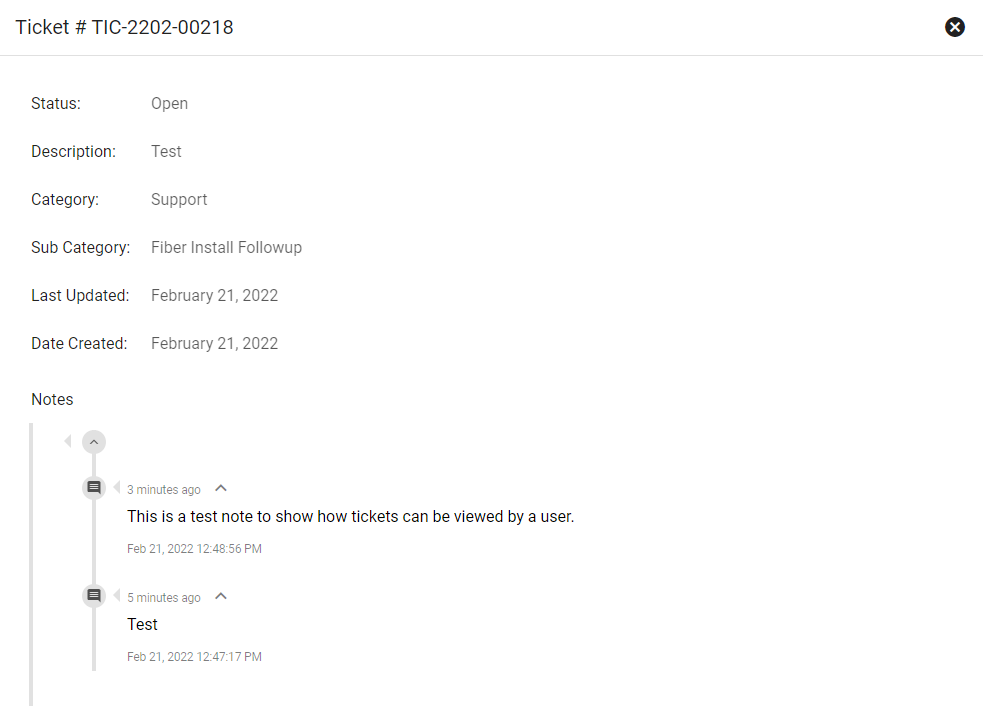
Subscribers are able to view a history of Tickets on their account through the Portal.
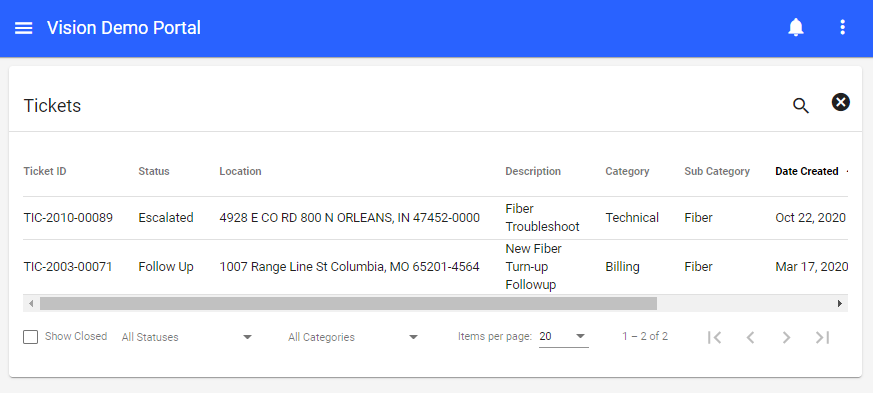
By default, only the ticket information is brought forward in a basic read-only view.
If a ticket note is marked as PUBLIC in the system, it would be recorded in Portal for the subscriber to read.
Providers are able to allow subscribers to open a new ticket through the portal by changing ticket template settings.
If this option is allowed, subscribers will be able to add a ticket to the portal by selecting the 
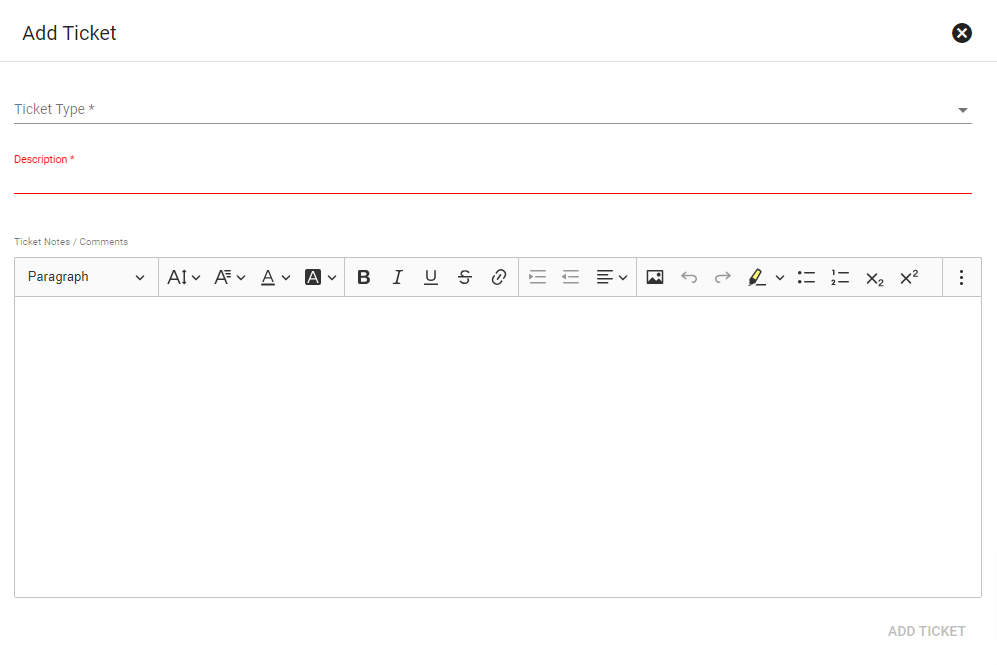
A subscriber can choose to submit a ticket and a provider can choose to respond to the ticket with a public note.
Scheduling
Self Scheduling
The portal can be set up to allow the subscriber to self schedule appointments. To do this go to the menu ![]() then select scheduling
then select scheduling ![]() If the subscriber has an appointment that needs to be schedule it will be displayed on the next screen.
If the subscriber has an appointment that needs to be schedule it will be displayed on the next screen.
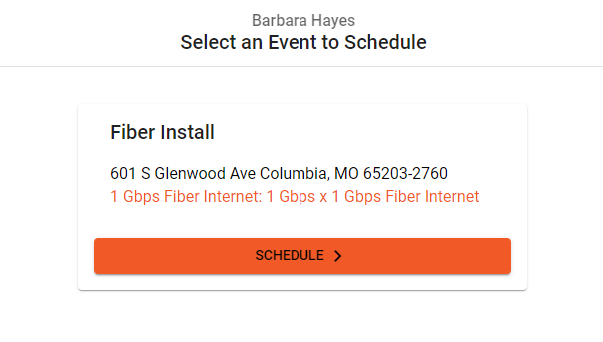
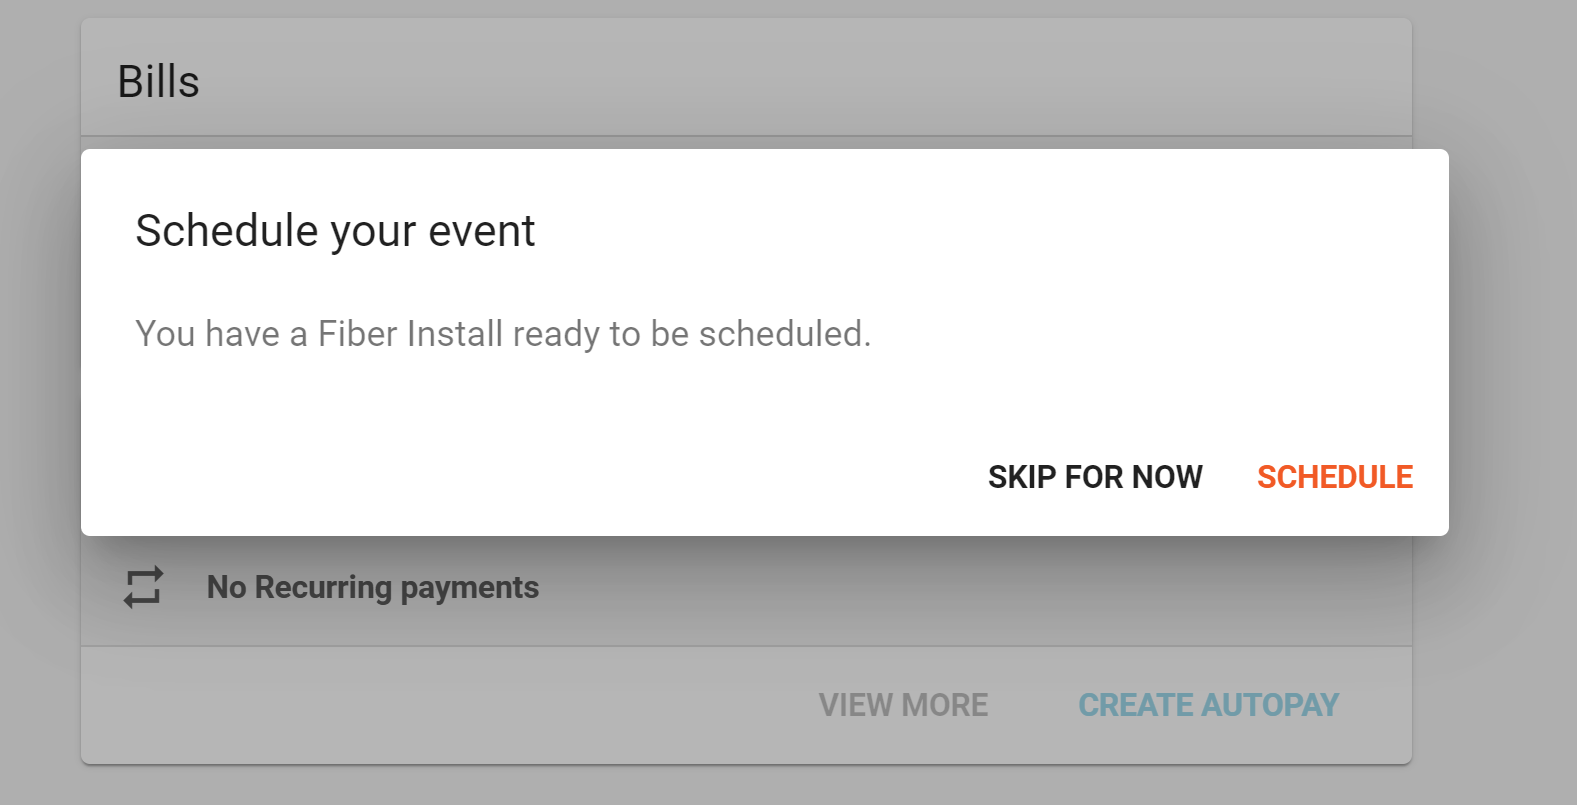
If a subscriber doesn't sign up for an install when purchasing their service through the shopping cart, they can go through the Portal where a popup will display as soon as logging in to the portal. This popup will give the subscriber a reminder that they have an event or install that has yet to be scheduled. **This is a tenant setting if you would like this setting for your portal settings please contact a support team member to get more information**
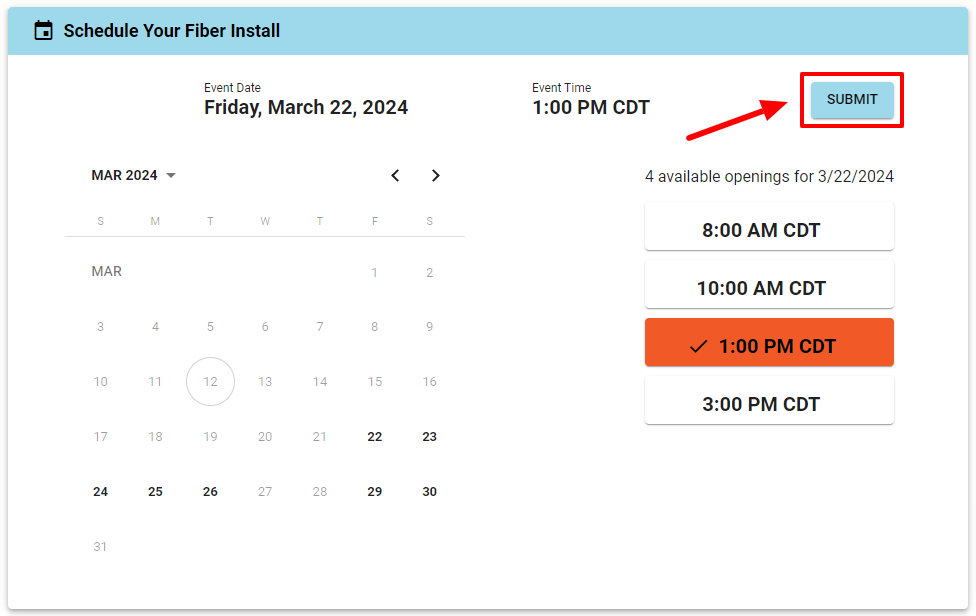
Available dates for an event will be open on the calendar, once selecting a day, times that are open will be displayed on the right side of the calendar.
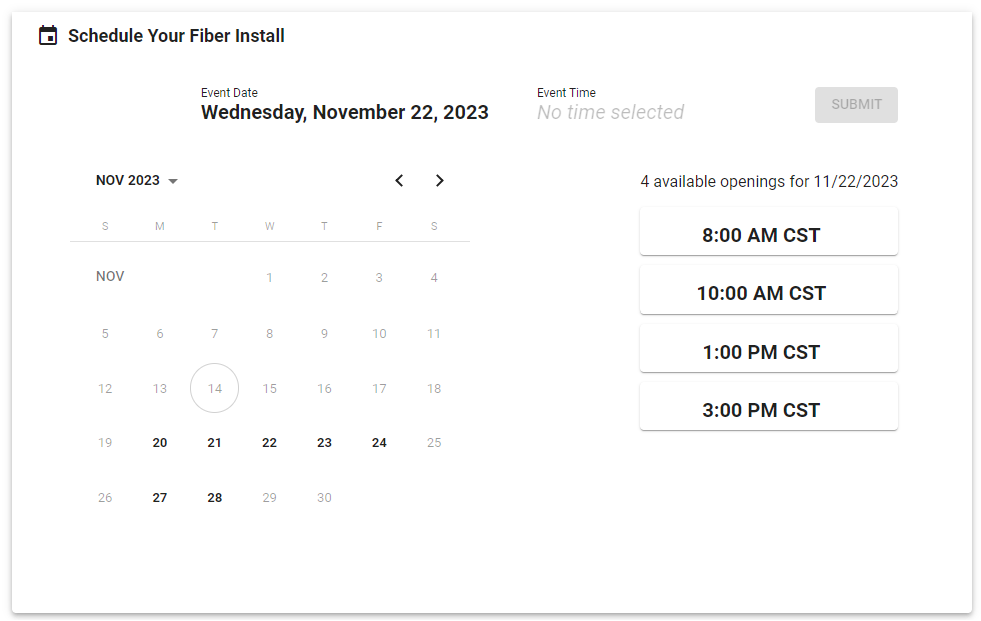
After selecting a date and time the subscriber will then need to click to SUBMIT button to confirm the appointment
Overdue Scheduling Tasks
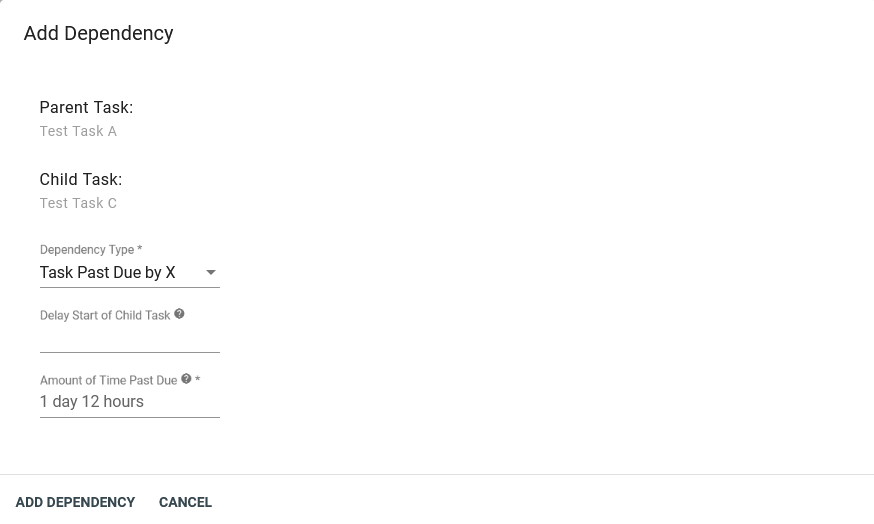
When scheduling a fiber install, if the customer doesn’t do so within a set time frame, the scheduling task becomes overdue. Within the workflow, you can configure follow-up tasks to trigger at different overdue intervals—for example, sending an email reminder at 1 day overdue, 1 week overdue, or 2 weeks overdue.
Each reminder is its own child task tied to the main scheduling task. Before running, these reminders first check if the scheduling task has already been completed. If it has, they’re ignored. If not, the workflow tracks how long the task has been overdue and automatically completes the appropriate reminder task once it reaches its designated time frame.
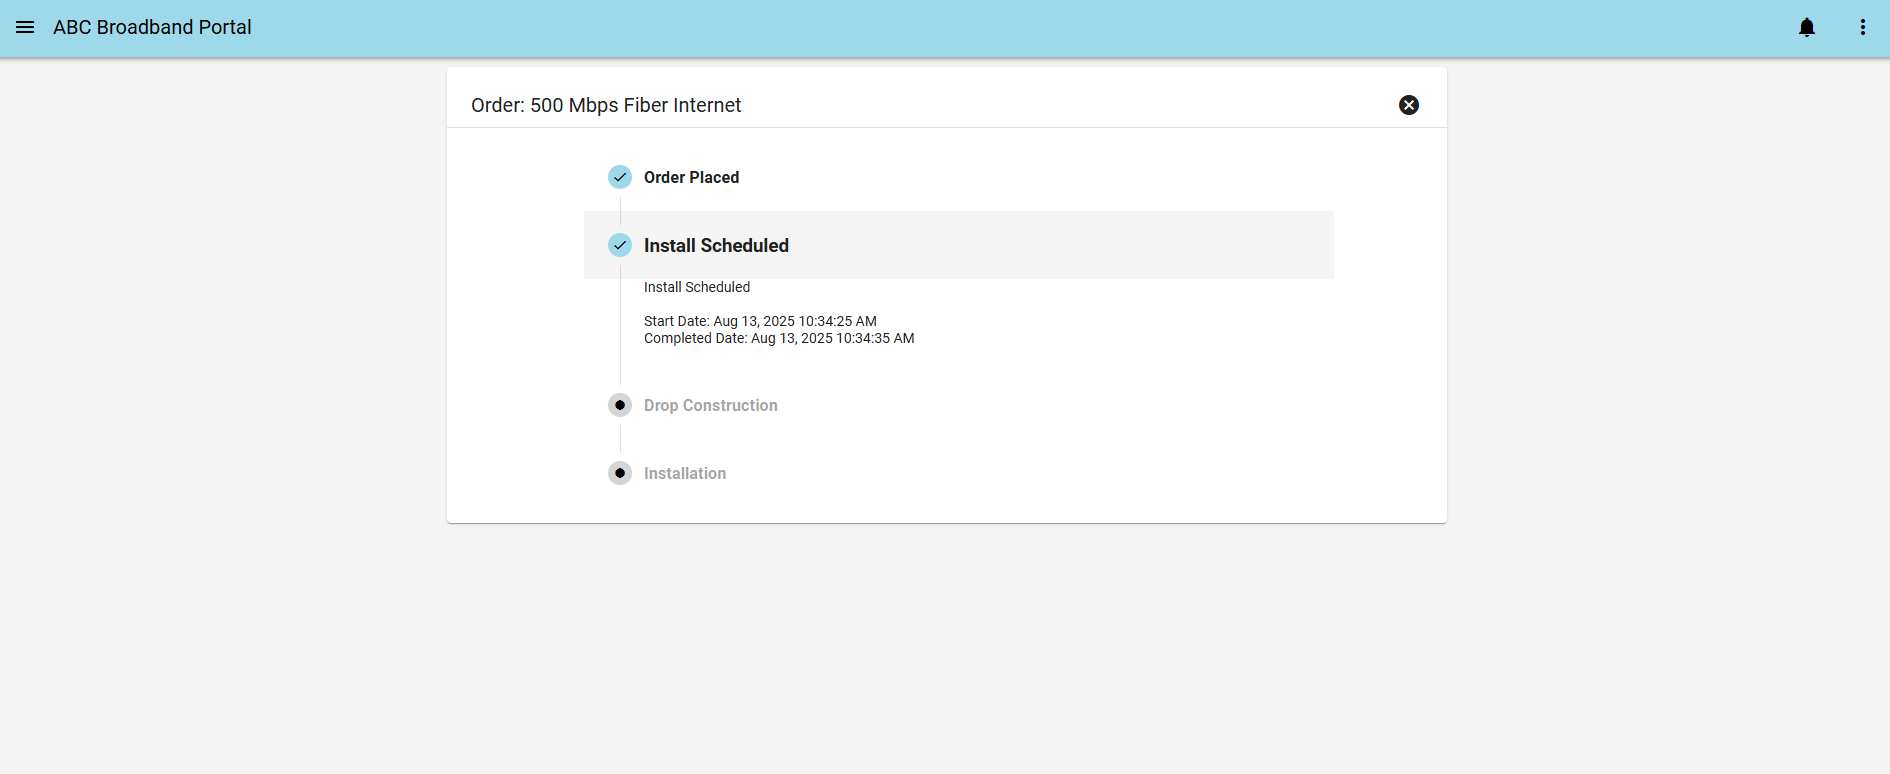
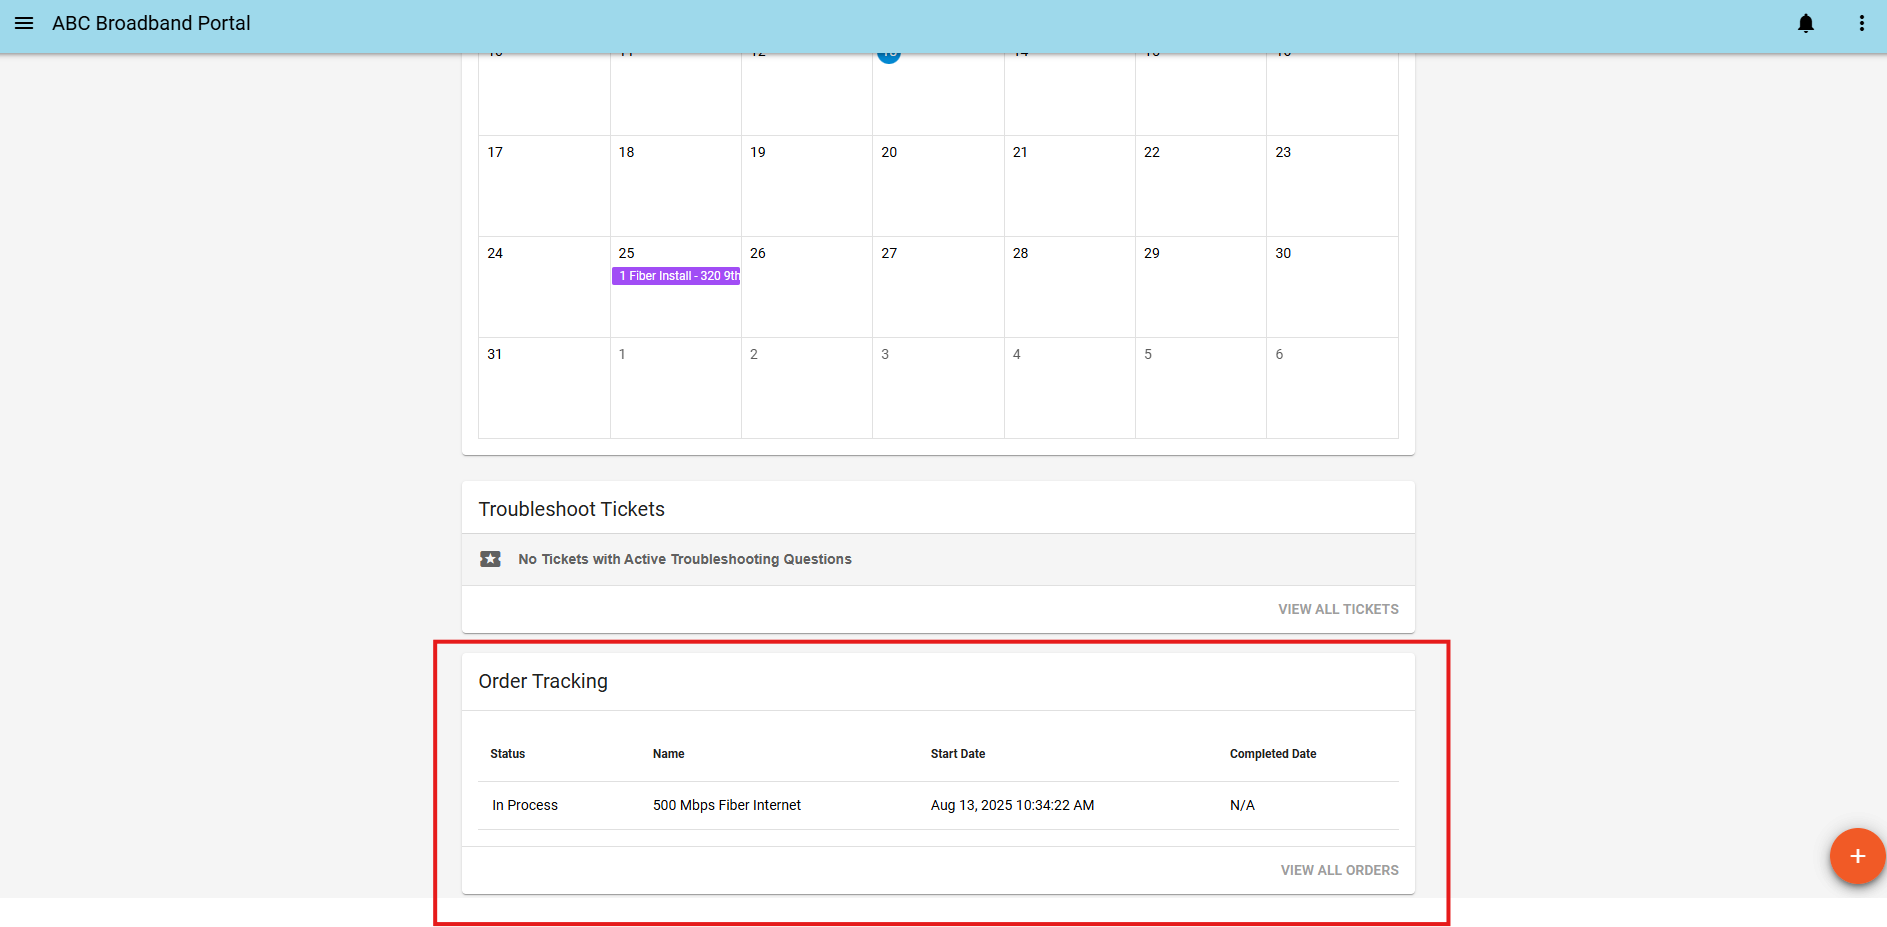
Portal Order Tracking
The Order Tracking feature lets customers see the status of selected workflows directly in their customer portal. It’s highly customizable as you can add it to any workflow and choose exactly which items appear on the tracker, how they appear, and when they are marked as completed. It's an easy way to keep your customers up-to-date and in-the-loop with the progress of their orders.
Setup Instructions
1. Enable the feature
Contact Vision Support to have Order Tracking turned on for your instance of Vision.
2. Select a workflow
Once enabled, open the workflow you want to make portal-trackable (for example, an installation workflow).
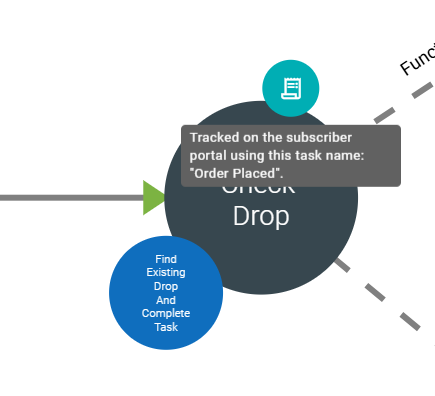
Note: If two tasks are on independent lines in the workflow, the tracker may display them in a different order than expected, especially if those items are completed next to one another. Additionally, the progress tracker can't run reliably on looping steps. It may be necessary to add a task solely for the purpose of order tracking.
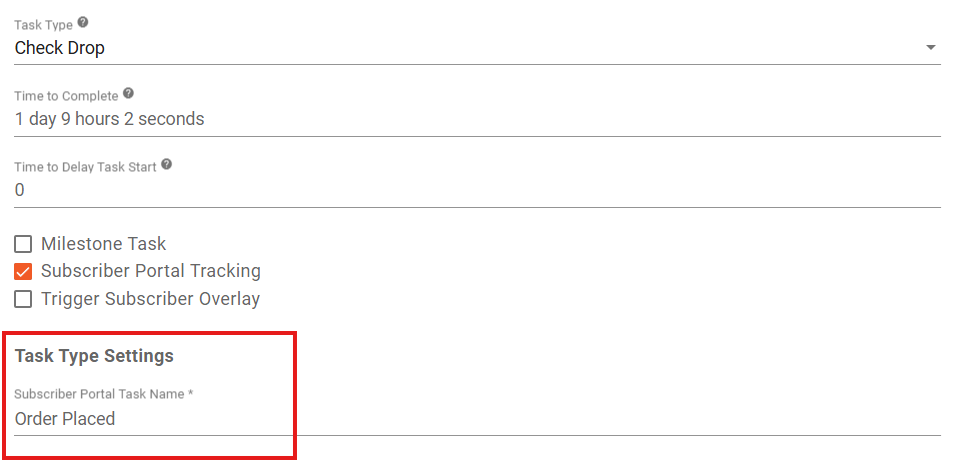
3. Mark tasks as trackable
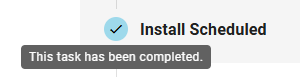
Click on a task you want customers to see. You’ll now have a checkbox to make that task trackable. Checked tasks will display an aqua circle icon to indicate they’re visible in the portal.
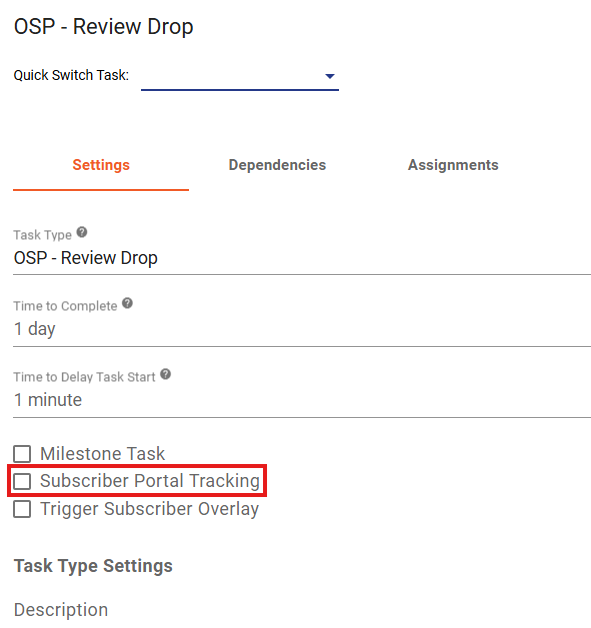
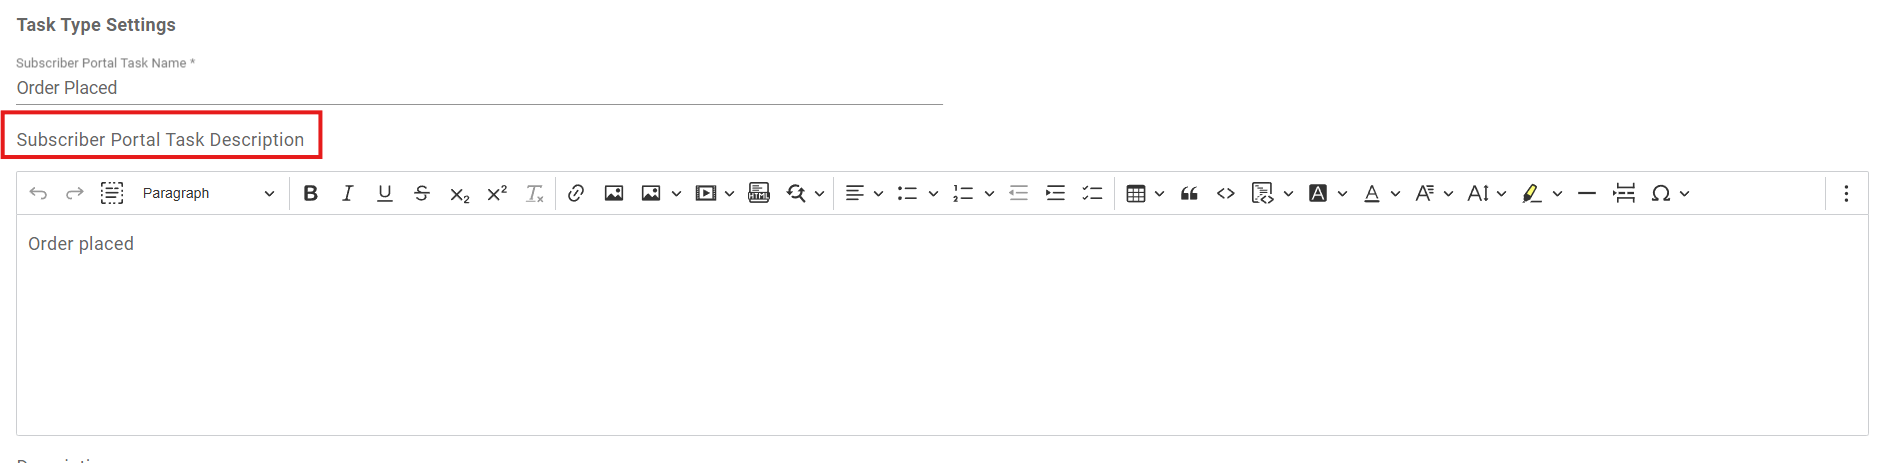
You also have a required field to name the task for the portal. This allows you to name items differently in the customer portal than for your internal team. Below this is a description box for additional details and formatting on the customer side.
Workflow view-
Portal View-
Workflow view-
Portal View-
4. Repeat for all desired tasks – Mark every task you want customers to track.
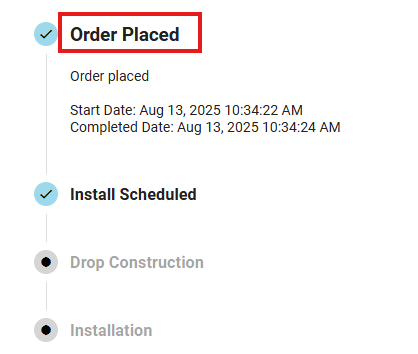
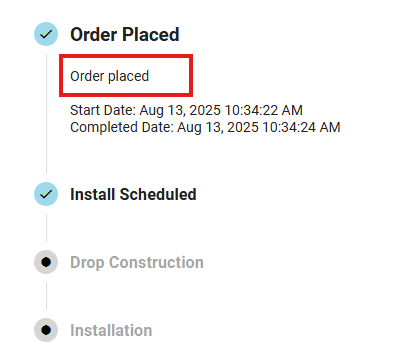
When a customer triggers the workflow, it will appear under the new Order Tracking tab in their portal, showing progress through the marked tasks.

The tracked orders will also show up on their dashboard in a card.
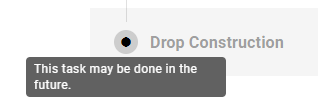
Portal Tracker Symbol Guide
Black dots in the center indicate an incomplete task, while check marks show that a task is completed. You can also hover over the circles for a tool tip on their status.
Completed-
Incomplete/Skipped-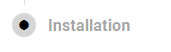
Selected-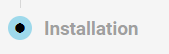
Troubleshooting
If you are running into issues while using portals, try looking for your problem in the Portal Account Troubleshooting Section.