FAQ
Hello, how can we help? Frequently Asked Questions are here to help you find real time answers, troubleshooting tips, and documentation. Whether you are looking for administrator answers or are wanting to know basic Vision User information, it’s all here. You can browse the topics below or jump straight to the category pertaining to your question. Each drop down contains a step-by-step guide and links to documentation.
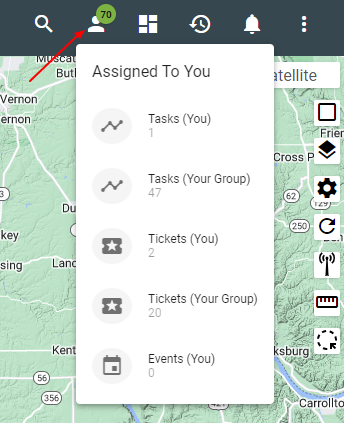
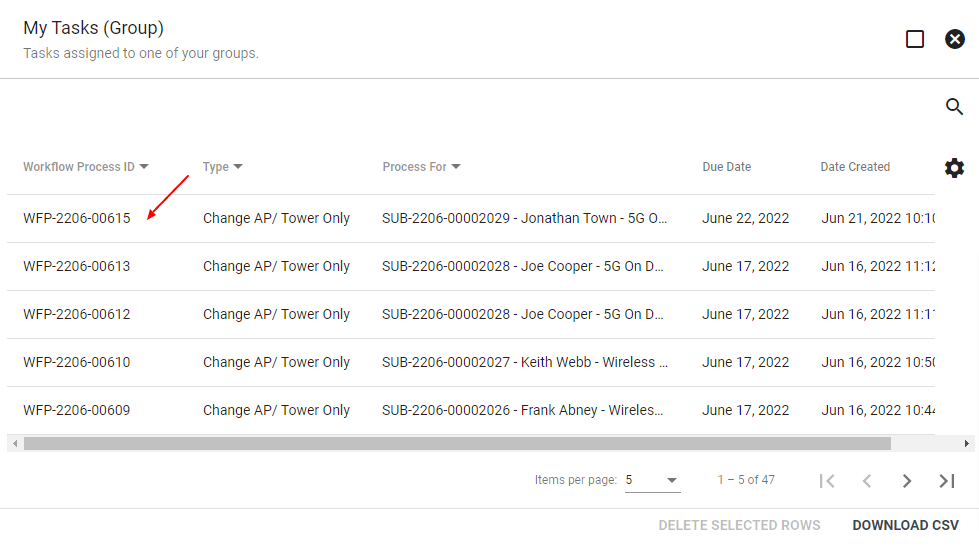
To easily see tasks assigned to you and your group, click the assigned to you 
Learn more about Workflows here.
Subscriber Status: Current, Delinquent, Error, Lead, Past, System
The subscriber status helps describe a subscriber’s standing in the system. Associate these statuses with billing. Do not manually change the status to reflect eligibility.
If an account is a duplicate account you can change the status to error and that will help filter it from future search results.
Remember workflows will automatically change statuses of a subscriber based on their billing status, but if needed you can change it manually here.
Learn more about Subscriber Statuses and Subscriber Management.
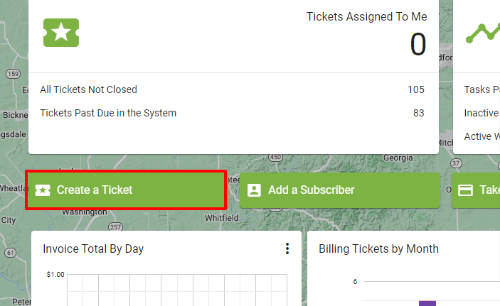
There are two ways to create a new ticket. Either click on Create a Ticket on your Dashboard or click on the FAB in the lower right-hand corner of a Subscriber Account Page and click Open Ticket. Then you can fill out the information on the ticket and click ADD TICKET.
Learn more about tickets.
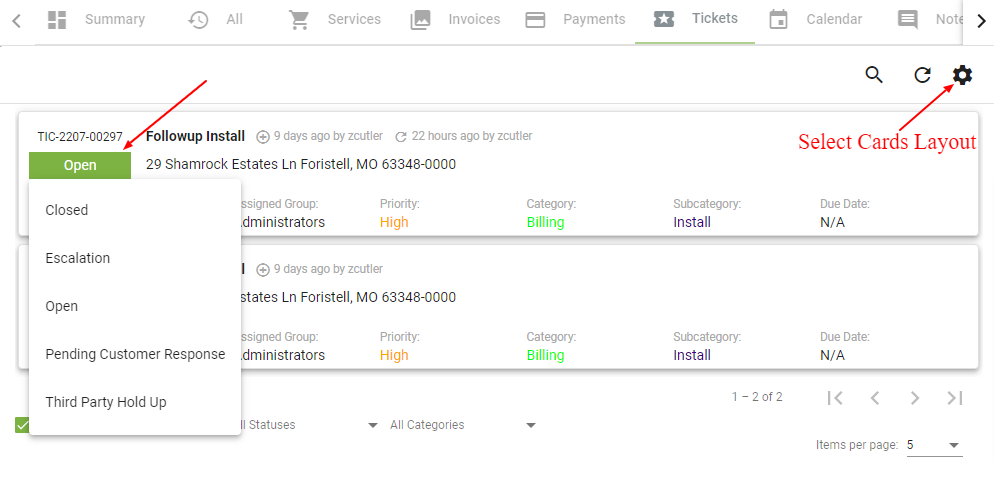
Tickets can easily be closed in the card display view without needing to open the tickets individually.
When you are on the ticket tab of the Subscriber Account, hit the gear icon in the upper right corner. Select cards under the layout drop down. Click SAVE CHANGES. That will change your default settings for tickets going forward.
Then you can click the open box to flip it to closed or another status listed.
Learn more about Tickets.
First search a subscriber’s name to get to their account page.
Once on the subscriber’s account page, use the tabs at the top the find needed information. Such as the All tab, where you can see a log of all past actions on the account. You can see what active services and workflows are associated with the account. Click the link to learn how to customize the Account Summary Cards that contain information related to a subscriber.
A summary is presented at the top of the account to indicate the subscriber type (Business, Residential, Lead, etc.), unique customer ID, name and billing status.
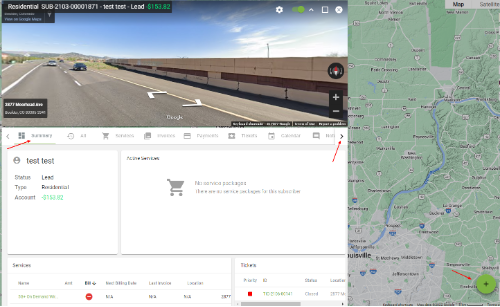
The Floating Action Button FAB is in the lower right-hand corner. There you will be able to take action on the account, like adding a ticket, taking a payment, adding a service, ect.
Learn more about Subscriber Account pages.
The Dashboard search field labeled Search Subscribers will search specifically for subscriber information, such as names. This can be found on every user dashboard. Click on the Dashboard icon on the top header to activate the Dashboard menu.
The top header Super Search returns results for many data points in the system such as addresses, subscriber name, subscriber IDs, contact information, invoices, tickets, hardware, circuits, warehouses, vendors, purchase orders, manufacturers, IP addresses, workflows, and more. This search icon is found on every page of Vision.
To customize your search results, Vision lets you edit your personal search standards in User Settings. You can select or de-select from the search types. Once you select your search preferences be sure to save your preferences. Those settings will be saved going forward unless you updated your selections. These settings will improve your Super Search results.
3-Dot Menu > User Settings > Search Tab > Save Search Preferences
Learn more about Search Tools.
A Vision User can update their password under their User Settings, found under the 3-dot menu in the upper right-hand corner of Vision.
3 Dot Menu > User Settings > Change Password > UPDATE
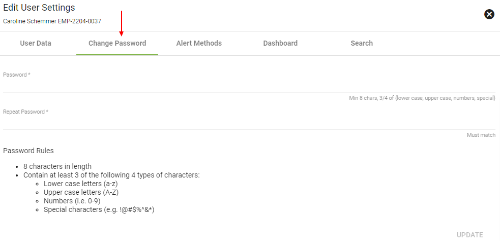
Learn more about User Settings.
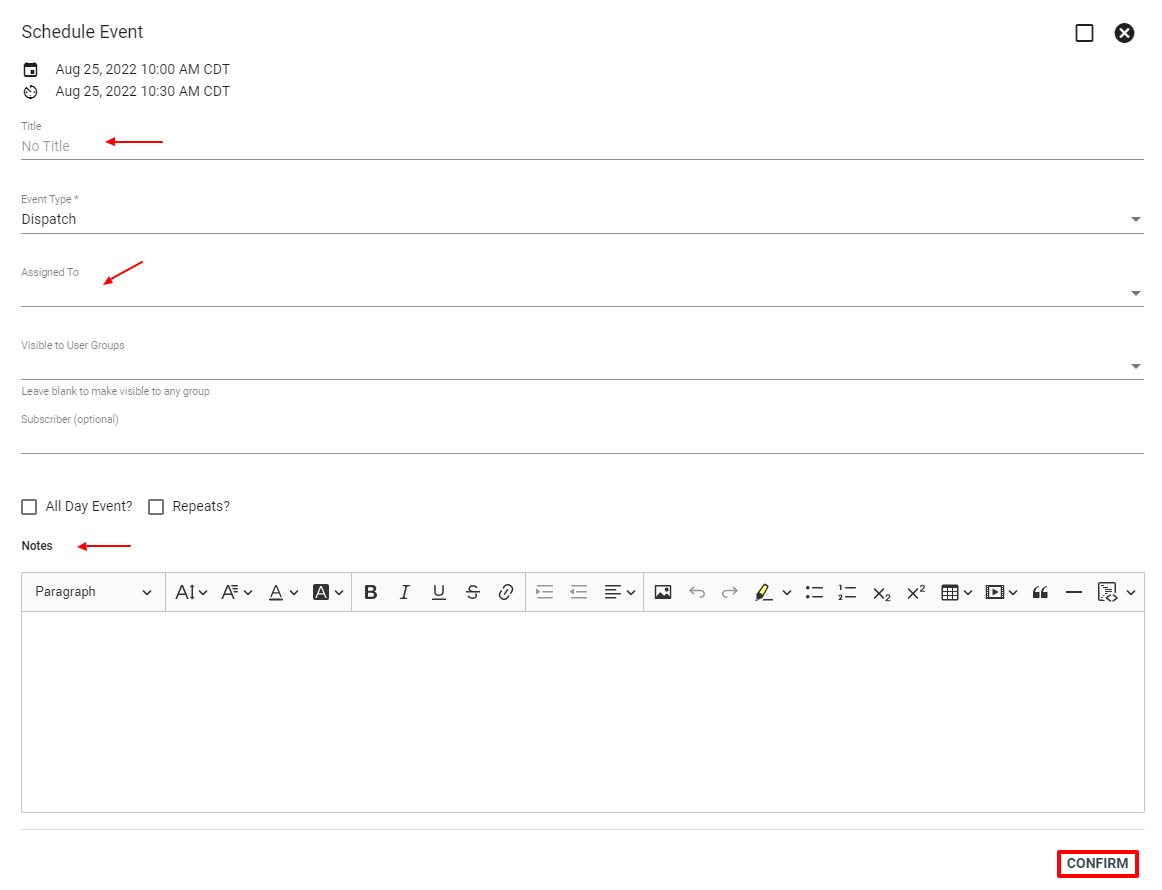
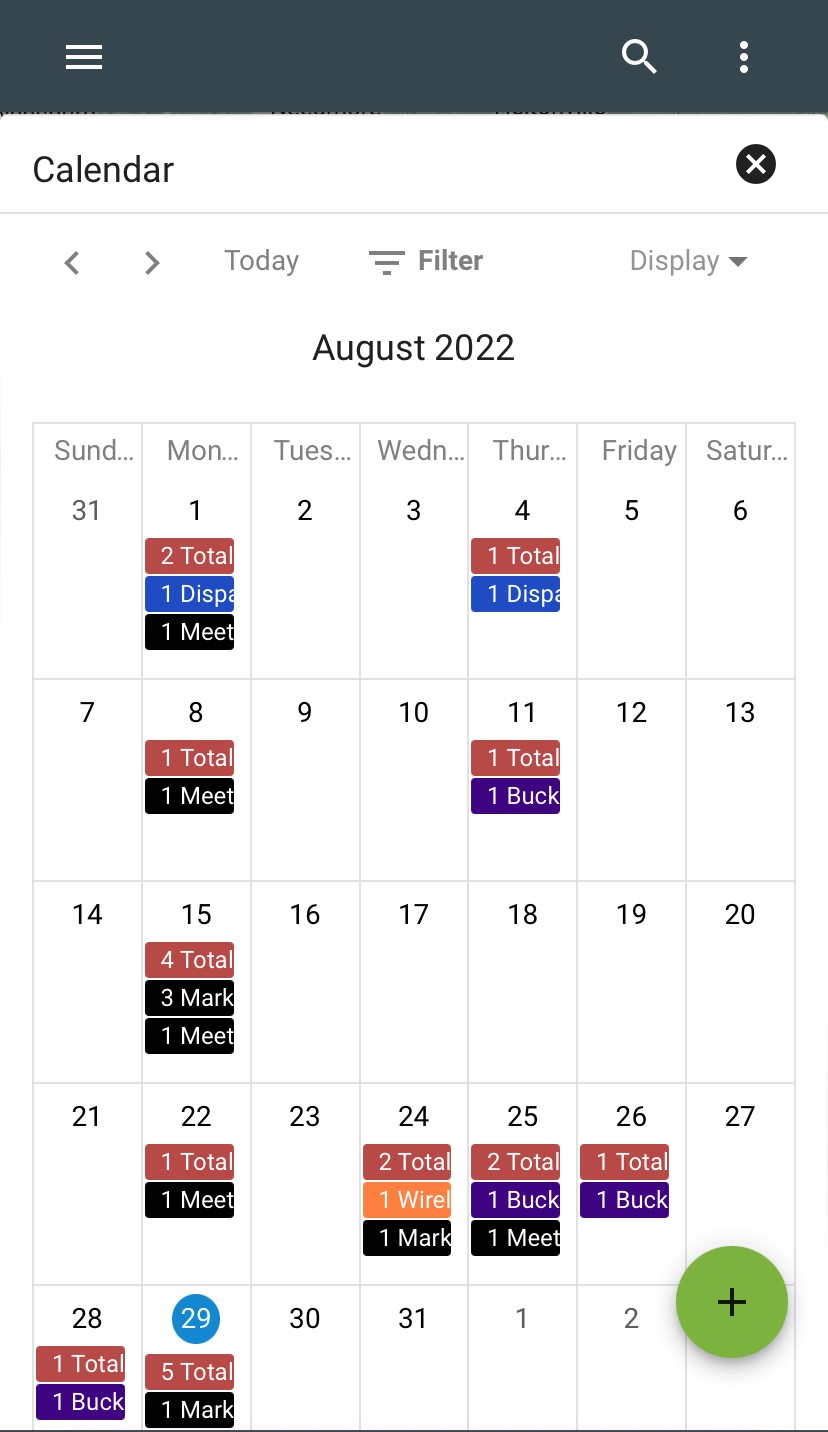
Under the menu click on Calendars. Users can view their schedule and filter the calendar by month, week, or day.
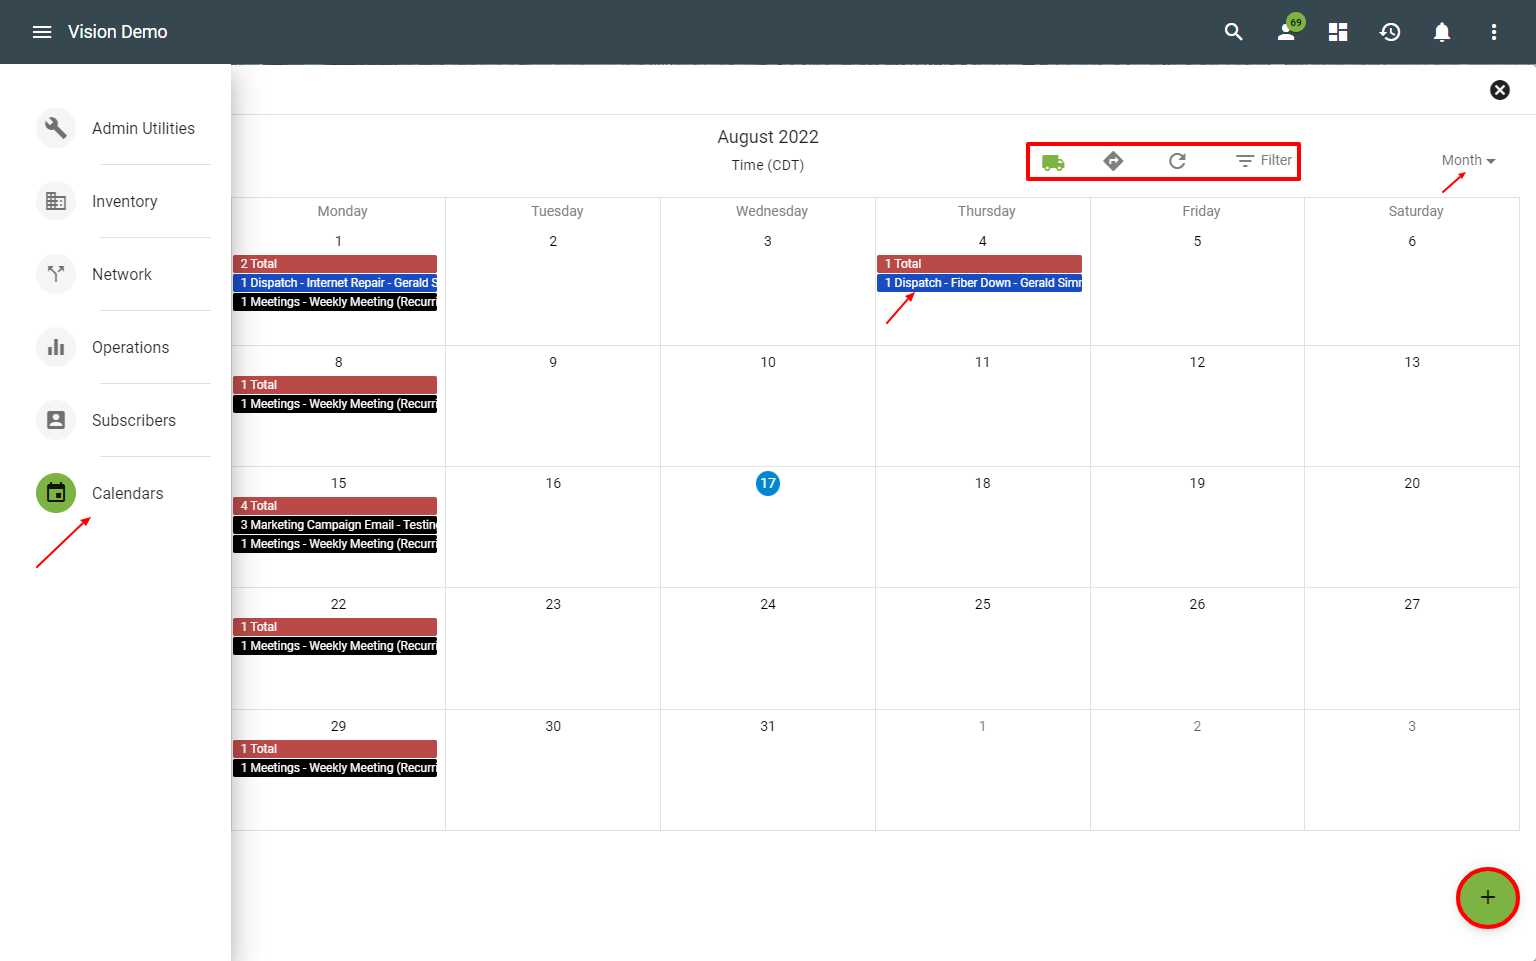
Click into the individual events on the calendar to view more details, such as start and end times, meeting or event title, assigned users and groups. From this view you can also view and add notes, view dynamic workflows associated, and view and add attachments. A dispatch event will also display the subscriber, location, and driving options. If you add or make changes, be sure to click CONFIRM. You can also select REMOVE EVENT.
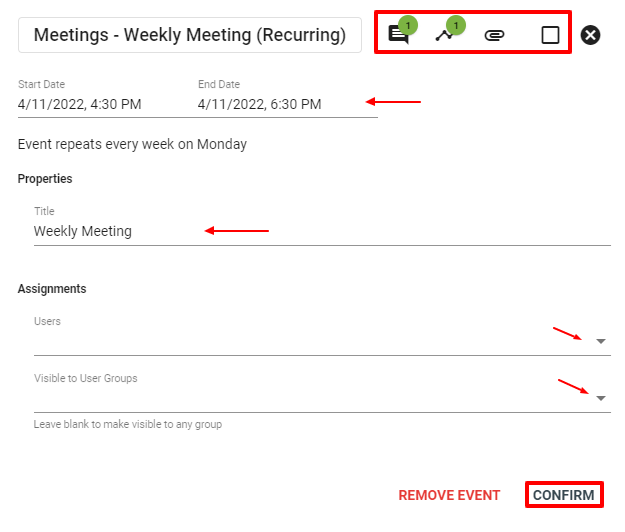
Learn more about the Calendar.
You may not have the proper permission set to perform a task, if you believe that you should talk with you administrator or Point-of-Contact to gain that permission.
If your permission sets were reloaded perform a logout and login cycle to update your permissions.
Whenever you add a dashboard card through tour user settings the first time it loads it will not show up properly. If this is the case, perform a page reload and try clicking the dashboard card again.
If you are using Firefox, turn off Enhanced Tracking Protection. Leaving it enabled can lead to being forced to log in frequently.
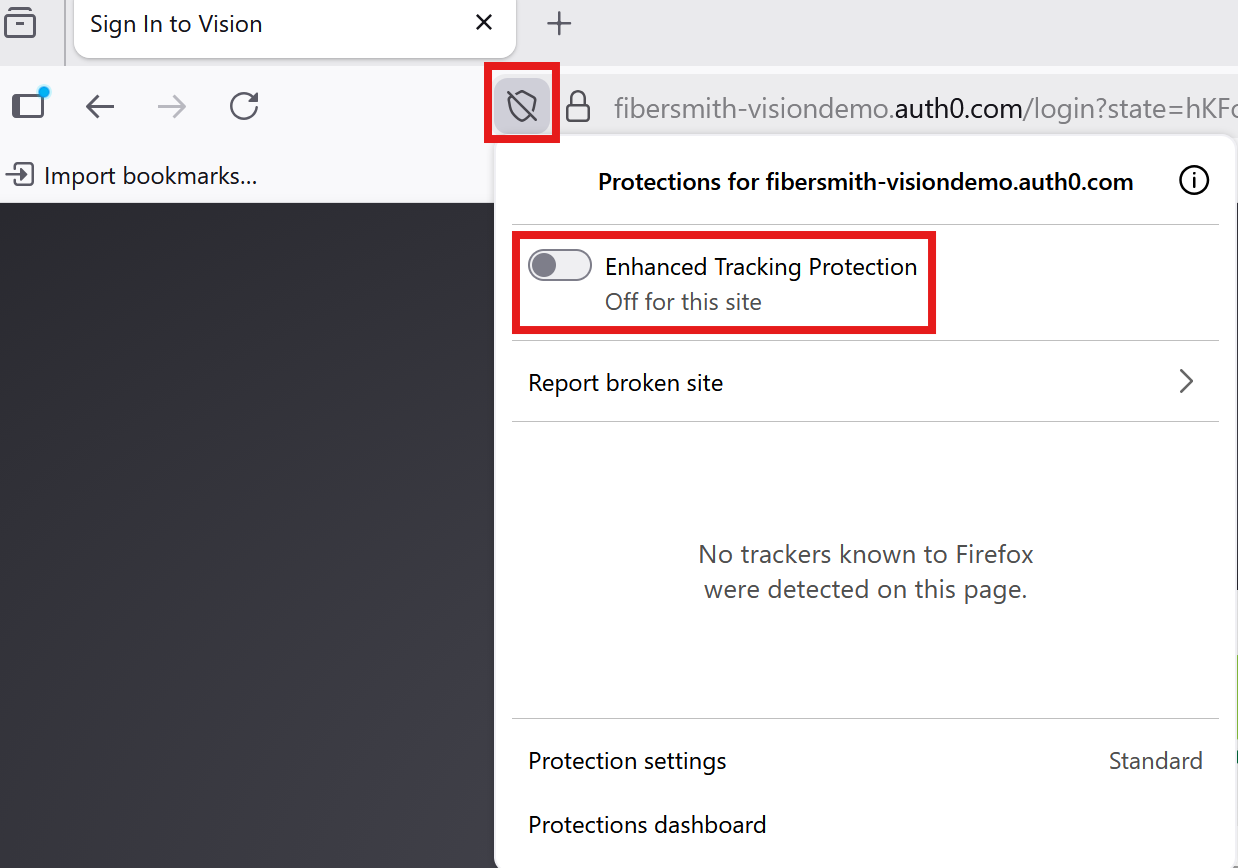
This is an issue that may occur when you navigate to the /login url instead of the main tenant url.
If this issue is happening to you, make a new tab and then navigate to the main url of your tenant. This should be something like (tenant).fibersmith.systems. Double check your browsers autofill to make sure you are not accidentally being sent to the (tenant).fibersmith.systems/login.
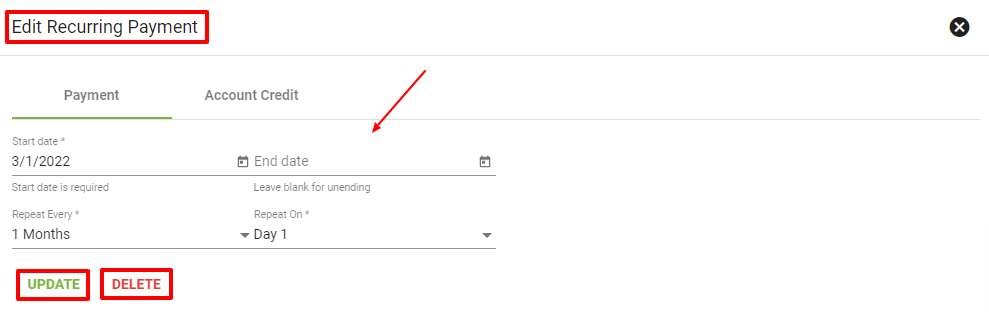
Click on the Recurring Payment under the Payments tab that you want to edit or delete.
Select EDIT in the bottom righthand corner. From there, change the payment start date, end date and when/if the payment will repeat. (Ex. Choose the 1st of the month)
Click UPDATE to save those changes, or click DELETE to delete that Recurring Payment.
Select EDIT in the bottom righthand corner.
From there, change the payment start date, end date and when/if the payment will repeat.
Click UPDATE to save those changes.
Click DELETE to delete that Recurring Payment.
Learn more about Payments and Recurring Payments.
To add a new Recurring Payment Credit, click the  and then select the Add Payment button
  .
.
From the "Select Payment" dropdown, choose Credit as the payment type.
Choose the appropriate Credit type from the dropdown menu, such as a bundle discount.
(To edit or add Credit Types, including editing a Credit Type to Recurring, visit the Credits section under Admin Utilities.)
Then select ADD CREDIT.
Click CONFIRM to confirm recurring credit.
Learn more about Credits and Recurring Credit.
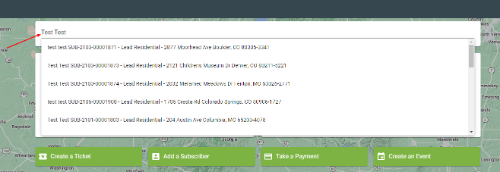
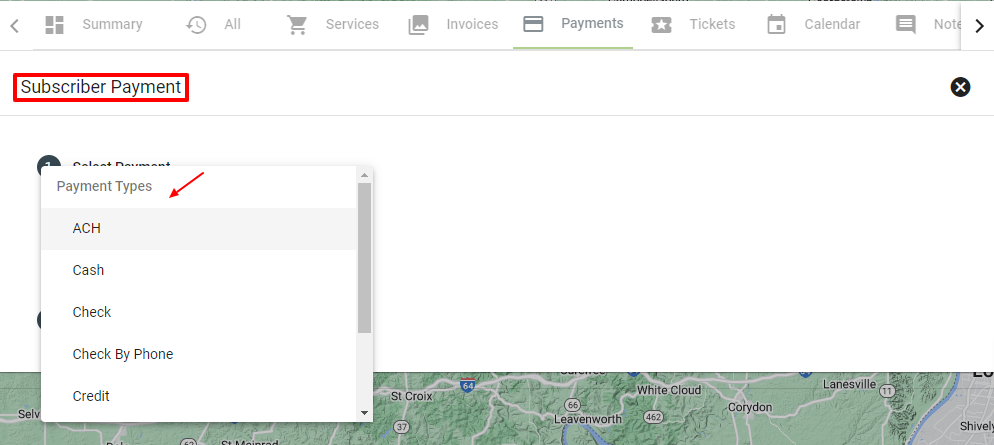
There are a couple of ways to add a payment. One, from the dashboard you can click on Take a Payment. Then type in the subscriber and click submit. That will take you directly to the Subscriber Payment screen.
The second way to add a payment is from the Subscriber Account Page. To add a new payment, click the FAB and then select the Add Payment Button .
Types of payments:
- ACH (electronic payment)
- Cash
- Check
- Check by phone
- Credit
- Credit Card
- Direct Deposit - This transaction type is recording a bank-to-bank transaction type and is not actually processing any payment.
Learn more about Payments and Taking a Payment.
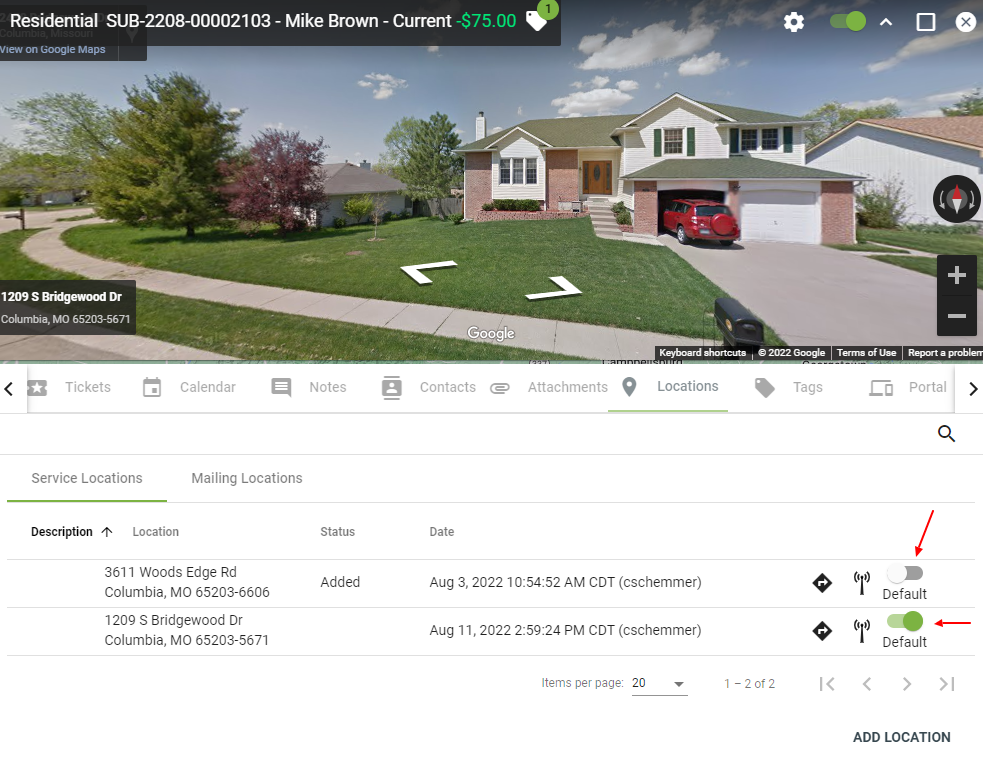
Navigate to a Subscriber Account Page, then click the Locations Tab. Here you will see separate tabs for Service Locations and Mailing Locations. A Subscriber may use a different location rather than their Service Location to receive their invoice/bill for example. Those addresses would be listed under the Mailing Location Tab.
Learn more about Subscriber Locations.
The Active Services Card is a handy card to have displayed because it shows the current services that are active on a Subscriber Account.
View the associated MAC address, serial number, IP address, Central Office, OLT and ONT.
Click on the highlighted text on an active services card to be redirected to the specific piece of Hardware. Hover over the highlighted text to view a description of the available actions.
If a service package has multiple pieces of hardware associated with it, one single active services card will display all of the packages' hardware.
Green- The Hardware is being monitored and is working correctly.
Red- The Hardware is not responding.
Yellow- The Hardware is still responding but is losing signal strength.
Gray- The Hardware is not being monitored.
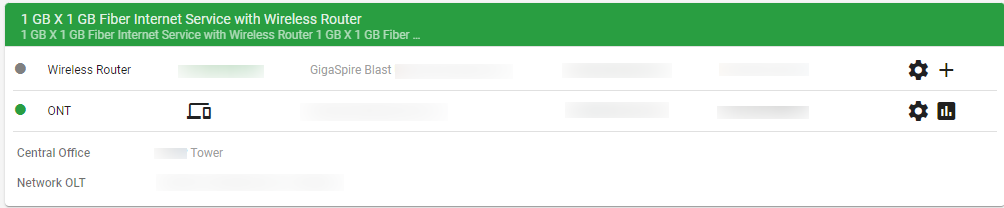
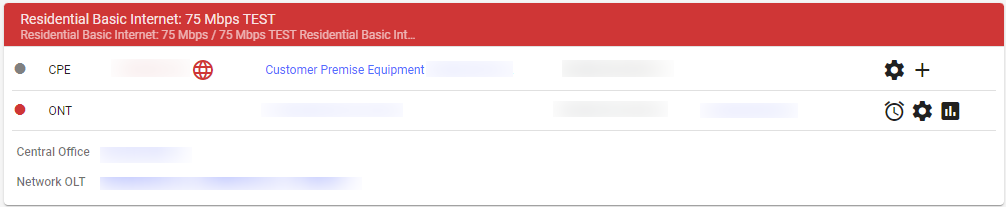

If you do not currently have the Active Services Card displayed on subscriber account pages, visit the Summary page to learn how to update and save card display.
Learn more about Active Services Cards.
Tags or overlays are an important piece of customer service and for call center employees to be aware of. They allow for employees to quickly see what events such as a network event is associated with a subscriber’s account. If a subscriber is associated with a network outage, the overlay on their account page would quickly alert the customer service representative. They can click on the network event to view more information, or they can click OK or SNOOZE this message for now. These features allow them to relay important information to the customer on the phone and keep quality customer service.
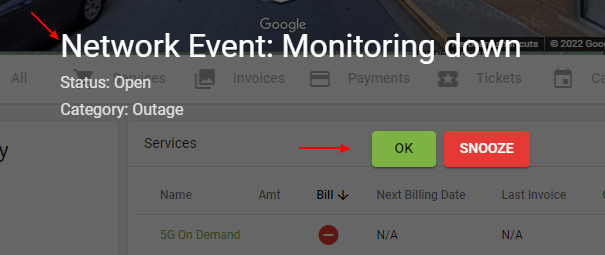
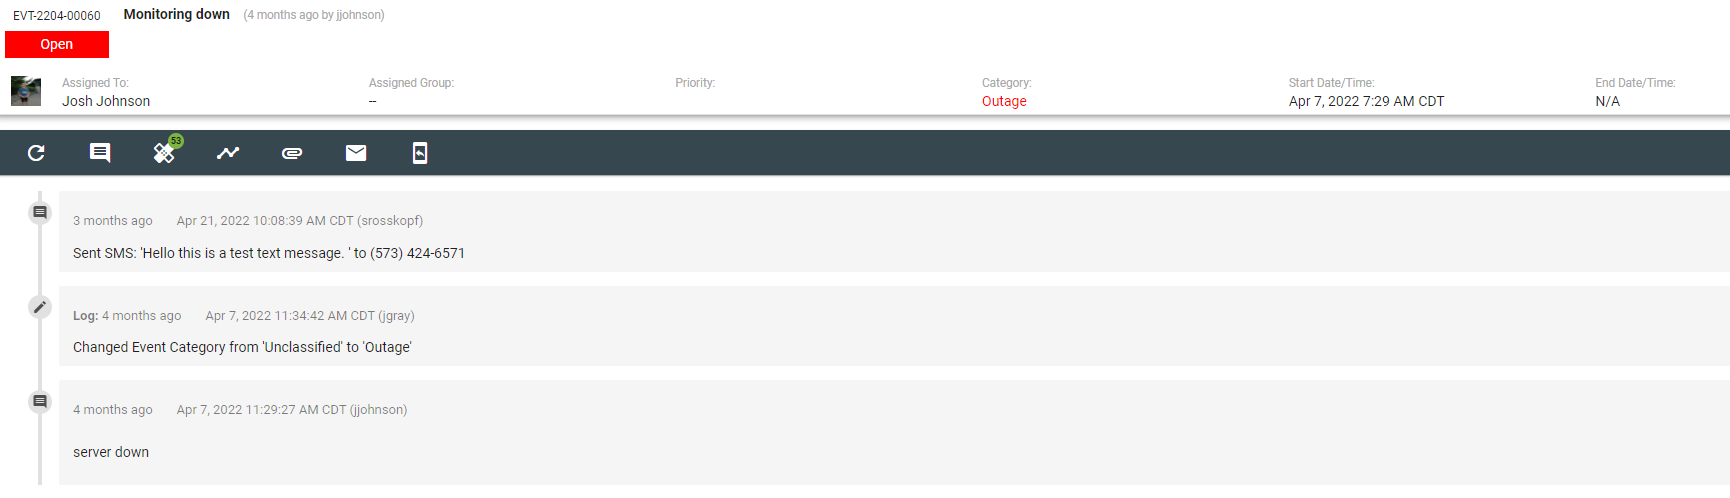

You can also view previous network events a subscriber has been apart of in the past by going to the All tab on their Subscriber Account page. Then when you have that customer on the phone you will have quick history to refer to.

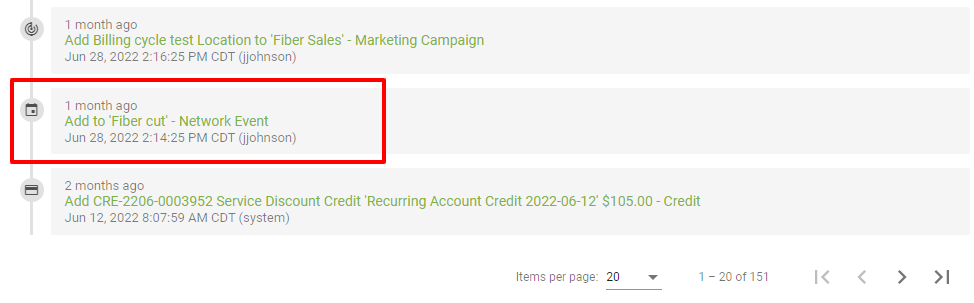
You can view tags associated with subscriber account by clicking on the Tags tab. Or if they do have a tag, it will be displayed on the top of their account page and it is clickable.
Learn more about Network Events and Tags.
If a subscriber moves location and is still in a service area, you can add their new service to their account and cancel their old service. They can’t carry their old service to their new location. Do not just edit their location under the locations tab on their account page.
Instead, you will need to close their old service at their previous location. Then you can add their new service to the new location.
Navigate to the Subscriber’s page.
Click on the FAB and select Add Service. It automatically brings you to step 2 Select Offer. Instead click into Step 1 Select Service Location. Do not select existing location, click Add New Location instead.
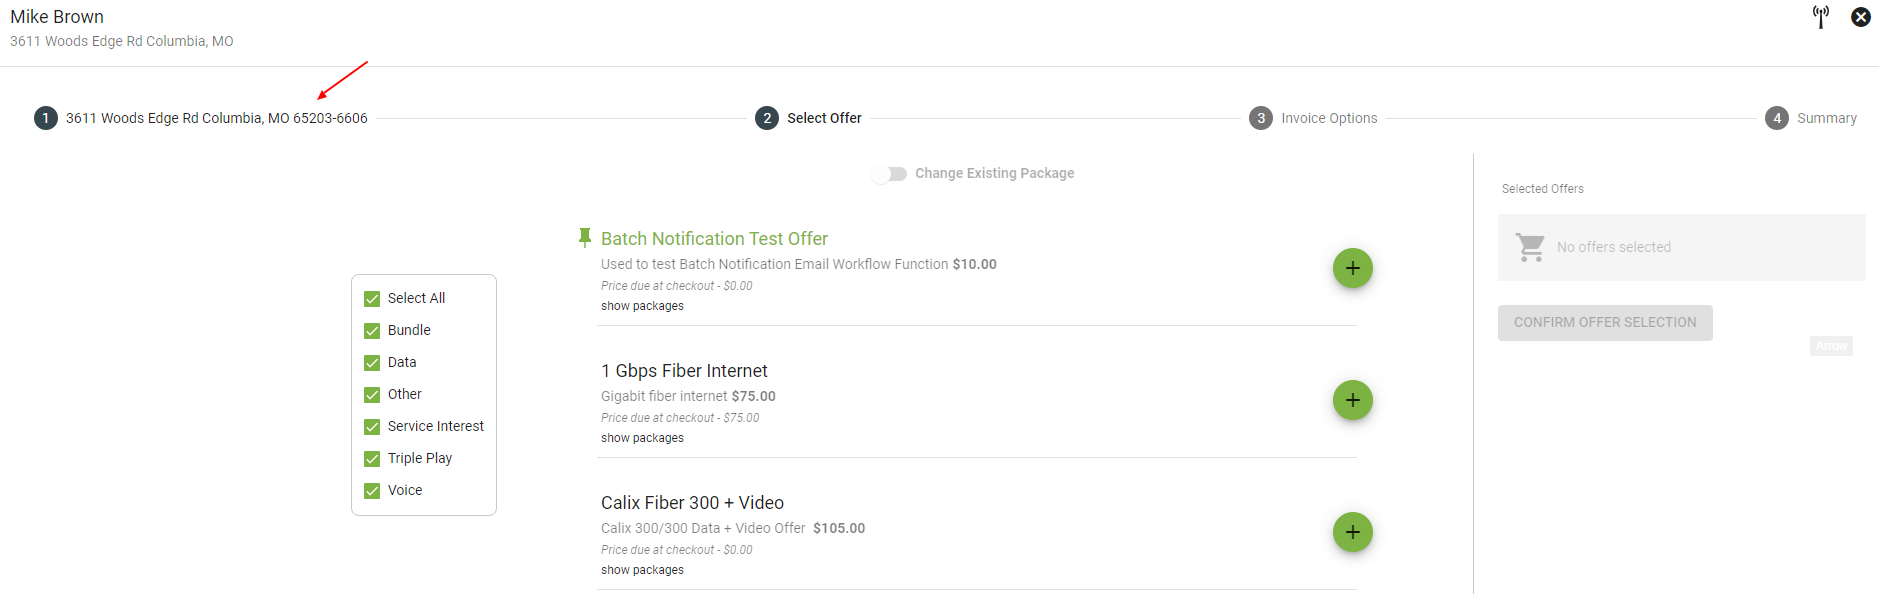
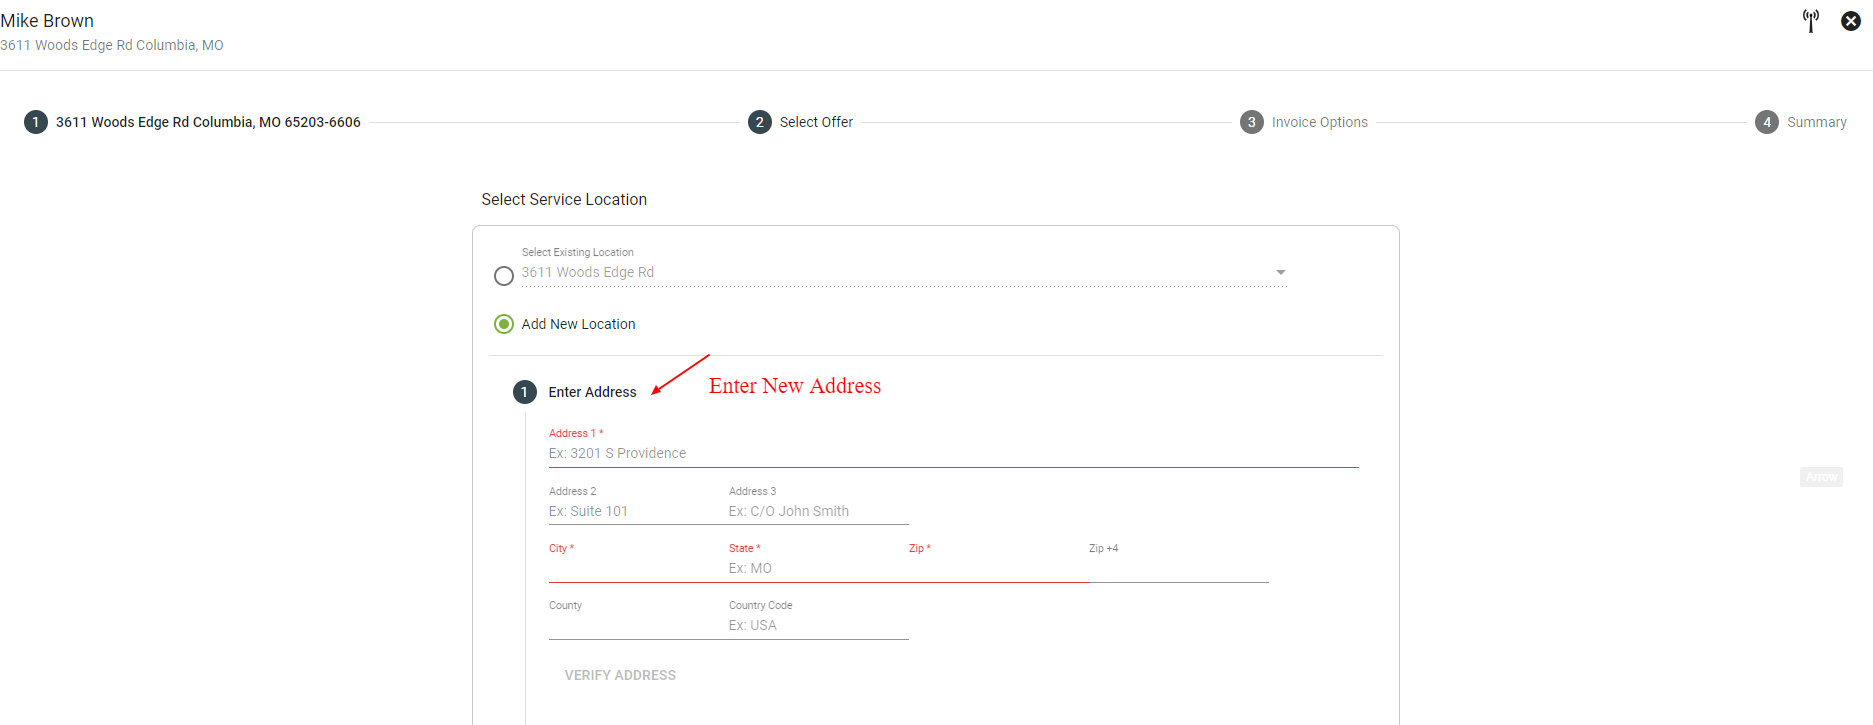
Verify the address and confirm rooftop location.
Then it will bring you to Step 2 Select Offer. Vision will show what packages are available at that new location. Select the new offer and then click CONFIRM OFFER SELECTION.
Choose invoice options and click CONTINUE.
Under the Locations tab, use the default toggle to select their new address.
Click the Open Workflow Process icon next to their previous service under the Services tab. Click the FAB in the lower right to start the package's cancel service workflow.
Learn more about Subscriber Services.
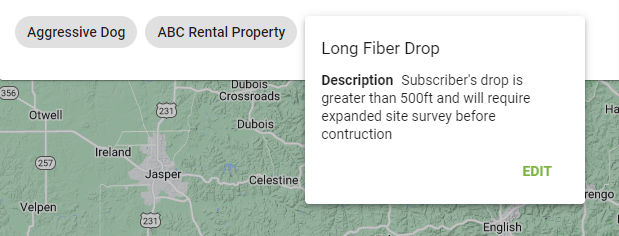
To move a location pin, navigate to the Subscriber’s Account Page and select the Locations Tab. Once on the location page, select the location and click the survey tab. Using the map, drag the pin to the correct rooftop. You’ll be prompted to confirm you want to save the coordinates to the new location, select YES.
Subscriber’s Page > Locations Tab > Select Location > Survey Tab > Satellite View > Move Pin
Learn more about Subscriber Locations.
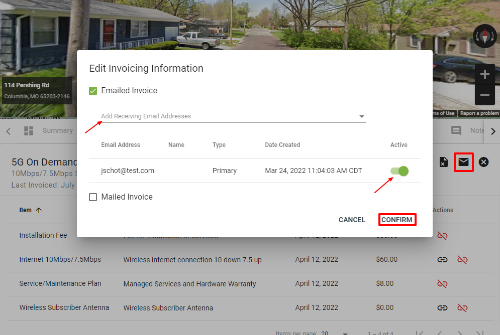
Customer Account > Services > Click into Current Service > Edit Invoicing > add or deactivate email address> COMFIRM
To edit a customer’s invoice information, like their email address, navigate to their account page. Then select Services and click into their current service. From there click on the email icon in the upper right-hand corner to Edit Invoicing Information. You can add a new email address to receive invoices going forward. Be sure to click CONFIRM. You can deactivate old email addresses and add more than one active email addresses.
Learn more about Invoicing.
Checks can be added straight to the subscriber’s account individually through the Add Payment button.
Subscriber Account > Click the FAB > Take Payment Button
Or, if a stack of checks needs to be processed in mass, the following section of Vision will be helpful.
Operations > Billing > Check Processing
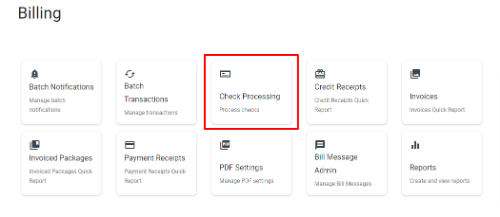
Learn more about Billing.
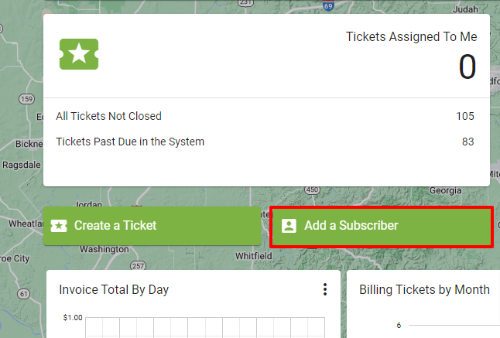
You can add a new subscriber directly your Vision Dashboard by clicking on the Add a Subscriber button. This is a quick way to add a fiber Internet Subscriber when you do not need to double check visuals on the map or line of sight for wireless Internet service.
When adding a new subscriber for wireless, we recommend using the Line of Sight Tool on the homepage to search for the location and place a pin on the desired location. From there you can click the 
Learn more about Subscriber Onboarding.
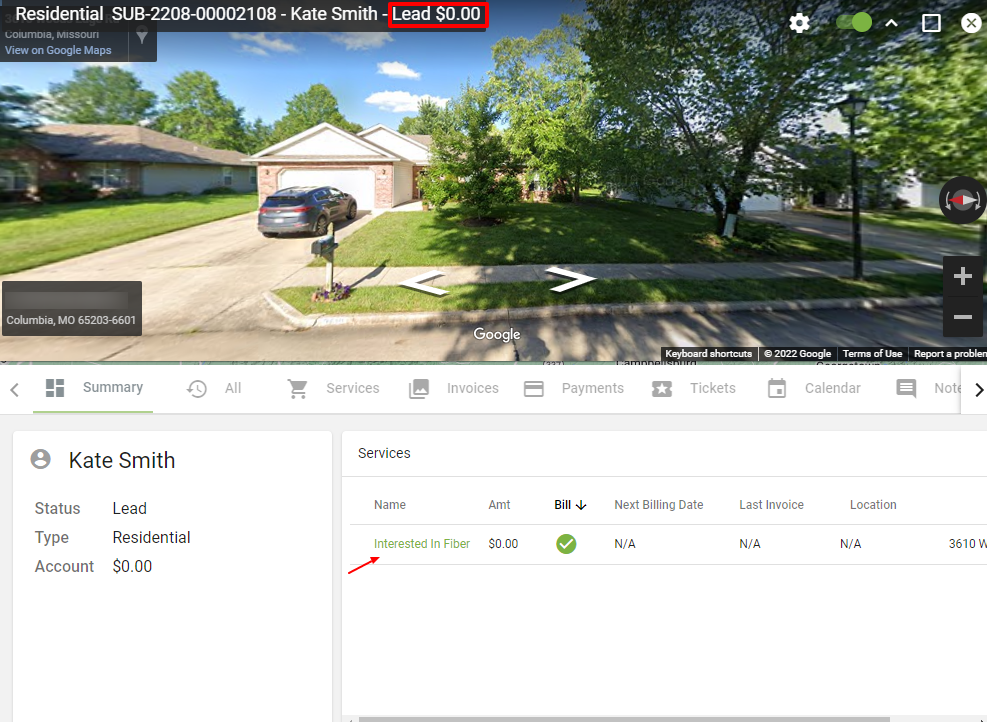
To enter a lead into the system, follow the same steps as adding a new subscriber. Either enter their address or add their location via the map. However, you will want to sign the lead up for an interest package that is $0.00 at checkout. This will allow you to input the lead’s information. Their subscriber status at the top of their subscriber account page will be displayed as Lead.
Learn more about the Acccount Page.
You can add a new service item from the Subscriber’s account page. Confirm the location, select the offer, select the invoice option, and click CONFIRM OFFER SELECTION.
Subscriber Account > FAB > Add Service Button
Learn more about Subscribers Services.
From your Dashboard search for the Subscriber and choose the correct account. Once on the subscriber account page, use the arrows to find the Contacts tab.
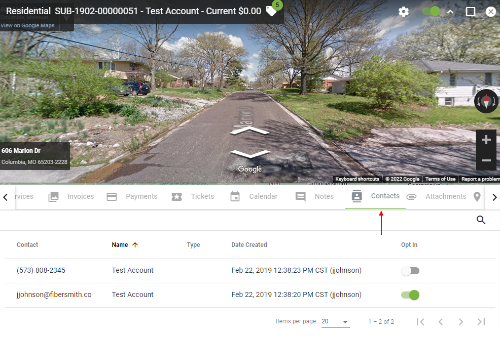
To add a contact or contact type, click on the FAB and select Add Contact. Be sure to click SUBMIT when finished.
Note that adding a new email contact here does not mean that going forward that new email address will receive invoicing.
Learn more about Subscriber Contacts.
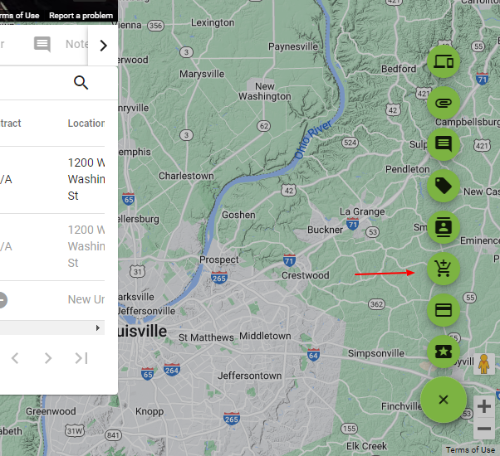
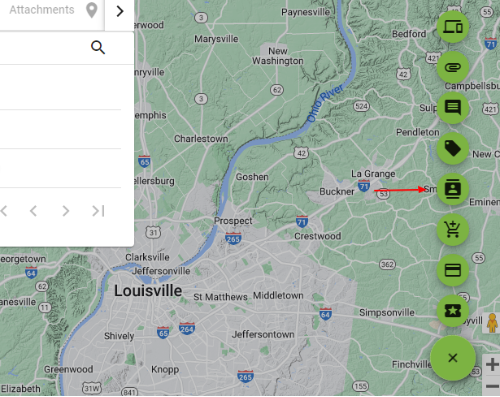
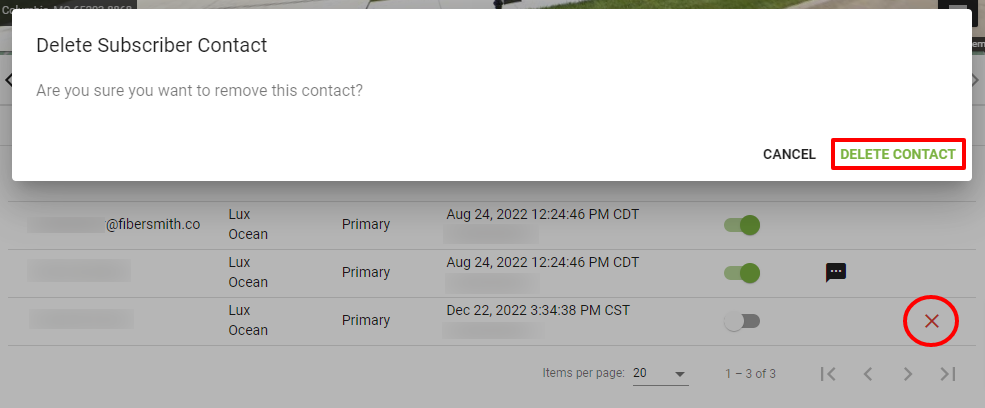
Navigate to the Contacts tab on a Subscriber’s Account Page. Click  to delete a Contact. The default Contact may not be deleted if there is only one contact method or the Contact is tied to billing information.
Learn more about Subscriber Contacts.
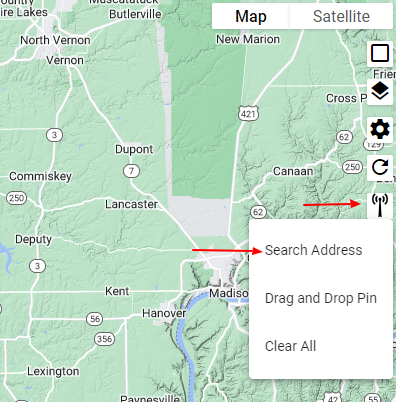
There are a few quick ways to check an address for service:
1 - From the Dashboard view, click 
2 - From the system's base Map, click on the 
3 - From the system's base Map, click Satellite and then click on the
Learn more about Subscriber Onboarding.
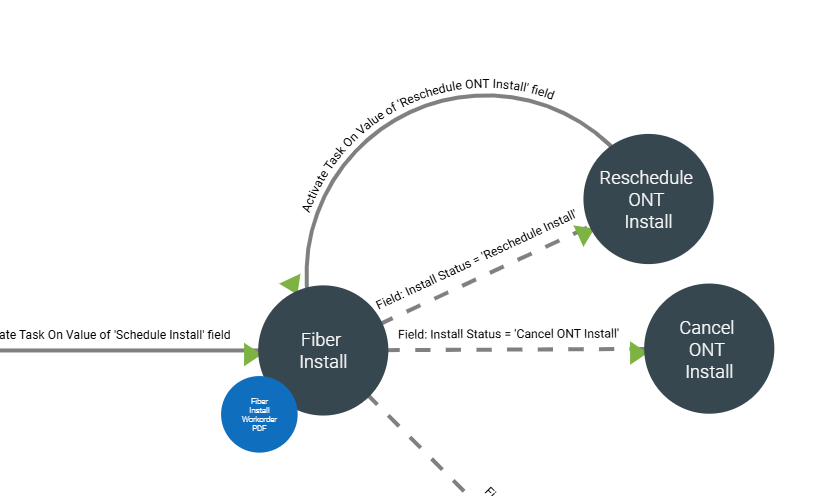
The turn up process of a service is managed by Workflows in the system.
To schedule an installation of service, open the 
Go to the Schedule Install task.
Click on the 
Select an available time slot.
The schedule install is usually handled by a task. Learn more about tasks here, or see an example of the turnup workflow.
There are a few options in regard to rescheduling an event or appointment on the calendar such as an install or dispatch.
1. Tools for rescheduling will be built into a task in a workflow.
2. Tools for rescheduling will be built into a dispatch workflow through a troubleshooting ticket.
3. Manually from the calendar you can adjust the event date. This will be the least common option, as most rescheduling events will be driven through the workflows.
Since workflows typically schedule events you will want to look into building in "reschedule" tasks in your workflows where something could delay the completion of a workflow.
To upgrade or downgrade the speed package on a customer's account, go to the 
Select 
Select the Change Existing Package toggle button to select the current speed package needing the upgrade/downgrade.
In the list of available packages, click the + button to select it to the cart. Then click CONFIRM SELECTION.
Depending on your company's Workflow process, the system will go through the predetermined steps to changing the package and invoicing.
Learn more about Changing a Service.
To cancel a customer's account, first navigate to the customer's Subscriber Account page using the search tool.
Click on the Services tab.
Click on the 
Click the 
Select the X to start the Cancel Subscriber Package Workflow.
Follow the workflow steps to complete cancellation.
Learn more about Canceling a Service.
To email a payment receipt from the system, first pull up the customer's account page using the search tool.
Go to the Payment tab.
Under the Payments section. Click into the specific payment line to view more details.
Select the 
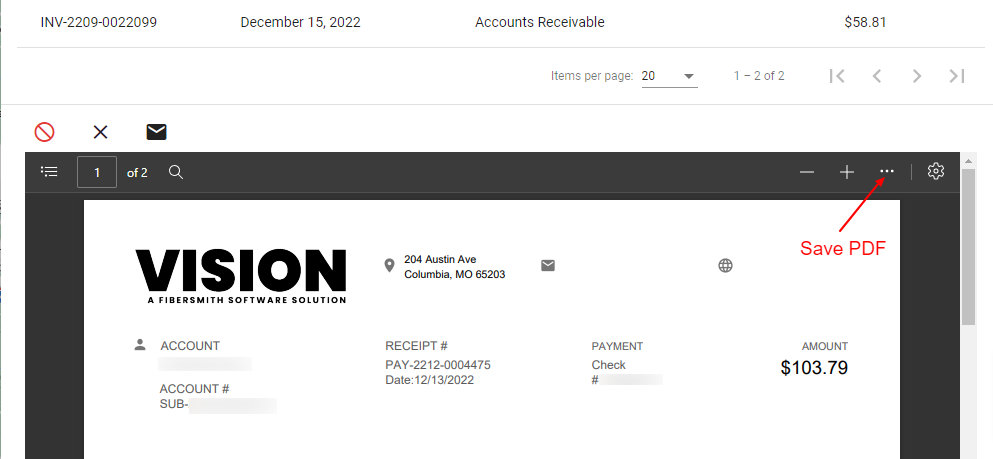
Click the 
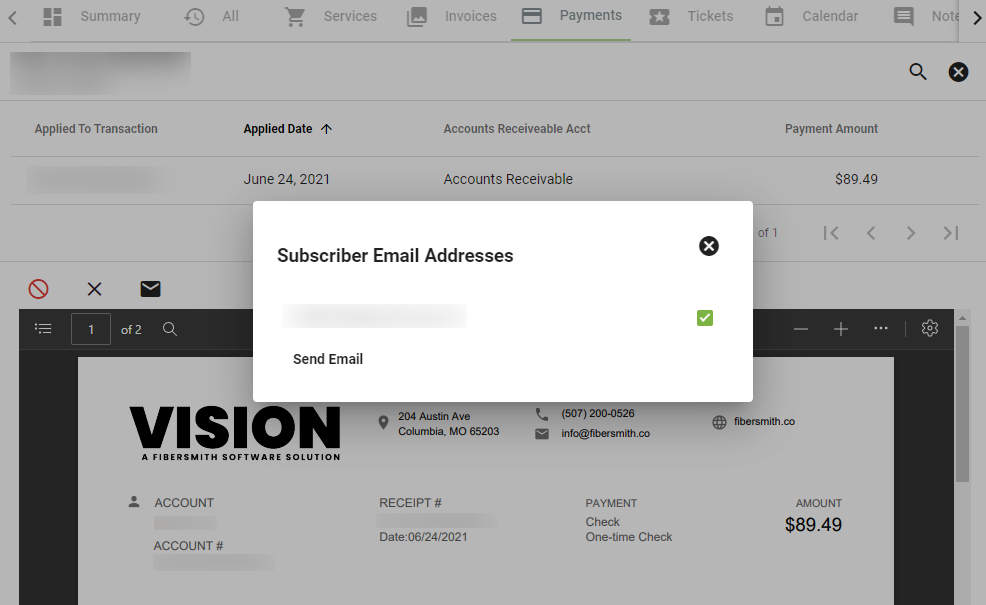
You can learn more specifically about payments in their receipts on the Subscriber Payments page.
For a full history of a customer's lifecycle, it is important to understand all contacts with a customer. The majority of service providers want to be able to report on the amount and types of calls coming in from their subscriber base.
A quick way to document the call is to Create a Ticket.
Navigate to the subscriber’s account. Click the FAB and select Open Ticket.
Or click the Create a Ticket button from your dashboard. Enter the subscriber’s name and click SUBMIT.
Grab a template for quick addition of pre-set comment options. Or add your own details.
Select ADD TICKET. Depending on the situation of the call set a ticket due date to follow up with the subscriber or close out the ticket if no further actions is needed. The better the notes in the ticket will help next time someone talks to the customer.
Learn more about Creating a New Ticket.
Search for and select the applicable subscriber, then click the + button in the bottom right hand corner. Click the Add Portal User button.
Select an email address from the dropdown menu or click Add New to add a new email address. Edit the username if necessary and then click ADD DETAILS to add the user. Input a password and then click ADD DETAILS. Input the user details, including the user name and phone number, then select the subscriber’s name from the Subscriber Name search field. Click ADD USER to add the new user to the portal.
More instructions found on the Subscriber Portal page.
First navigate to the Subscriber Account. Then click on the Locations tab. Then click on the Mailing Locations tab. Then Click ADD LOCATION.

In this case, skip step 1 and click SKIP.
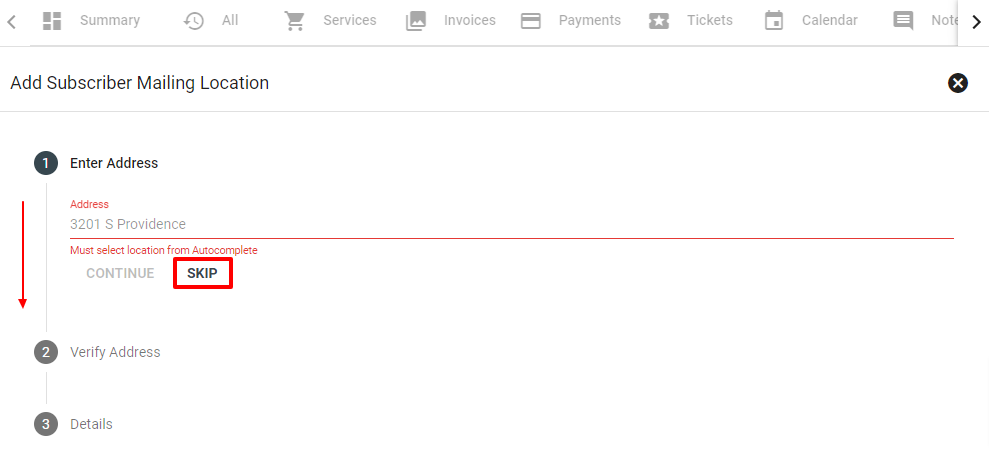
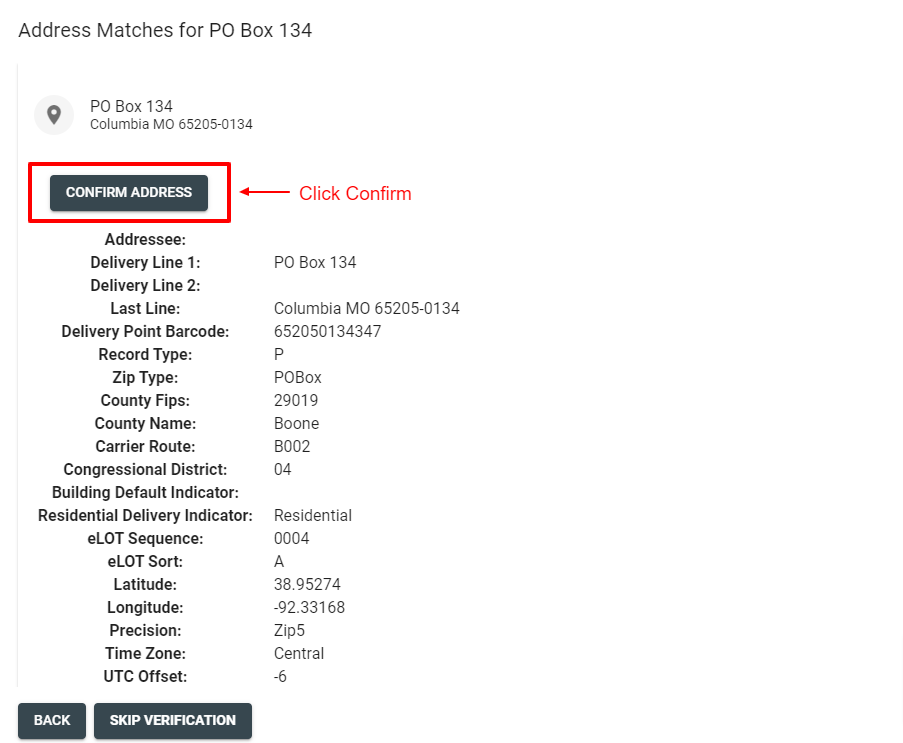
Enter the PO Box in the address line in step 2. Select VERIFY.
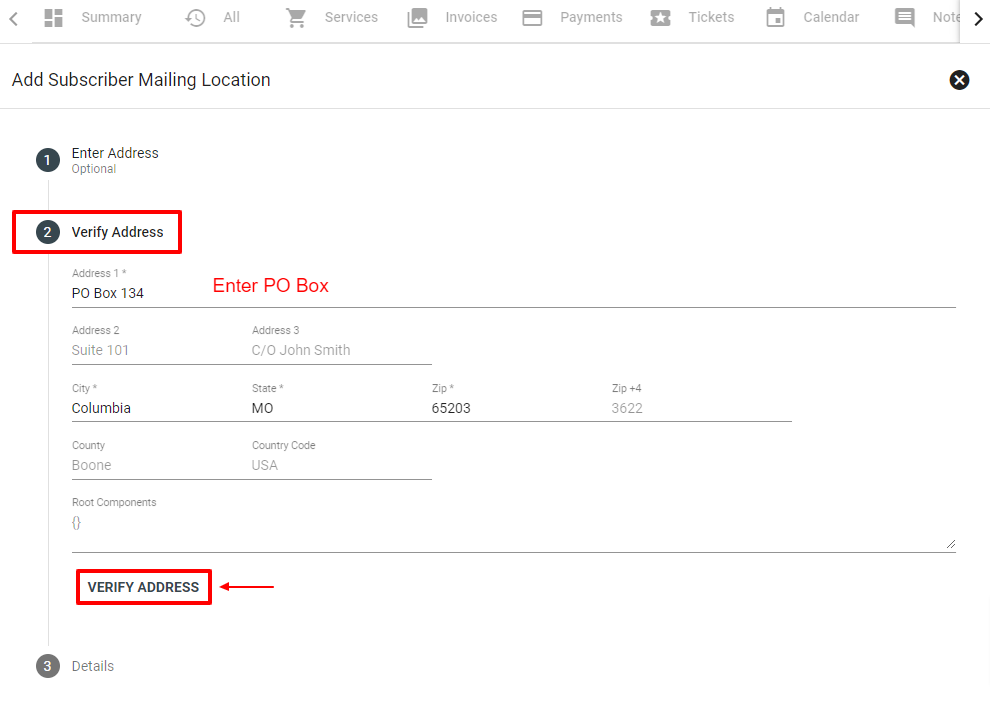
Then click the PO Box.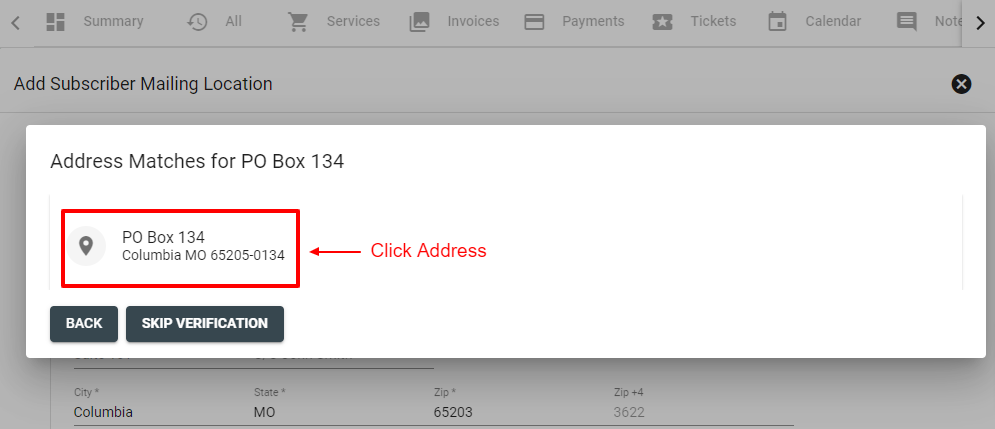
Click CONFIRM ADDRESS.
Add a description and click ADD LOCATION.
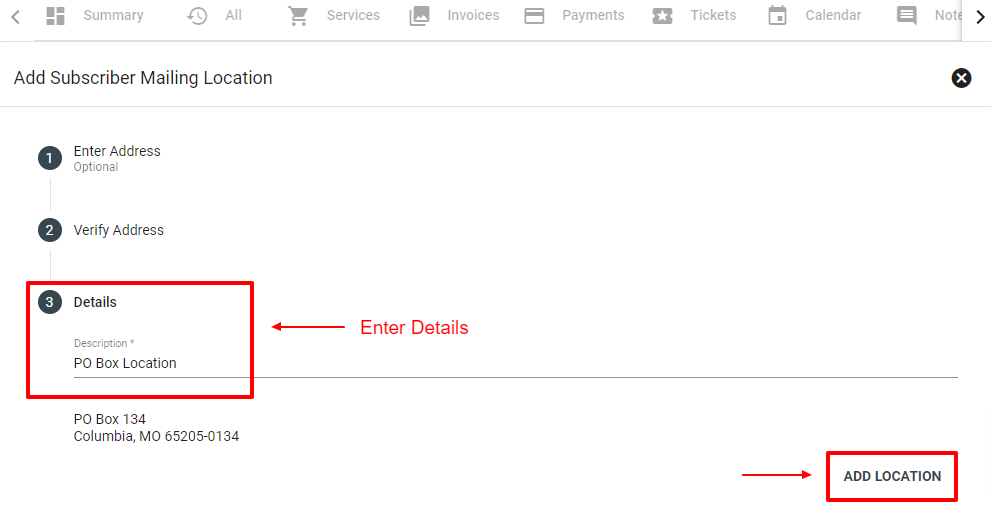
Learn more about Subscriber Mailing Location here.
Navigate to the Subscriber Account Page. Then click on the Invoices tab.
Click on an Invoice to view more information.
Below the Invoice ID you'll see the Invoice Date, Due Date, and the Subscriber's Location. Invoice details include the associated package, line items, billing start and end, quantity, rate, and amount.
Learn more about Subscriber Invoices.
To open a trouble ticket while on a subscriber's account, select the 

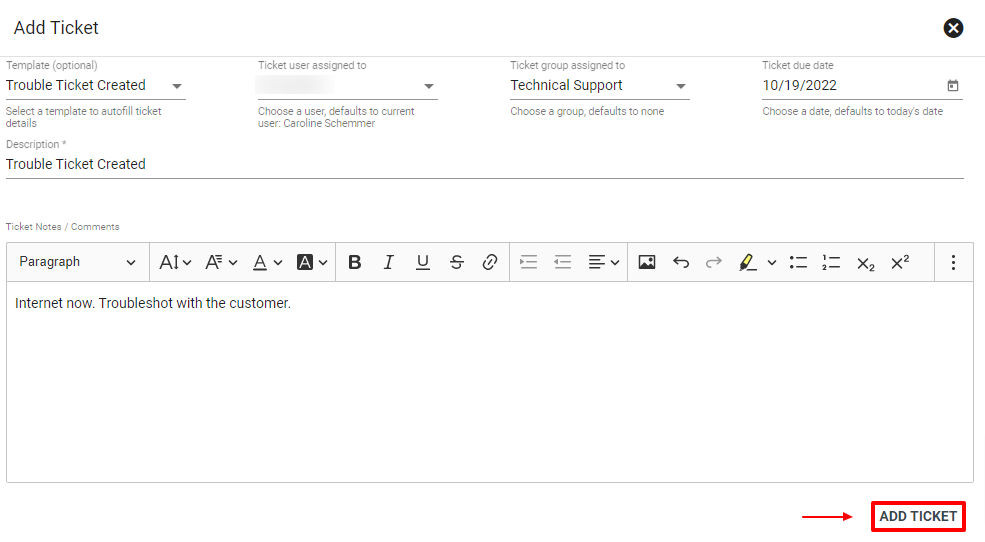
From there you can fill in the details under the Add Ticket page. You can choose an existing template if you have pre-configured templates. Assign the ticket to a Vision User and a due date. Enter a description and any relevant ticket details in the ticket notes field.
Select ADD TICKET at the bottom right corner to add the ticket.
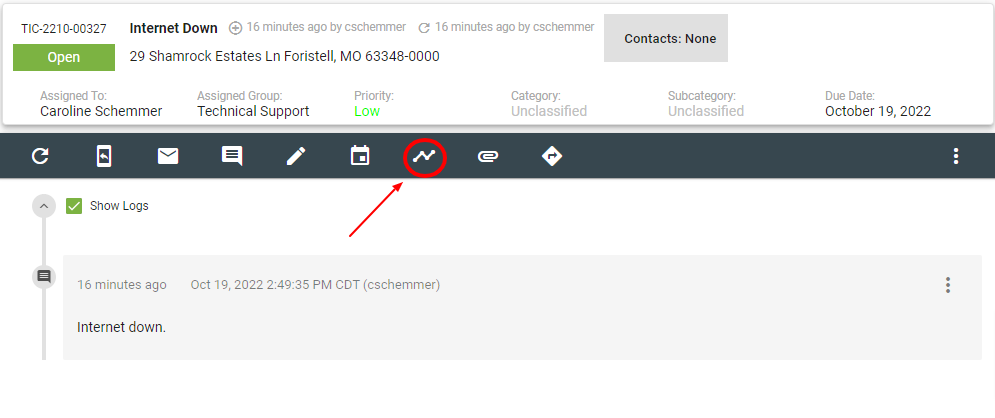
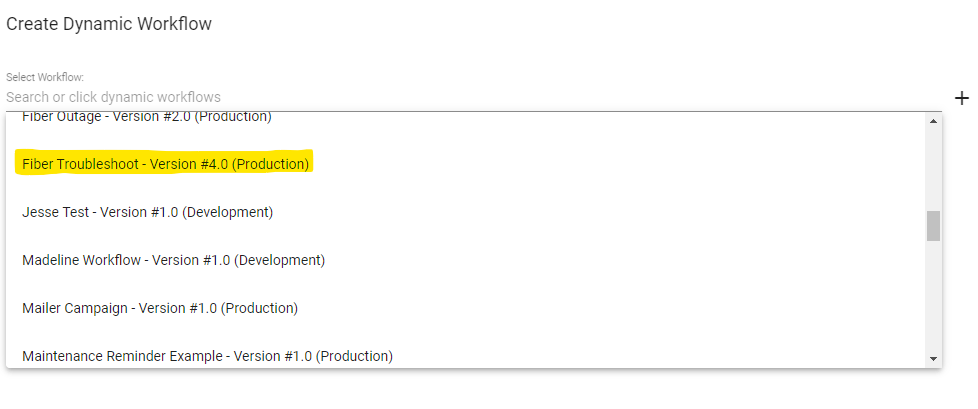
Then click the workflow icon to launch a Dynamic Workflow. Select a workflow from the drop down. For example, if the customer has fiber internet that is down I would select the appropriate workflow to help troubleshoot the situation.
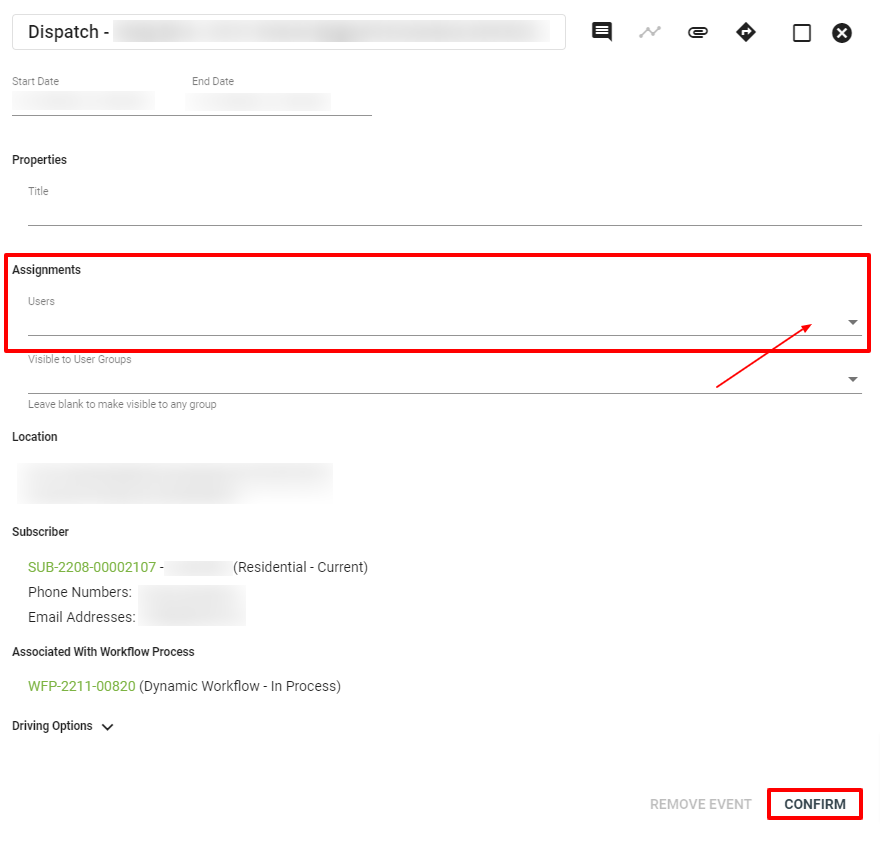
Then you can walk through the tasks of the workflow, for example verify ONT power. If the issue can not be resolved, it will lead you to schedule a dispatch.
Learn more about Tickets.
To change the assigned user on an assignment or task, go to the Main Menu icon in the upper-left hand corner and click on Calendars. Find the event you want to modify. Then you can click the drop down menu and change the assigned user. Then click CONFIRM.
If you are needed to change a specific subscriber event, you can navigate to the Subscriber Account and click the Calendar tab to view only events associated with that subscriber. From there find the event you want to modify. Then you can click the drop down menu and change the assigned user. Then click CONFIRM.
Note, if there is already an assigned user, you can click the red X to delete that assignment.
If a workflow process is no longer valid to be worked through to standard completion, build out available "OFF RAMPS" in your workflows to track where the process needs to end. If you need assistance create support ticket with support@fibersmith.systems.
Learn more about Workflow Processes and their Components.
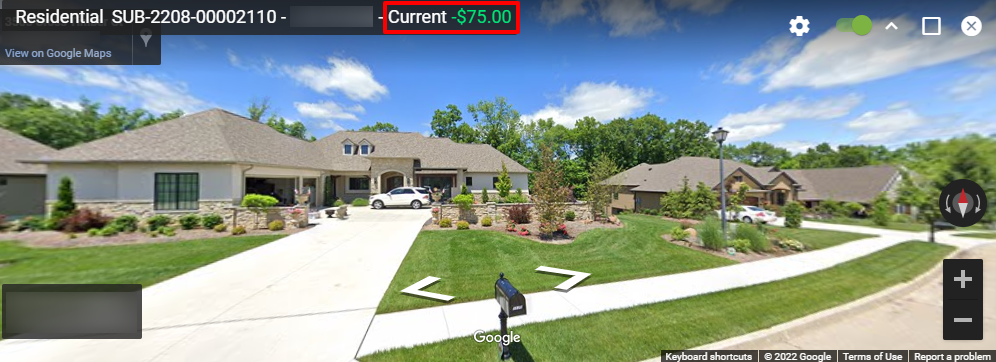
When a subscriber is a current customer, their subscriber status will show “Current” on their Subscriber Account page. That status is located at the top of their Subscriber Account Page.
On the Active Services Summary Card, the active service will be lit green.
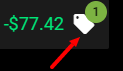
If a subscriber is past due on their bill, their status will change to “Delinquent.”
If a subscriber is hard disconnected, their status will change to “Collections” or “Past.” The Active Services Card will be red or no longer available.
Learn more about Subscriber Statuses and the Active Services Summary Card.
The Portal tab on the Subscriber Account page allows you to manage a specific Subscriber's Portal. Resend the verification email, change the password or add a Subscriber to the account from this tab.
Click here to view specific Portal Troubleshooting Questions and answers.
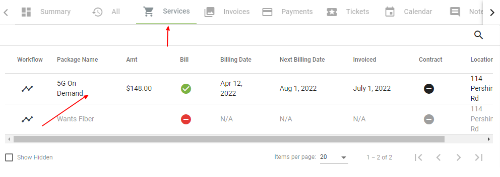
To check a subscriber's purchased internet speed, first pull up the customer's account page using the search tool.
Click on the Services tab.
View the Package Name section to see what internet package they purchased.
Click on the internet package name to view additional details.
Learn more about Subscriber Services.
To schedule a dispatch out to a subscriber's location, choose the Menu button in the top left of the screen, and then Calendars.
Once in the calendar interface, click the view menu, displaying Month by default.
Choose Schedule Dispatch from the drop down. This will display all available dispatch timeslots on the calendar.
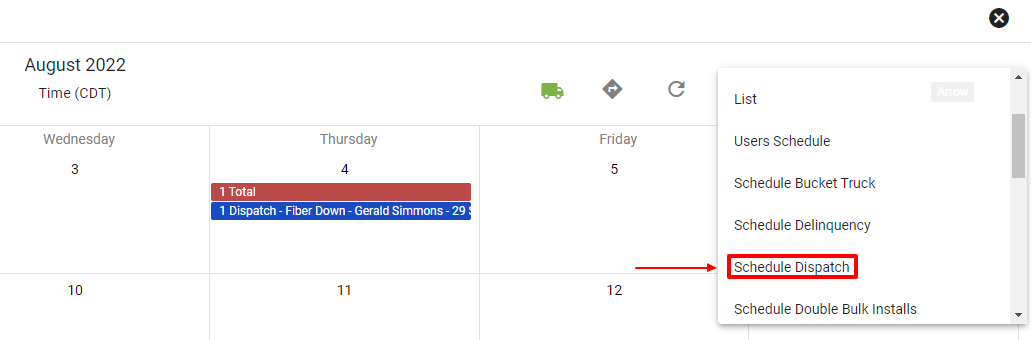
Click a dispatch timeslot and fill in each text field to complete relevant dispatch details.
Click CONFIRM to add your dispatch event to the calendar.
Learn more about Calendars.
To easily see tasks assigned to you and your group, click the assigned to you
Learn more about Workflows here.
Working your tickets and tasks will allow the system to best work for you. To begin your day, look for tickets and tasks assigned to you.
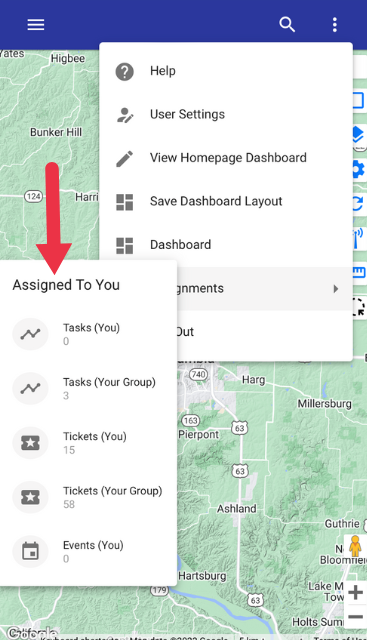
From a mobile device, navigate to the home page. In the upper right-hand corner, tap on the 3-Dot Menu. Select Assignments next to the person icon. Then tap Tasks or Tickets where You are assigned. Then you will be brought to a list view of all Tasks or Tickets. Or you can select Events and you will see a list of your calendar events for the day.
Or you can tap the 3-Dot Menu and select Dashboard. From the Dashboard you can view the number of Tickets and Tasks that are assigned to you. Tab on Tickets Assigned to Me or Tasks Assigned to Me to view a list of your tickets or tasks.
Learn more about Field Techs and Mobile Navigation.
In the upper left-hand corner select the Main Menu (Hamburger Menu). From there tab the Calendars option.
Tap to filter or change the calendar displays.
Tap an individual calendar event to view more details.
Tab the FAB in the lower right-hand corner to schedule a new calendar event. Fill in the details and tap CONFIRM.
Learn more about Field Techs and Mobile Navigation.
Getting your day started and finding your tasks easily is important. It is also convenient to have ‘drive time and directions’ at your fingertips. There is a couple of ways to easily do that. If you are viewing the calendar dispatch event, you can click on the 

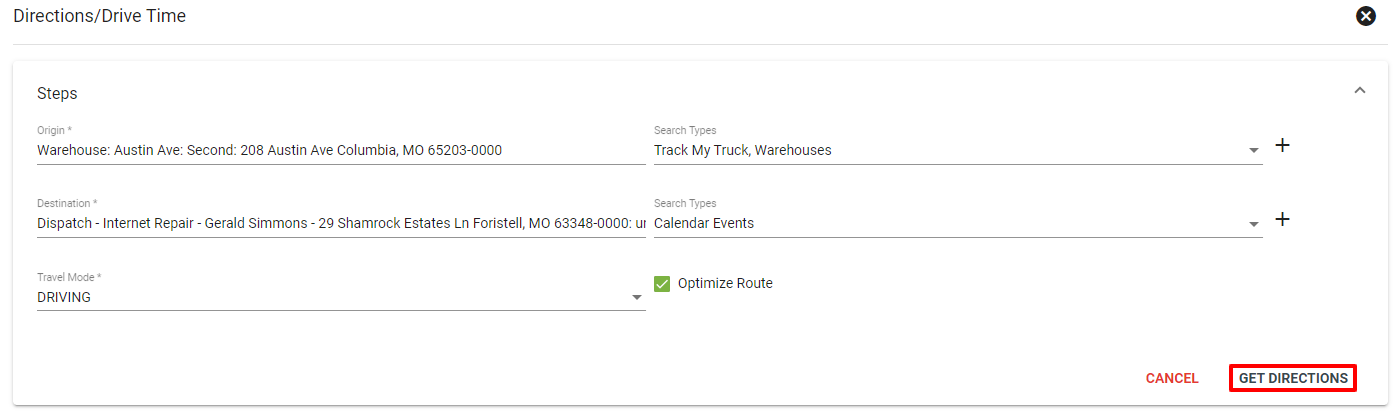
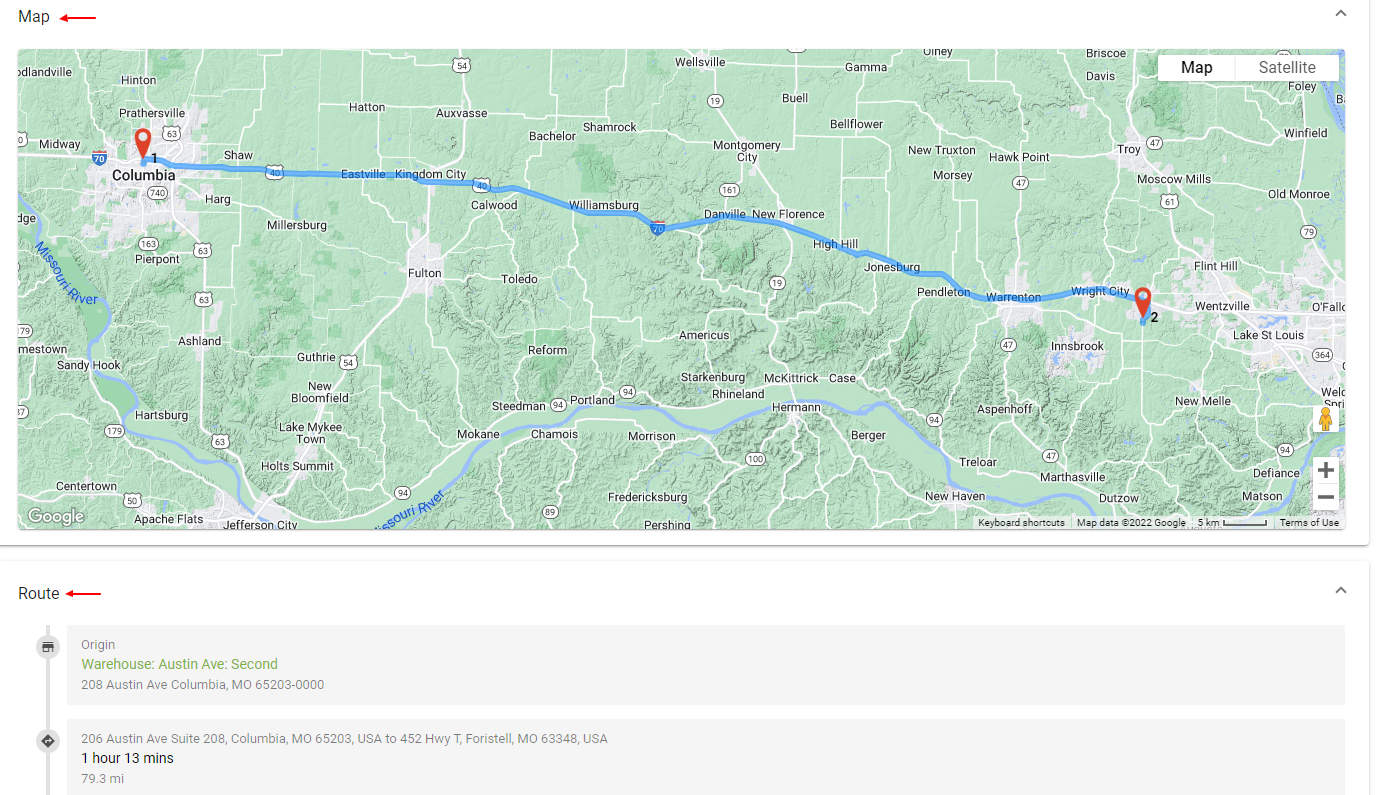
Or you can click into a task and view driving directions. Click the
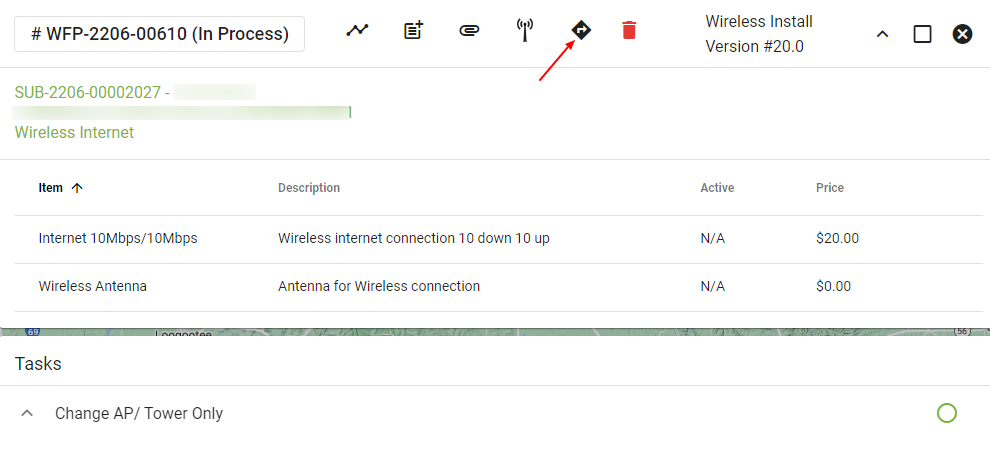
Learn more about Vision's use of Track Your Truck.
Admin Utilities > Credits > FAB
Click in the lower right-hand corner of the Credit Types page.
Enter a customized name, then click ADD.
Select the attributes that you would like to be associated with the new Credit Type. Be sure to select Active if you want this credit to be live.
Once done, click SUMBIT.
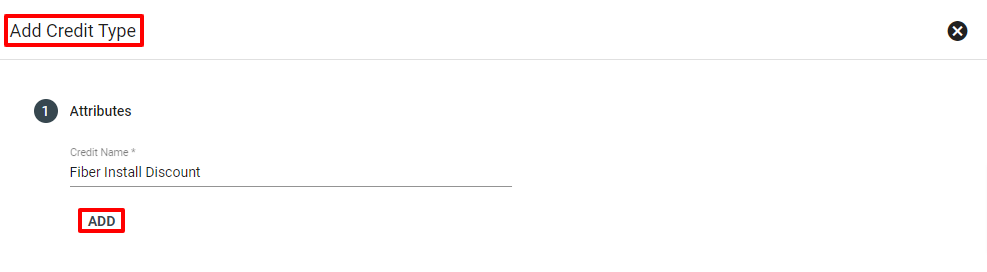
Learn more about Credits.
Network > Events > Click the FAB
There are several ways to create a network event.
One way is from the Main Menu then selecting Network.
Then select Events.
From there click the FAB and Add a Network Event.
Add a Description such as Tower Outage. Add any Notes or Comments and Click ADD EVENT.
Then you can click into the event you just created and add any associated workflows and subscribers. From there you can also send batch email and texts to associated subscribers.
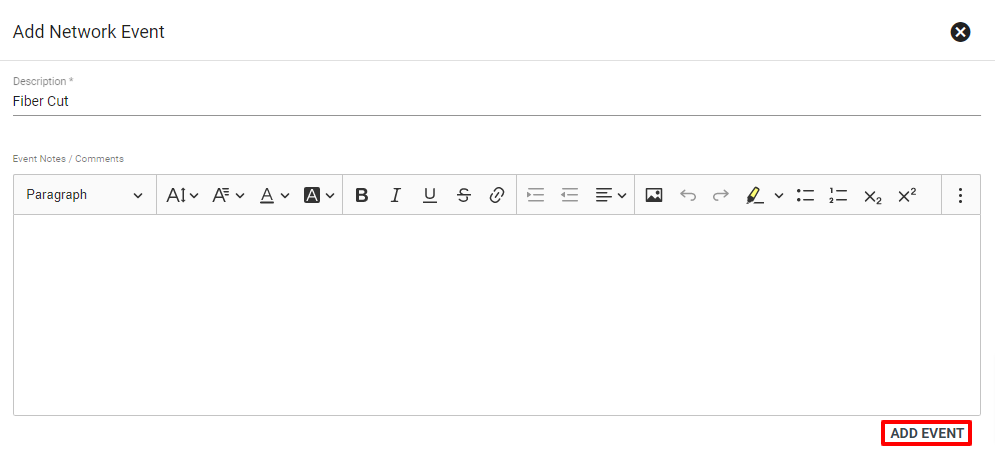
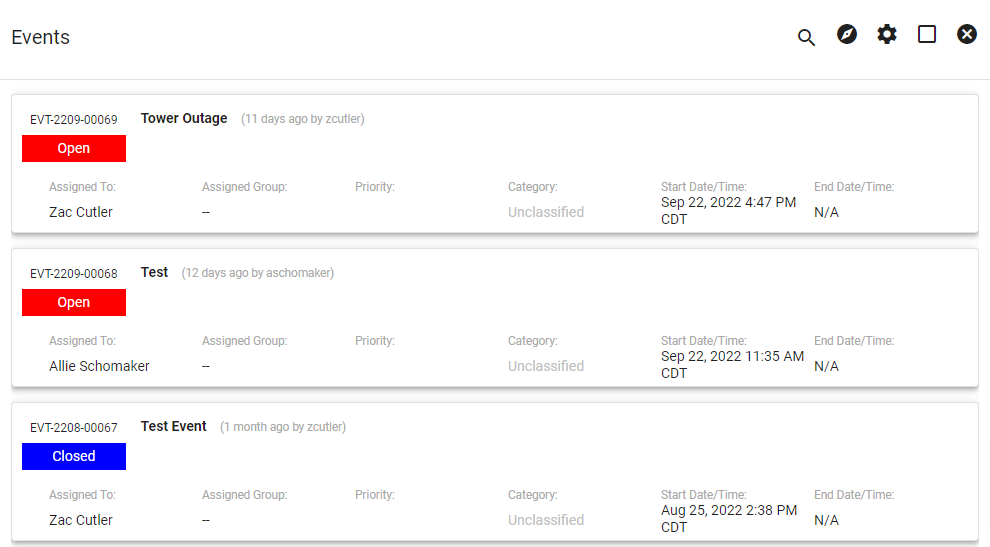
Learn more about Network Events.
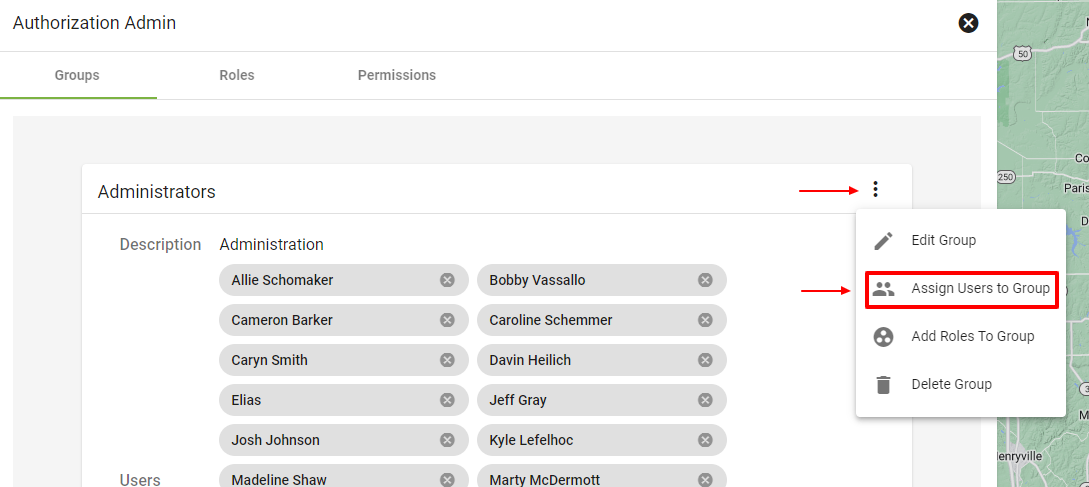
As you are onboarding your team into Vision, you will want to make sure users are assigned to the correct roles. The permissions set on the Authorization page will give access to your employees to be able to view certain items in Vision.
To assign Users to a group:
Menu > Admin Utilities > Authorization > Click on the 3-Dot menu in the Group > Assign Users to Group
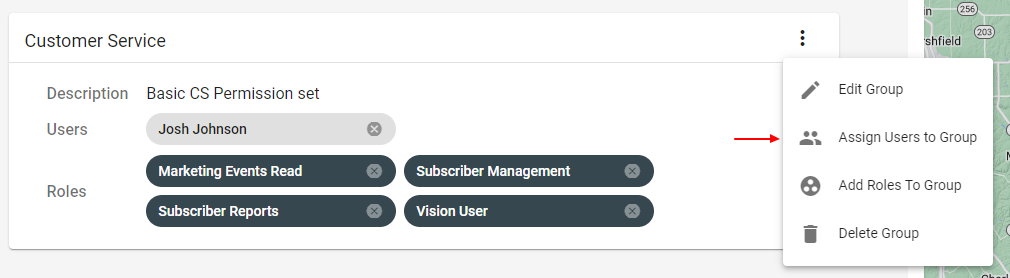
Learn more about Authorization and Users.
There are two options to update the location of a pin.
1. Admin Utilities > Locations > Search for Location to Edit
2. Subscriber’s Page > Locations Tab > Select Location to Edit
Once on the location page, select the survey tab. Using the map, drag the pin to the correct rooftop. You’ll be prompted to confirm you want to save the coordinates to the new location, select YES.
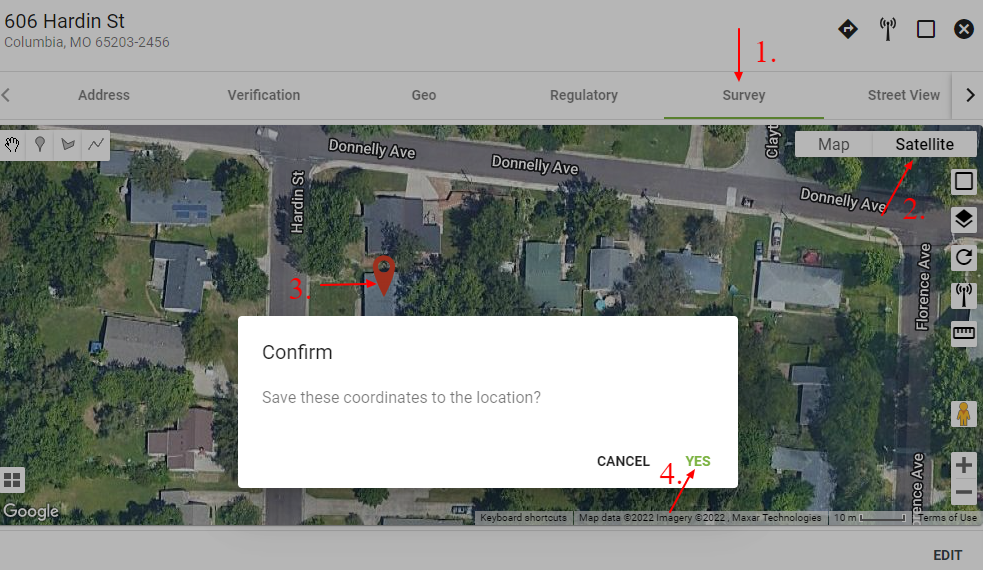
*Note that you do not need to click the Edit button, just the survey tab and then move the pin.
Learn more about Locations.
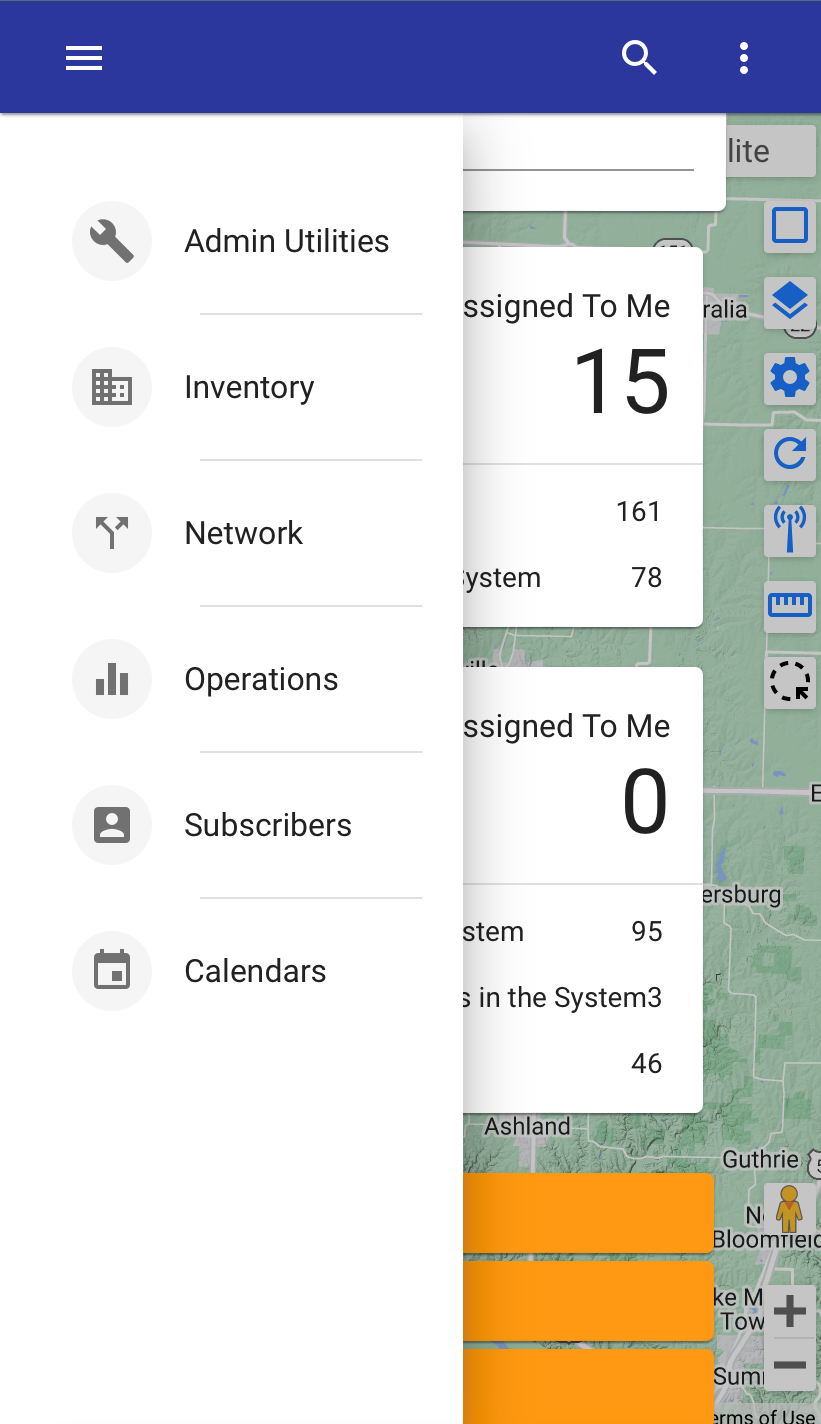
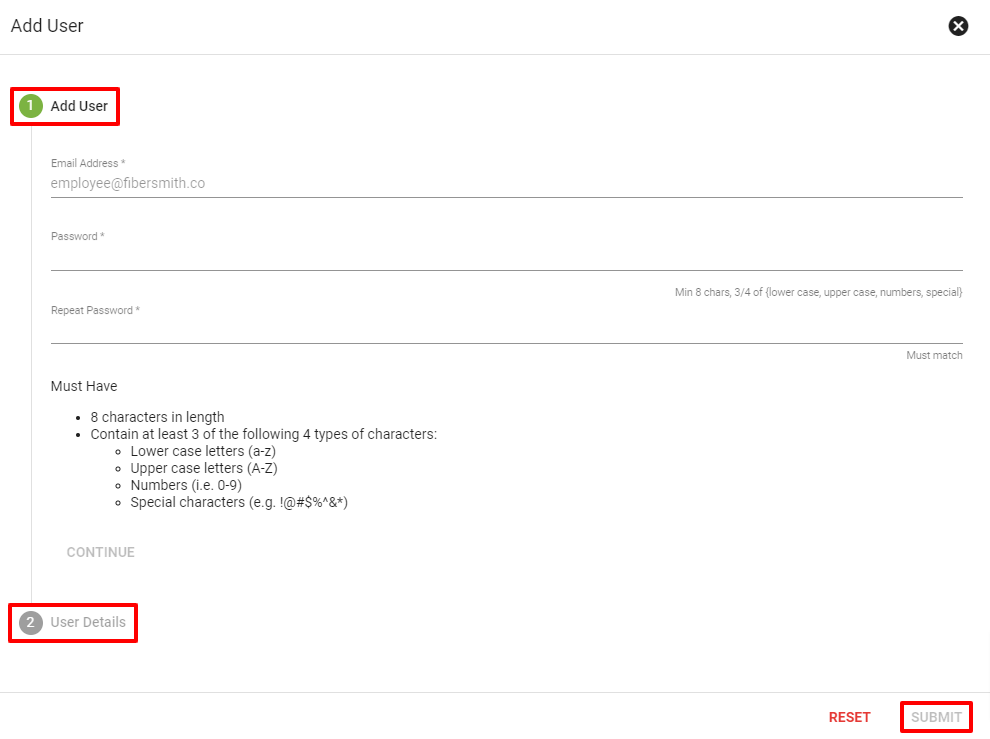
To setup a new employee in Vision, click the menu button in the top left of the screen, then select Admin Utilities.
Click Users.
Click the FAB in the bottom right-hand corner.
Enter their valid email address and password (they will be able to update their password later), then click SUBMIT.
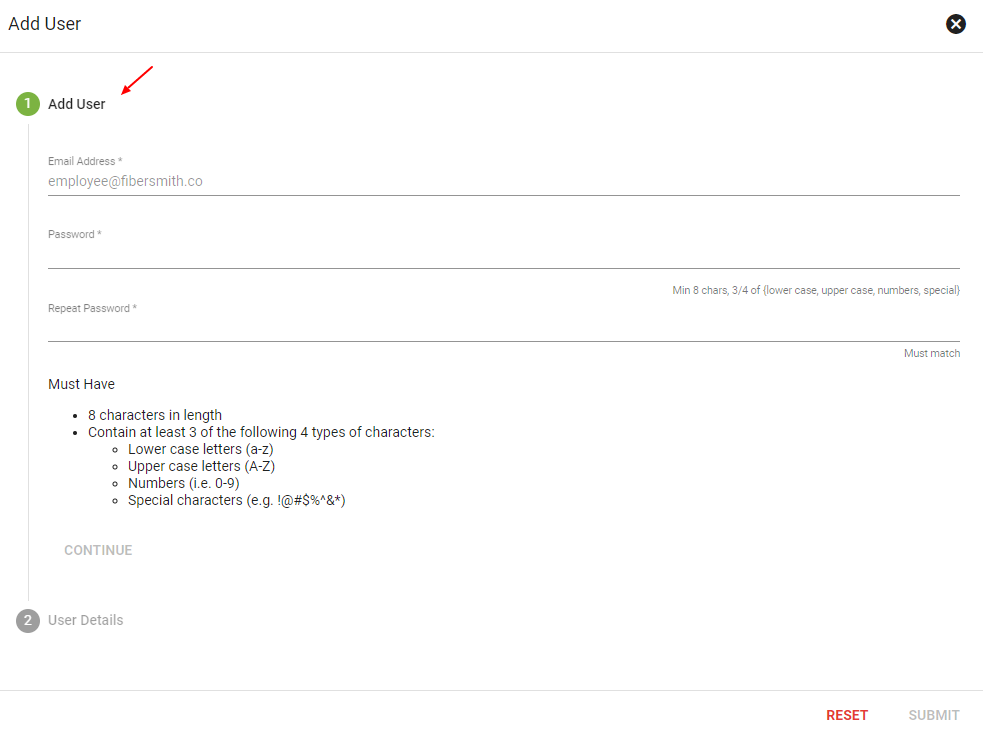
Enter their full name, username and phone number. Click SUBMIT.
The new user will receive a verification email. Have them follow the verification instructions in that email before attempting to login.
Add the new user to the appropriate permission group, by going back to the Admin Utilities menu, and select Authorization.
Learn more about Users and Authorization.
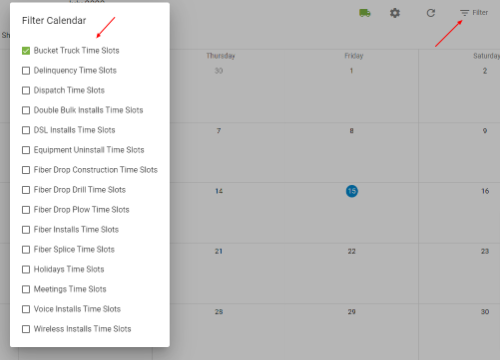
Admin Utilities > Calendar > Filter Calendar > FAB > Enter Calendar Info > COMFIRM
To create a new time slot, first make sure you have the correct event type selected in the Filters menu.
1- In the week or day calendar view, click and drag on a specific day at a specific time. If required, choose the Service Area to apply the Time Slot to.
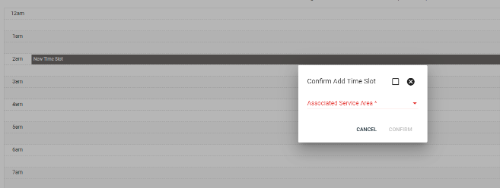
2 - Or click the Floating Action Button in the lower right. Choose a start date, end date, start time and end time. Click the All Day Event? checkbox if necessary (holidays, etc.)
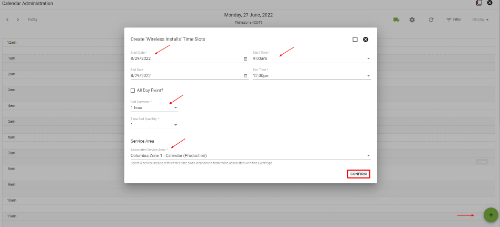
Using this method, you can create multiple slots during this one period of time using the Slot Duration and Slot Quantity drop downs. When there is more than one tech doing fiber installs during this time, add more Time Slot Quantities.
Choose the associated Service Area if necessary, then click CONFIRM.
Learn more about the Admin Calendar.
To setup a new service area, start by clicking the menu button in the top left, then choosing Admin Utilities > Service Area Management.
On the Service Area Management page click ADD.

If you have an existing .kml file, you can choose Upload to drop your existing shape into the system.
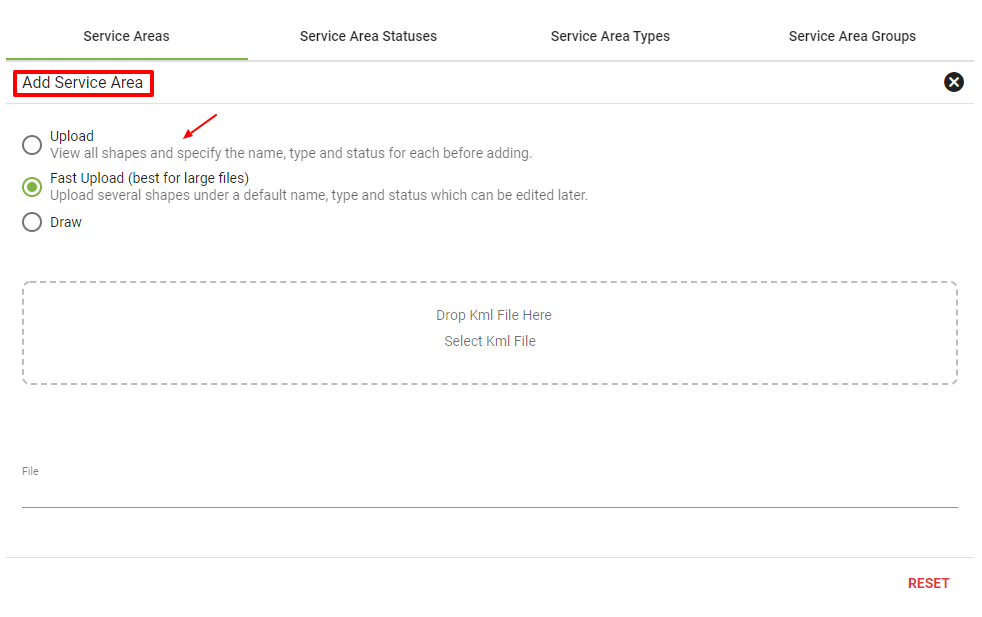
You can also draw a new shape manually by choosing Draw.
After choosing draw, use the hand tool to drag the map to your desired shape area. Click the polygon icon at the top left of the map to begin creating your shape. Connect the last dot to the first dot to finalize your shape.
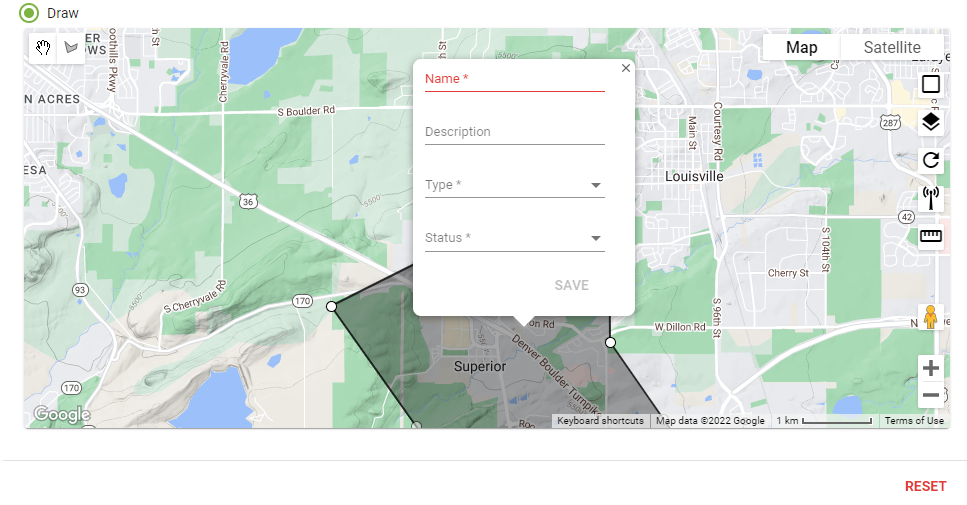
Next enter the name, description, service area yype and status for your new service area, then choose SAVE.
Learn more about Service Area Management.
To setup a new contractor to use the Contractor Portal, click the menu button in the top left of the screen, then select Network. Click Outside Plant.Then Click Contractor Users. Click FAB in the bottom right-hand corner.
Network > Outside Plant > Contractor Users > FAB
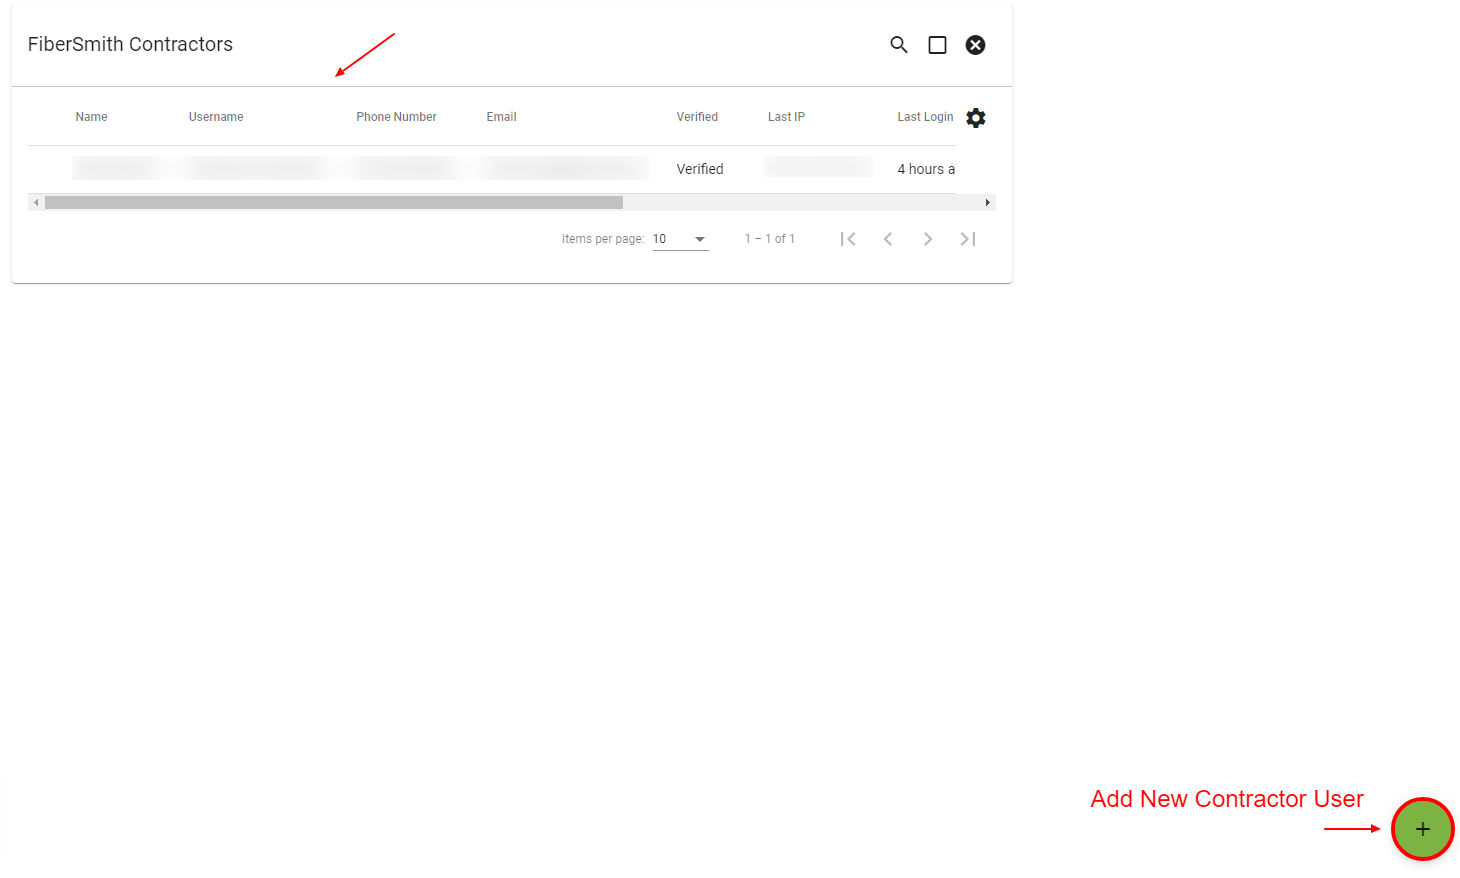
Add the user’s email address and password. They can go back to change their password later. Then click CONTINUE.
Then enter the user’s details which include; their name, username, and phone number. Then click SUMBMIT. Once your contractor is added as a user, they will be able to log into the Contractor Portal URL.
Learn more about Contractor Users and the Contractor Portal.
If this is your first time filing BDC reports, you’ll need to set up your submission and import the latest FCC Fabric data in Vision before generating your reports.
Once your submission is created, you can run the Availability and Subscription reports from the BDC Reporting section by navigating to Operations > Regulatory > BDC Reporting and opening your submission.
Your reports can be downloaded from the Output tab.
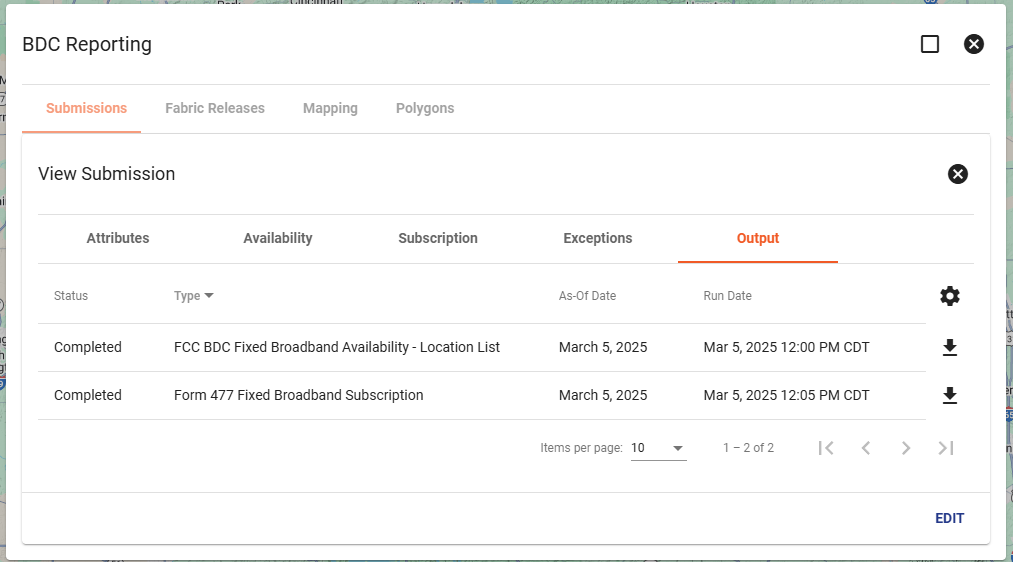
If you’ve already started your BDC reporting process and just need to access reports for an in-progress submission, you can find them by editing your existing submission from the same BDC Reporting section. Reports can be generated or re-downloaded at any time from the Availability, Subscription, or Output tabs.
For complete setup and reporting steps, visit the full BDC Reporting Guide.
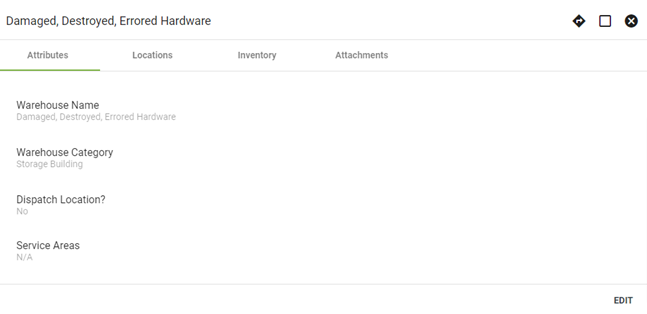
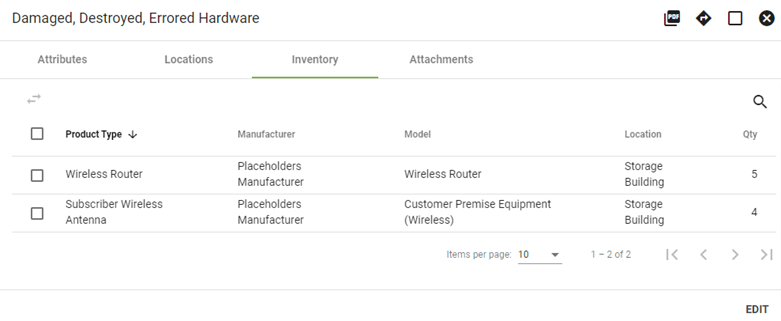
Damaged hardware does not get deleted from the system, instead it is placed in a warehouse for damaged hardware.
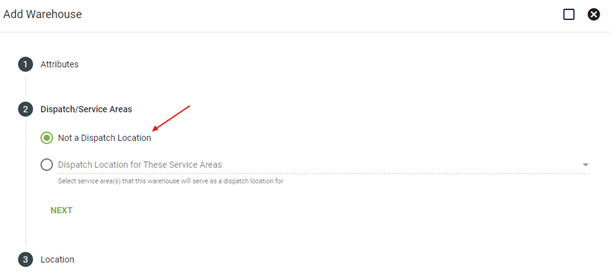
1. Add New Warehouse
Inventory > Warehouse > FAB > Create New Warehouse
First enter a description and type. (For example: Damaged, Destroyed, Errored Hardware) Then click NEXT.
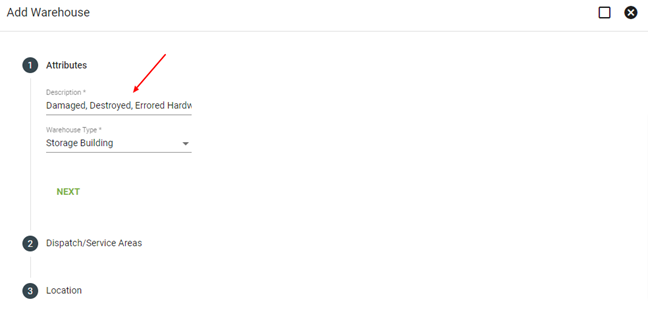
Then enter a dispatch/service area. Then click NEXT.
Now enter the Primary Location and description. Then click SUBMIT.
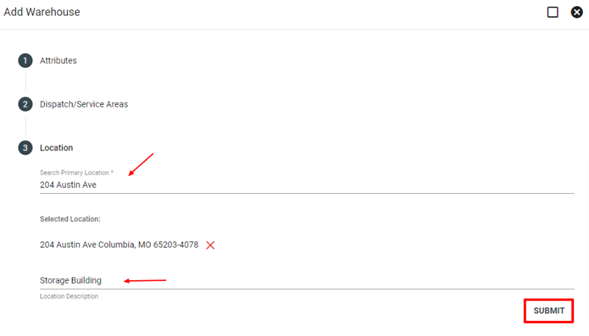
Now you should have your new placeholder warehouse set up.
2. Move Damaged Inventory to New Warehouse
Click EDIT under inventory to move items, then select the check box next to the item(s) and click swap icon.
Choose the Damaged Warehouse and location to where you would like the item moved, then click CONFIRM.
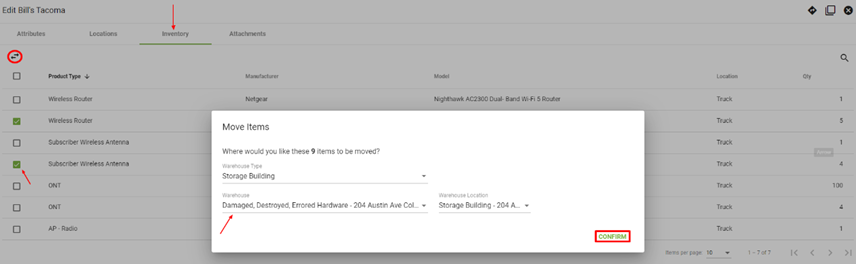
The damaged inventory will now be in the new warehouse you created.
Learn more about Damaged Inventory/Hardware.
To view the items in a specific warehouse, click the menu button in the top left of the screen, then choose Inventory.
Click Warehouse.
You can search for a specific warehouse on this screen by choosing the magnifying glass icon along the top of the Warehouse dialog box. Select a warehouse by clicking on it.
After selecting the warehouse you're looking for, choose the Inventory tab or the Hardware tab to display a list of hardware at that warehouse.
Learn more about Inventory Warehouses.
To check in a shipment of new equipment, click the Menu button in the top left of the screen, then select Inventory.
Click Purchases Orders.
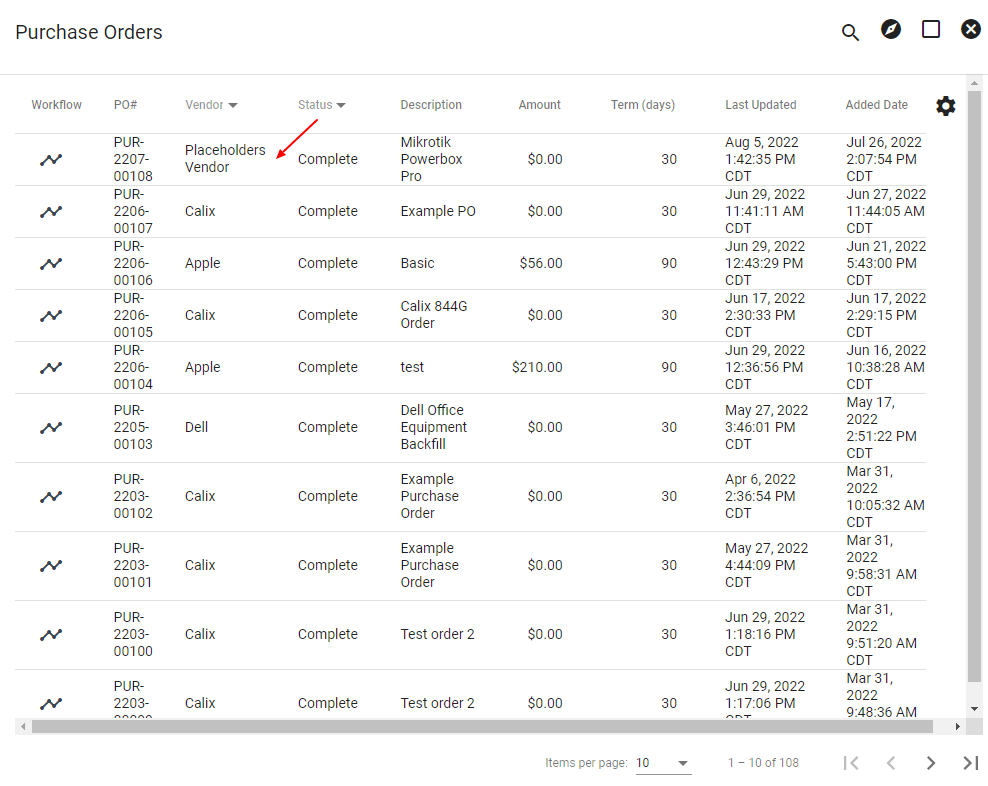
Choose the purchase order that corresponds to the equipment received.
Click EDIT.
Click Line Items to see all items associated with the purchase order.
For each inventory item received, click the Inventory Status to change the status to Received.
If there are additional items being waited on, click SUBMIT to update the purchase order without completing it.
If no other items are now received, select COMPLETE PO to complete the purchase order.
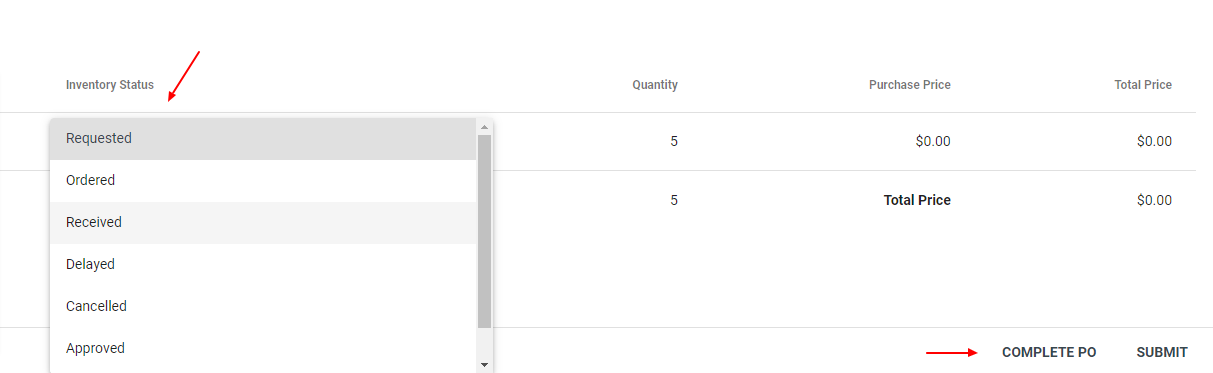
The received items will now be available in the warehouse the purchase order shipped them to.
Learn more about Purchase Orders.
To search all network hardware, choose the Menu button in the top left of the screen.
Choose Network.
Choose Hardware.
Use the Magnifying Glass icon to search for a specific piece or type of hardware.
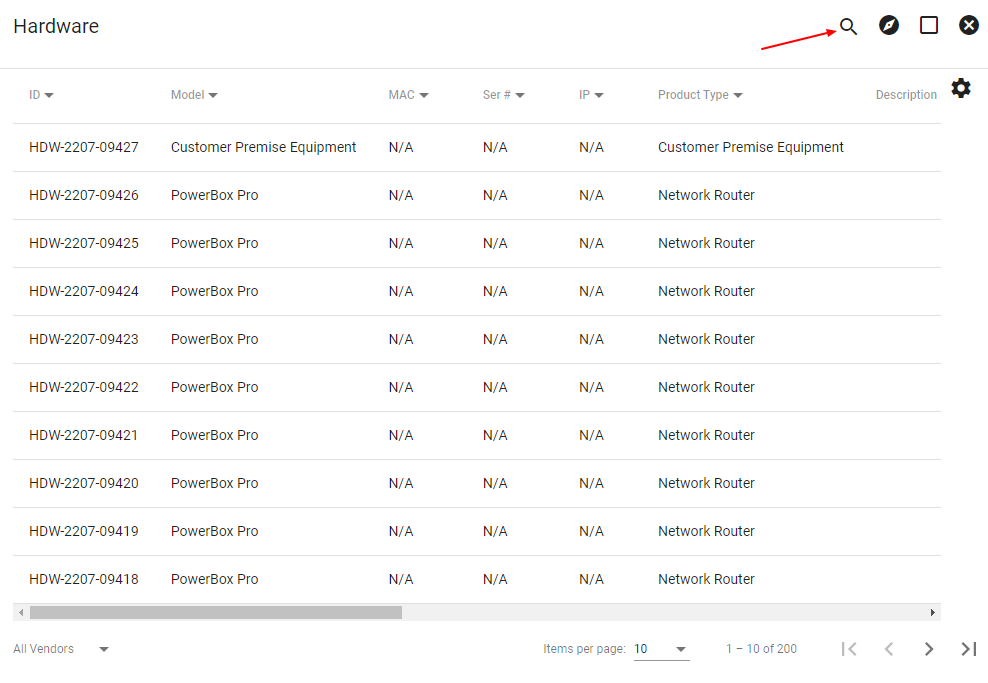
Learn more about managing Network Hardware.
Setting Hardware Initially
Click the  icon in the upper righthand corner of a purchase order to upload a CSV attachment. Select the upload to import, then click CONFIRM.
The information on the righthand side is the data being imported from the CSV file, while the information on the lefthand side is the hardware's existing data.
Click on a column on the lefthand side and then select the corresponding column on the righthand side. For example, click on the MAC address column on the left, then select the MAC address column on the right. Paired columns will display in the same color to indicate a match.
Select the next column of a pair on the lefthand side, then select the corresponding column on the righthand side. Finally, click CONFIRM.
Editing MAC addresses and Serial Numbers
Click the  icon to make changes to MAC addresses and serial numbers. Then you can select CANCEL or CONFIRM.
Learn more about purchase orders.
Your company can choose a custom URL that will direct customers to your public shopping cart. Your company’s shopping cart landing page will have a customizable message, contain your logo, and use your brand specific colors. Our Vision Support Team will help guide you through best practices and set up processes for your public shopping cart to be successful.
The public shopping cart homepage can display service areas in varying stages of construction. The service area status key lists the different statuses of the service areas for example, collecting interest, under construction, or fiber now available.
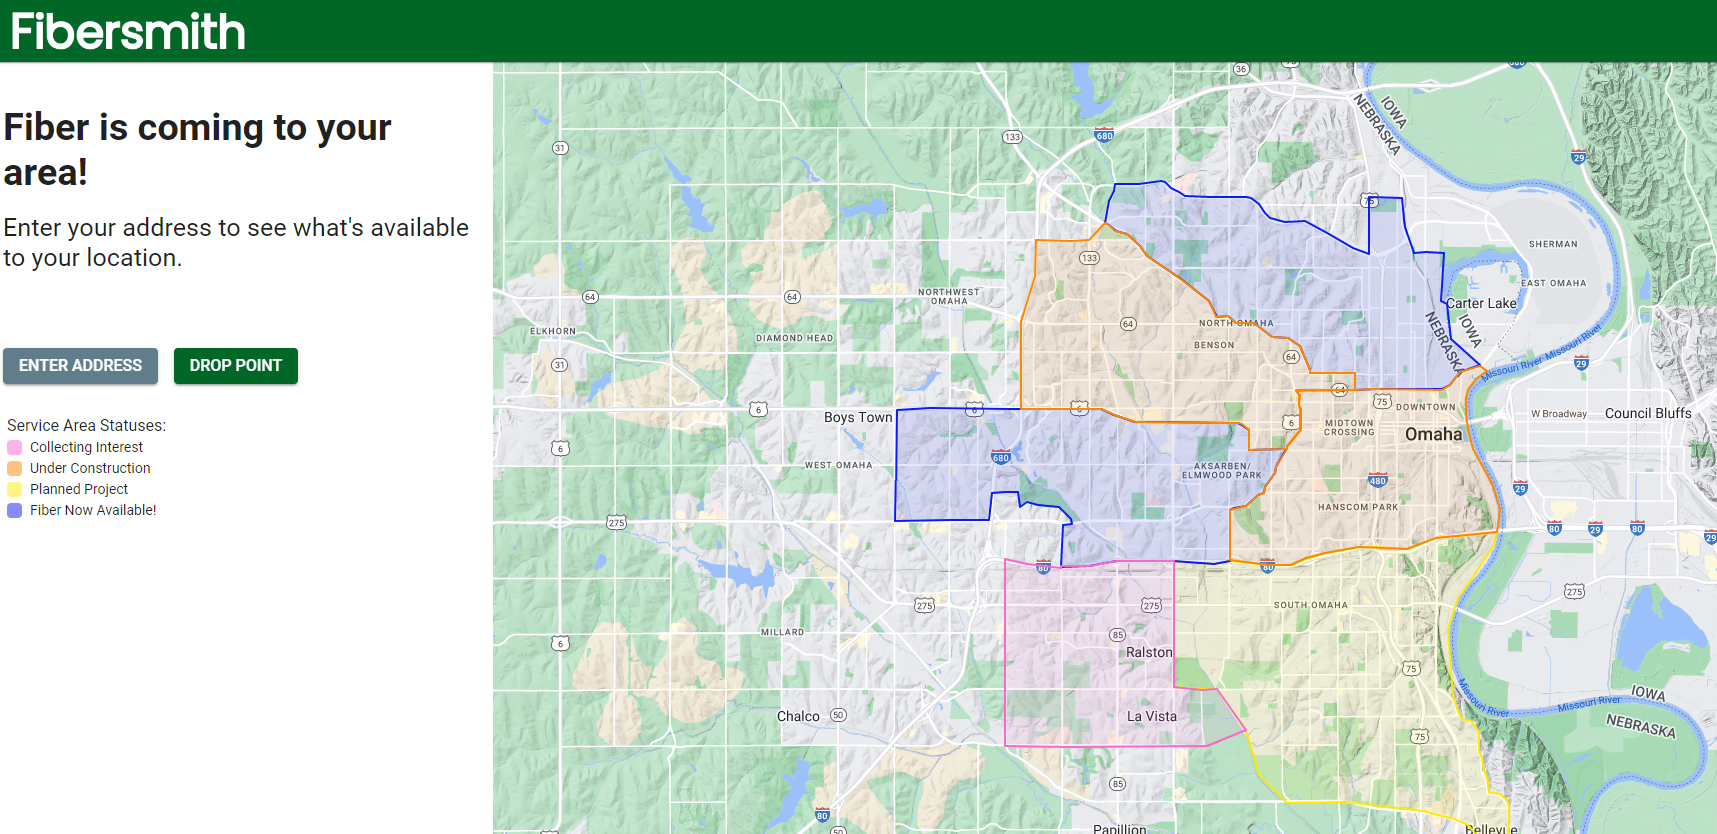
Learn more about the Public Shopping Cart.
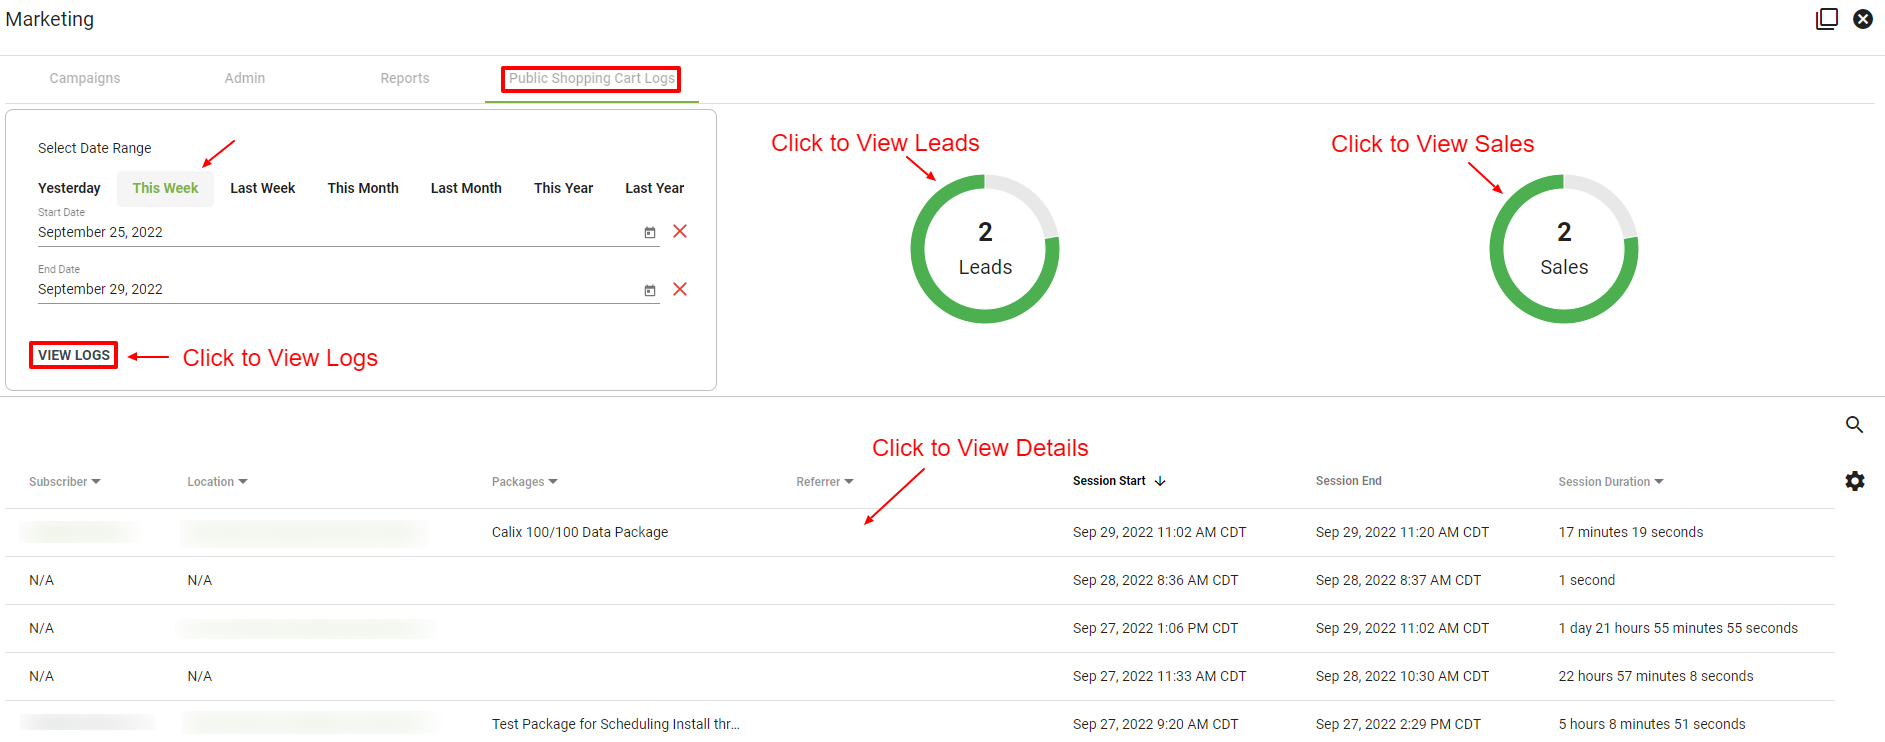
Operations > Marketing > Public Shopping Cart tab
From the Main Menu click on Operations.
Then select Marketing.
Then click the Public Shopping Cart tab.
From there select the date range and then click VIEW LOGS.
There you can view the Shopping Cart visitor logs and view how many Leads and Sales have come in.
Learn more about the Public Shopping Cart and the Public Shopping Cart Logs.
From the Marketing Campaign page, click the Floating Action Button
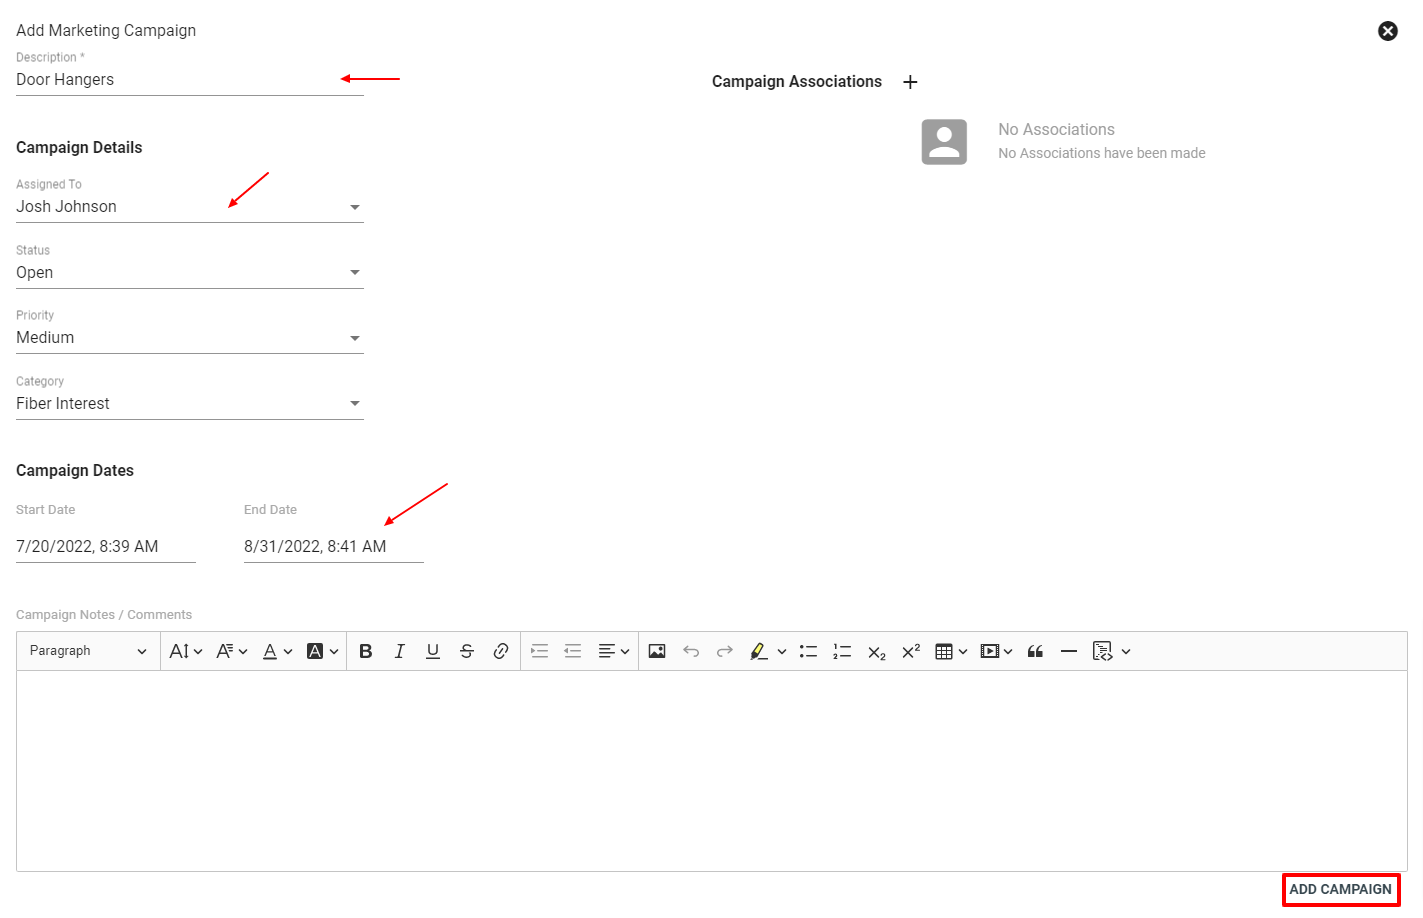
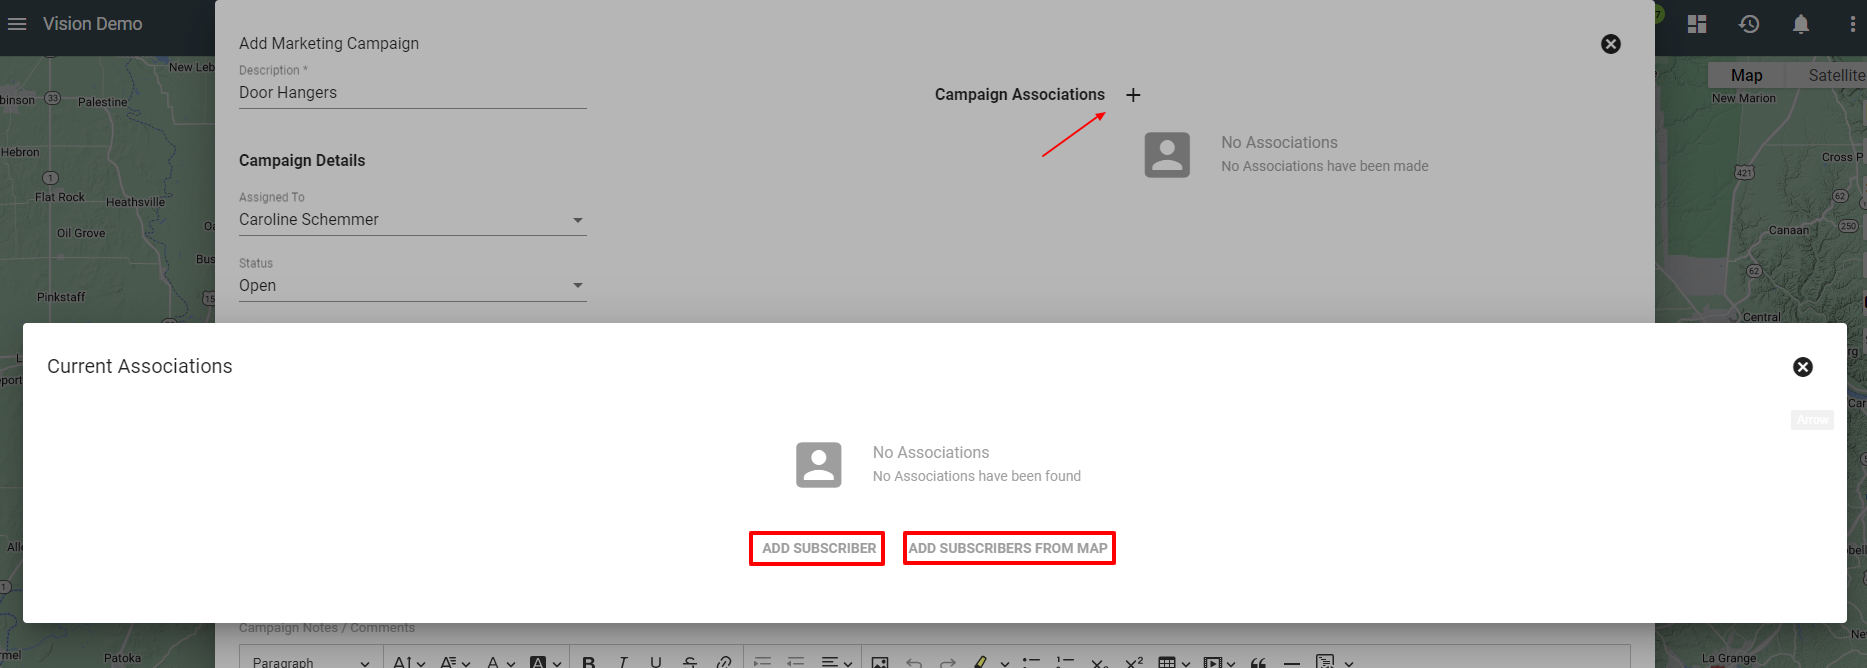
There are a couple of ways to add associations to a campaign. At the top right of the Add Marketing Campaign page click the Campaign Associations 
From the base map, click on the toggle map layers icon 
Use the Select Data Objects tool ![]()
Then, select ADD TO CURRENT CAMPAIGN.
Learn more about Marketing here.
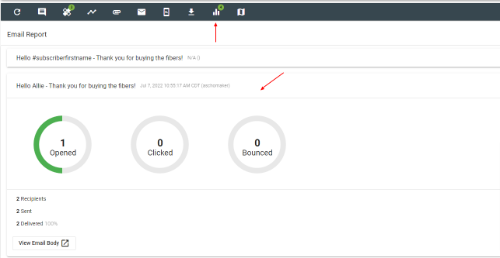
Operations > Marketing > Click into the Campaign > Click the Email Report Icon > Click on the Email to see the Report
To view your marketing campaign email click and open rates first select operations under the menu then select marketing. Then click on a specific campaign. From there click on the email report icon in the top menu bar. Then select the email to view the reports.
Learn more about Marketing.
Operations > Marketing > Reports
To view the email opt in and opt out reports first click on operations in the menu and select marketing. Then click the reports tab. There you will see list of subscribers and a date that they opted in or out of marketing email communication.
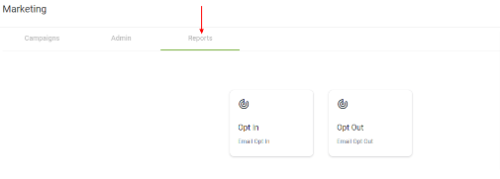
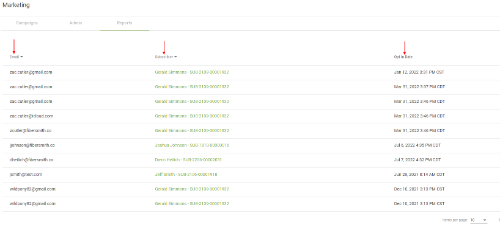
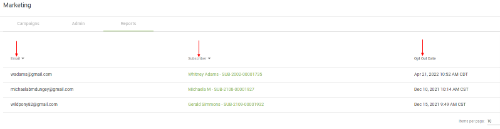
Learn more about Marketing Campaigns.
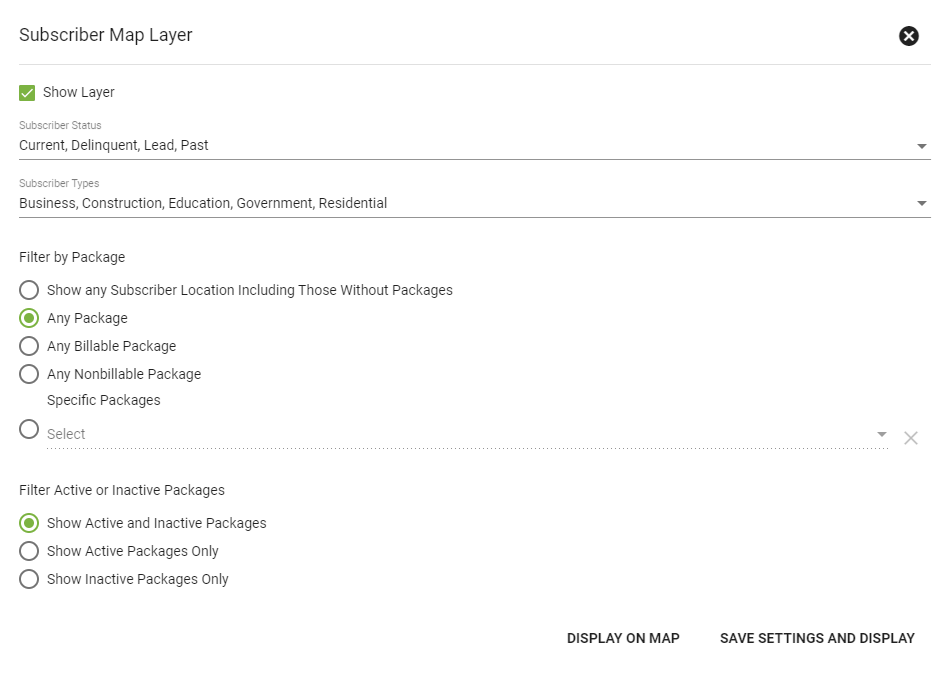
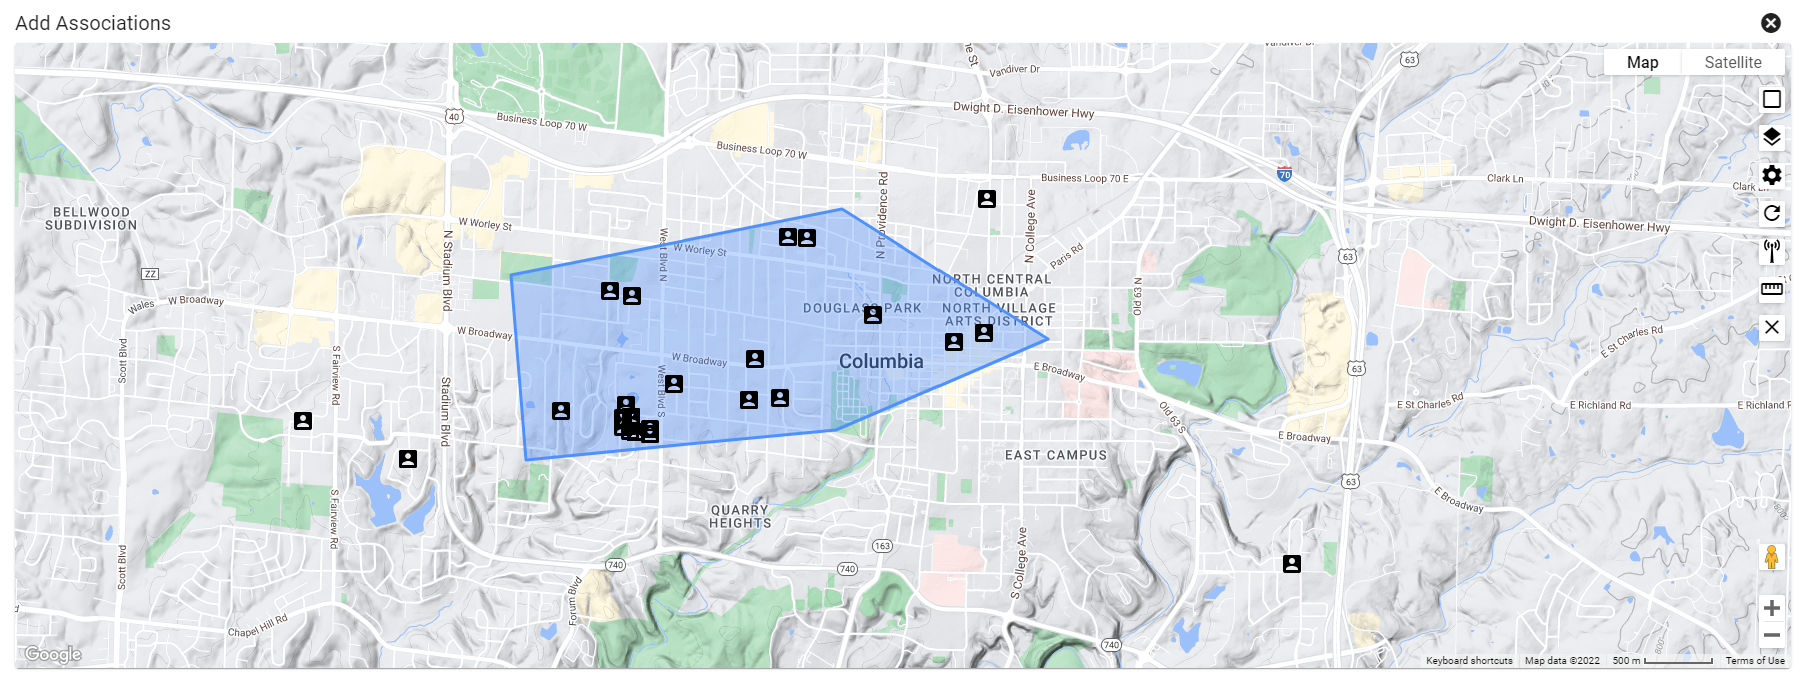
To send a mass email to a select group of customers with a certain service, start from the Map View.
Select the Toggle Layers icon on the far right map menu.
Choose Subscribers.
Check the Show Layer Checkbox.
Complete Subscriber Map Layer criteria to match the types of customers you are looking to reach. Selections can include their account status, account type and package type.
Choose DISPLAY ON MAP to apply your settings to the map layer.
Choose the Select Data Object icon (Lasso Tool) on the far-right menu.
Use the Select Data Objects tool to draw a shape around the customer points you wish to contact. Connect the last dot with your first dot to finalize the shape.
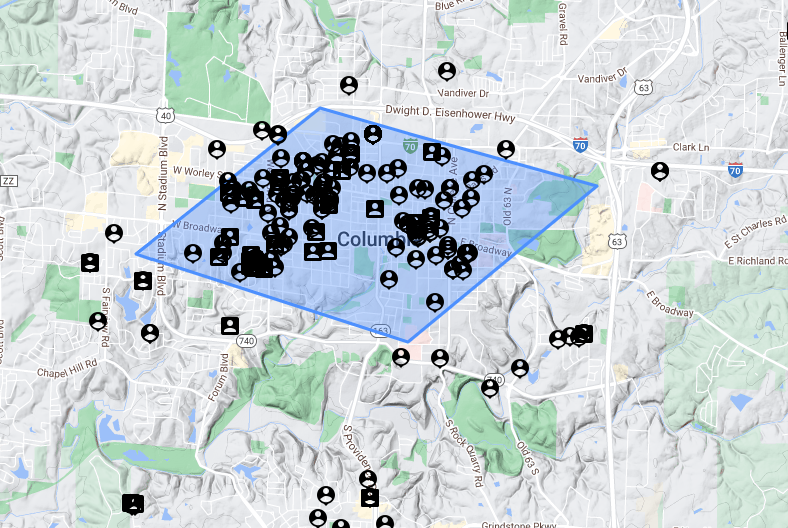
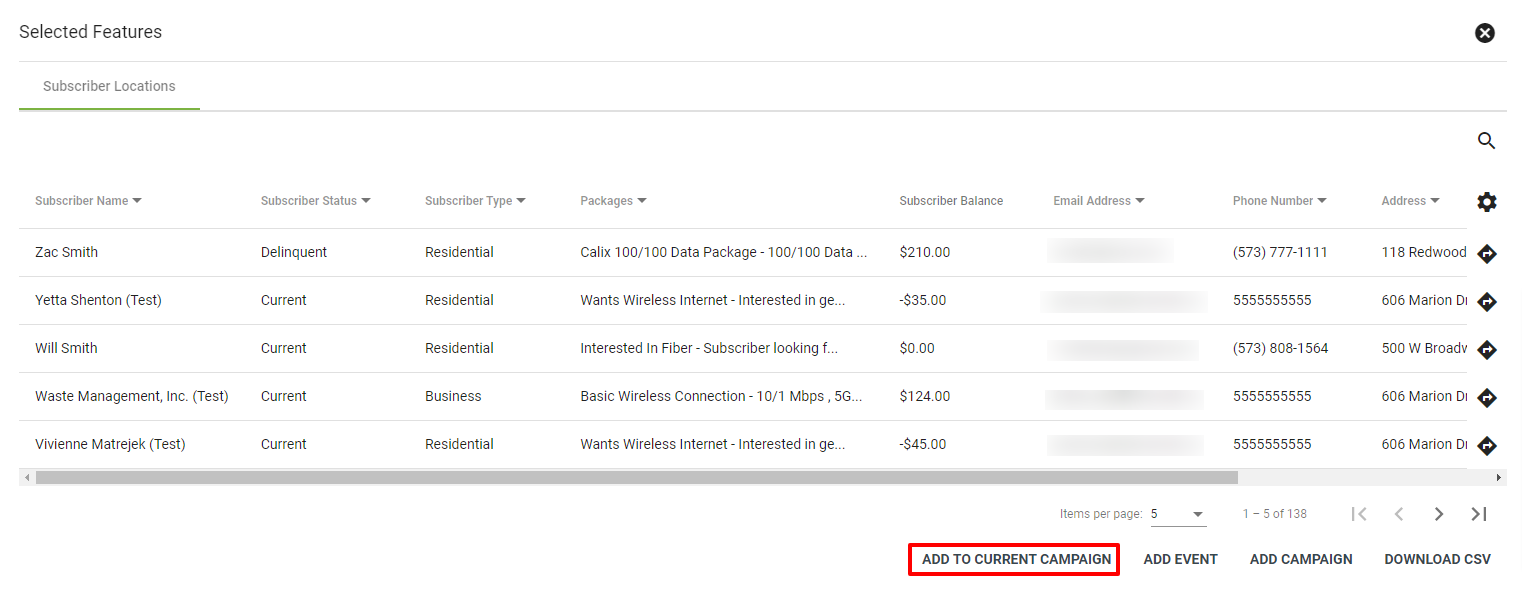
Click anywhere on the finalized shape to display the list of customers inside of that shape.
Click ADD CAMPAIGN to start a new marketing campaign or associate the subscribers with an existing campaign.
Once associated with a marketing campaign, choose the envelope button to email the subscribers you selected.
Learn more about Marketing Campaigns.
To set up a special, limited-time discount or promotion in Vision, first click on the Menu button in the top left corner, then click Admin Utilities.
Click Service Packages.
Click the FAB in the bottom right-hand corner to create a new package. Or copy an existing package by clicking the Clone Package icon to the far right of the package name.
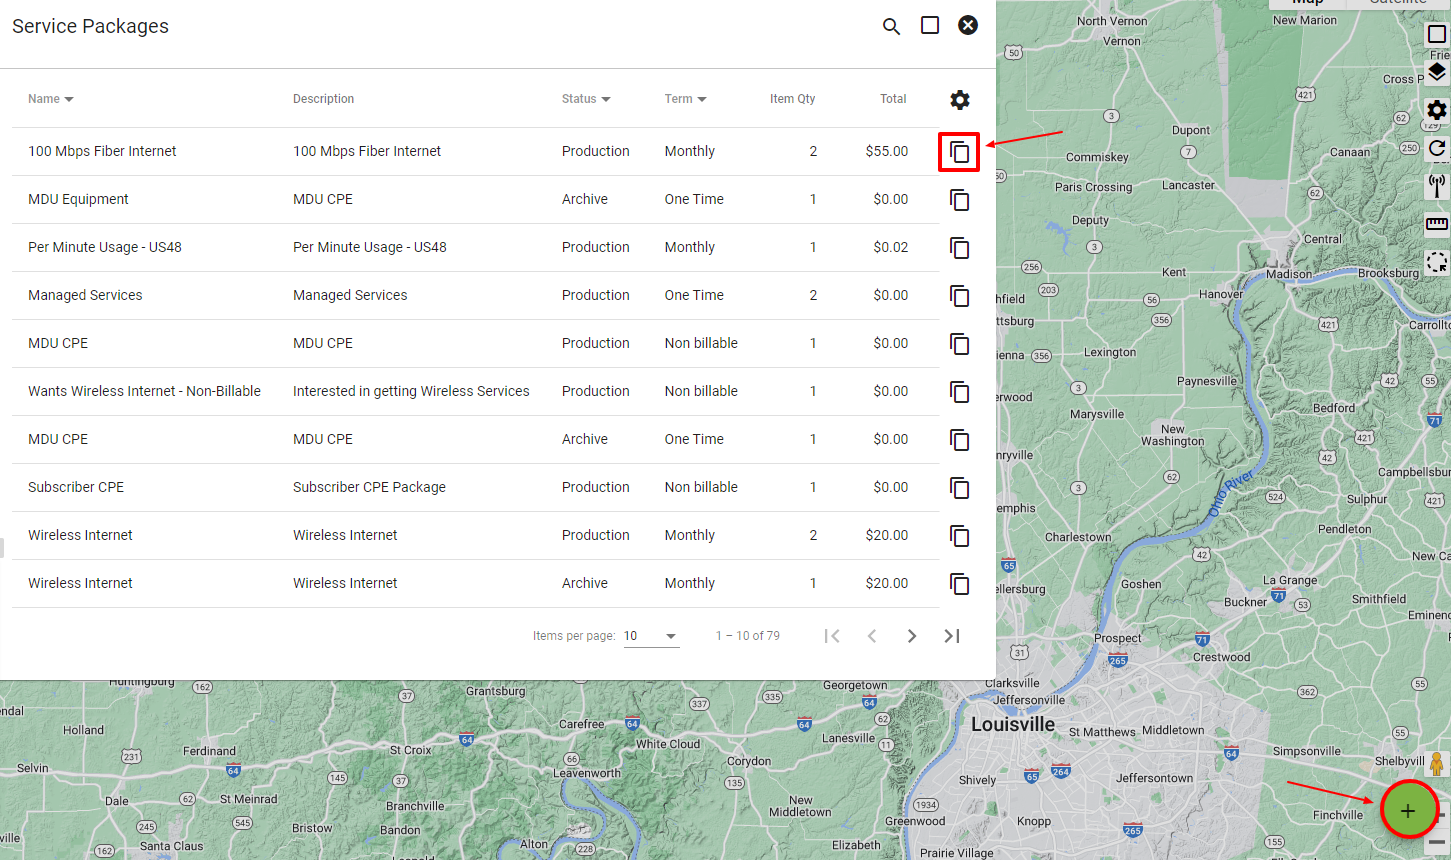
Set the service items and pricing up for this package to match your desired promotion. Then click ADD SERVICE PACKAGE.
Once your package(s) are established, go back to the Admin Utilities menu and click Service Offers.
Click the FAB in the bottom right-hand corner to add a New Service Offer.
Complete the Service Offer Attributes section. You can set a start and end date in this section that allows you to limit your promotion to a specific timeframe.
Choose the packages you want associated with this offer, and then choose the service areas it should apply to.
Click ADD OFFER to add your promotion to the system. It can now be selected from the shopping cart of subscribers who fall within the service area(s) the offer is associated with.
Learn more about Service Packages and Service Offers.
Please contact Vision Support for information on uploading leads from data sources.